Next: vRA Part 6 – System / Infrastructure & Fabric Administrators –>
vRealize Orchestrator (was known as vCenter Orchestrator before) is an integral part of a vRA deployment as most of the vRA extensibility features relies on vRO being available and correctly integrated to vRA appliance & IaaS components. vRO in tern, connects to a number of other 3rd party systems through plugins, such as Microsoft Active Directory, Microsoft SQL, VMware vSphere, NSX….etc., where you can create a range of vRO workflows to carry out / automate tasks within these 3rd party systems. Due to the integration between vRA and vRO, these vRO workflows can be published within the vRA catalog and be made available via the built in self service portal (for example, you can publish a blueprint for resetting the passwords for an AD user through a workflow created on vRO).
I personally haven’t seen much documentation or clear guidelines with sufficient details on how to set up vRA with vRO for this level of extensibility which was one of the main reasons why I decided to publish this series of posts (which, hopefully will be addressed by VMware in the future).
So, now its the time to deploy the vRO and have it fully configured in preparation for the integration with vRA in due course. This article therefore looks at the deployment and the initial configuration of vRO component. (This should be considered a must have part of your vRA deployment)
vRO is available in many different forms
- Available as a standalone appliance to be downloaded free of charge for vSphere customers
- Automatically deployed if you install Windows version of vCenter (vRO Windows services are disabled by default though) – Note that this is now deprecated with the vRO 6.0.1 and hence SHOULD NOT be used going forward.
- Available built in to the vRA itself (used for PaaS functions only, NOT used for IaaS functions for which you must register an external vRO)
In the interest of performance, and separation (and with the added ability of clustering should you need that in future), I prefer to deploy the standalone appliance (which is also the VMware’s recommended approach) so this article will rely on that. However, note that the post deployment configuration is still the same between the standalone appliance and the default version installed with vCenter.
The latest version of vRO released as of today, is the version 6.0.1, which was released in March 2015, in line with the announcement of vSphere 6.0. The release notes for the new version can be found here. It is compatible with vCenter server 4.1 and above.
Few highlights are below,
- The stability of the vCenter Server plug-in has been improved by resolving major issues based on customer feedback (this was a real issue with earlier versions)
- vRealize Orchestrator 6.0.1 supports the vSphere Web Client integration and context execution of vRealize Orchestrator workflows as part of vSphere Web Client 6.0
- Switch Case introduced to handling conditional and branching operations within an automated workflow (If a value matches a switch case, specific workflow branch is executed)
- Global error handling introduced
- vRO control center beta introduced (Centralized admin interface for runtime execution, workflow monitoring & correlation with system resources, unified log access and configuration)
I will not be covering details about the Orchestrator itself, but only how to deploy & configure it within this post. If you need information about the vRO itself, including its architecture…etc. please refer to the official documentation found here.
Orchestrator Appliance Deployment
- Download the vRO appliance from My VMware portal as an ova and deploy on to the Management Cluster (NOT the compute / production cluster. Refer to the proposed architecture diagram in the previous post of this series here)
- During the deployment, you’d need to provide the information required and click next (ensure SSH is enabled)

- Once the appliance is deployed and powered on, SSH on to the appliance as root and change the root password expiry date.
- The password for the root account of the Orchestrator Appliance expires after 365 days. You can increase the expiry time for an account by logging in to the Orchestrator Appliance as root, and running passwd -x number_of_days name_of_account.

- The password for the root account of the Orchestrator Appliance expires after 365 days. You can increase the expiry time for an account by logging in to the Orchestrator Appliance as root, and running passwd -x number_of_days name_of_account.
- Configure the appliance
- Go to the https://<vRO FQDN>:5480 and login using root.
- Change the Time Zone & Setup NTP (Admin->Time Settings)
- Update the Proxy settings should it be required and verify all other networking settings.

That’s it. the basic vRO appliance is now deployed and ready to be configured for vRO functionality which we’ll look at next.
vRO Configuration
- Login to the vRO appliance Configuration page
- https://<vRO FQDN>:8283/vco-config (username: vmware)
- Bind the IP & DNS
- Click on Network on the left and select the IP address from the drop down menu to bind the vRO to the correct IP address.

- Click on Network on the left and select the IP address from the drop down menu to bind the vRO to the correct IP address.
- Import vCenter SSL Certificate
- Under Network, click on SSL Trust Manager tab and type import the vCenter server SSL certificate using the URL “https://<FQDN of the vCenter Server>”
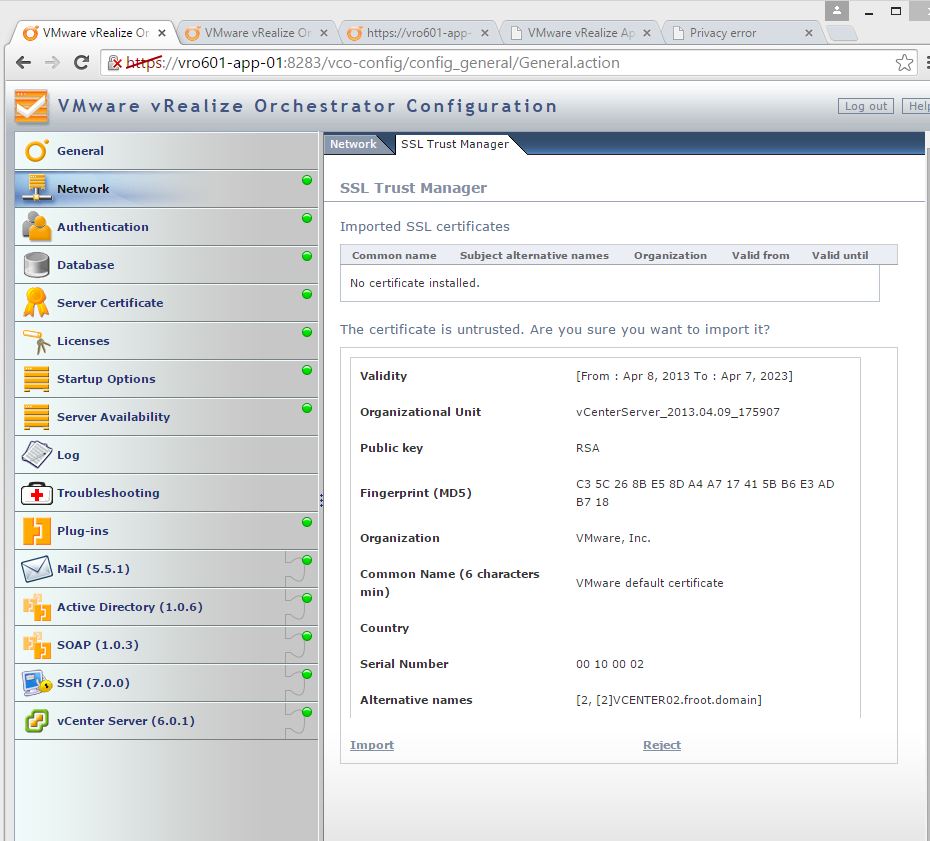
- Note that this vCenter server should be the one managing the compute / production ESXi cluster, NOT the one managing the Management cluster.
- Under Network, click on SSL Trust Manager tab and type import the vCenter server SSL certificate using the URL “https://<FQDN of the vCenter Server>”
- Setup Authentication Type
- Best practise recommendation is to configure the authentication source to be the vCenter SSO as this allows the user of vRO through vSphere web client. Note that the built in OpenLDAP is NOT recommended for production deployments.
- Import SSO server SSL certificate using the SSL Trust Manager
- Host: https://<FQDN of the SSO server>:7444
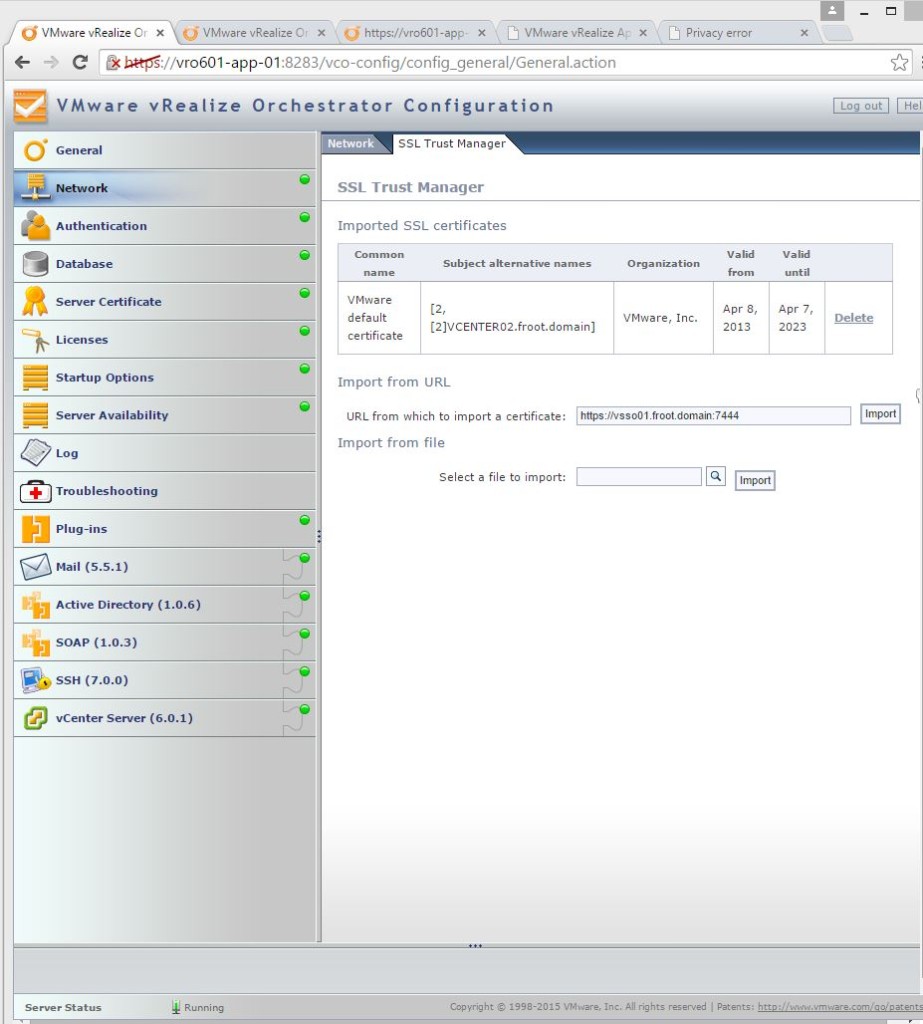
- Host: https://<FQDN of the SSO server>:7444
- Setup vCenter SSO for authentication
- SSO Registration
- Select the Authentication mode as SSO Authentication within the Authentication section.
- Host: https://<FQDN of the SSO server>:7444
- Admin user name: Administrator@vsphere.local

- SSO Configuration (Setup vRO admin group)
- Specify the SSO group that gets rights to the vRO server admin role here
- Select the SSO domain (I’m selecting the Active Directory attached to the SSO server)
- Select the dedicated Active Directory group (I’ve got a dedicated AD group created called “VMware vRO Administrators” which I’m going to add here.)

- Make sure the following accounts are members of this group on the AD
- vRA service account (<domain>\svc_vRA)
- vRO service account (<domain>\svc_vRO)
- Any domain user account requiring access to vRO workflows through vRO client.
- Note: One thing I’ve noticed here is that when changing this SSO Admin group (SSO or AD) always unregister the orchestrator and re-register with SSO. In the old version of vCO, it really didn’t like it when you just change this vRO admin group
- SSO Registration
- Assign vCenter license (default vRO license is only valid for 90 days)
- Under Licenses, select vCenter Server license
- Provide the vCenter address (<FQDN of the vCenter Server>) and an administrative user name to the vCenter (I’d create a new vRO service account, such as <domain name>\svc_vRO, and assign vSphere administrative privileges to it and use it here as that’s neat and follow the RBAC guidelines)

- restart the vRO server service using the startup options
- Assign an external Microsoft SQL database
- The vRO 6.0.1 built in database is sufficient for small to medium scale deployments only and we will be using a separate SQL server as per VMware best practise.
- External database is also a pre-requisite for future clustering of the vRO.
- Prepare the SQL database
- Note: I’m going to use an external SQL 2008R2 server instance here.
- Verify that the protocol and port access is setup correctly on the SQL server

- Create an empty database on the SQL server (vRO601)
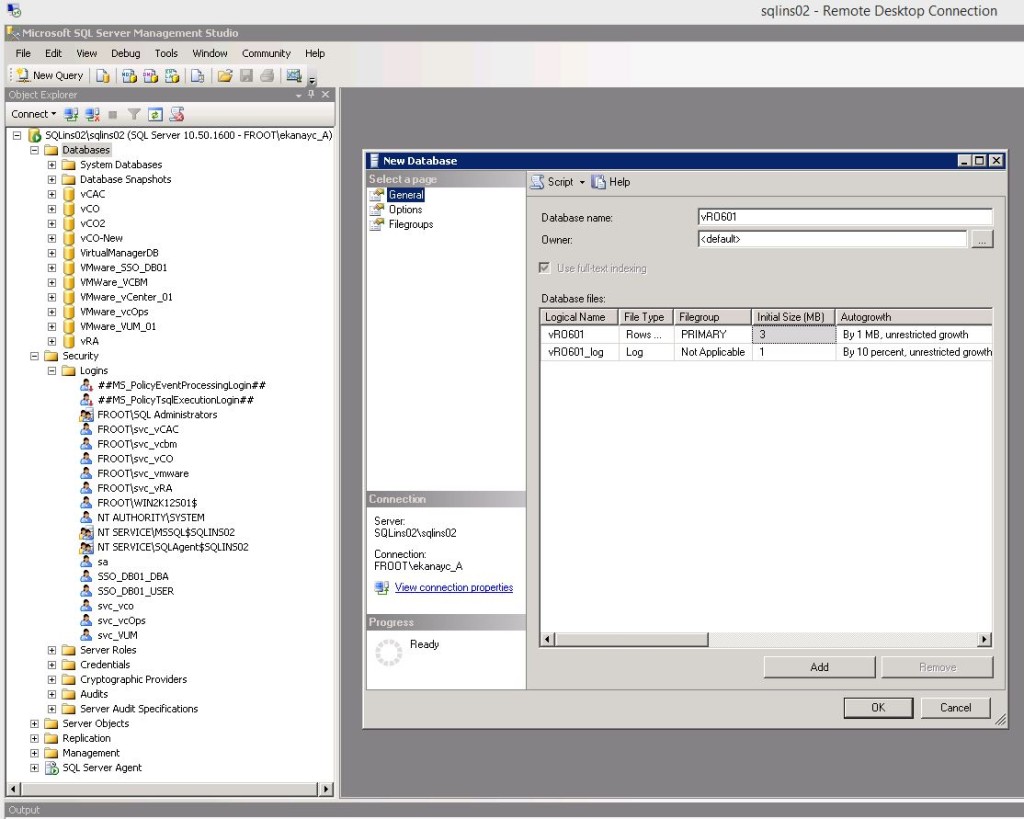
- Create a SQL user account (svc_vRO) and map this to the vRO601 database with dbo permission
- Note: With using the vRO Linux based appliance, I’ve had weird errors here and trying to get both Windows authenticationand SQL authentication work here. To cut a long story short, I only managed to get it to work after adding a Windows domain account (froot\svc_vRO) and a SQL account (svc_vRO), both with the same name added as DBO to the database. (makes no sense). This account will only be used by vRO to connect to its database. Ensure that SQL password expiry is ticked off when creating the sql account to avoid future problems.

- Note: With using the vRO Linux based appliance, I’ve had weird errors here and trying to get both Windows authenticationand SQL authentication work here. To cut a long story short, I only managed to get it to work after adding a Windows domain account (froot\svc_vRO) and a SQL account (svc_vRO), both with the same name added as DBO to the database. (makes no sense). This account will only be used by vRO to connect to its database. Ensure that SQL password expiry is ticked off when creating the sql account to avoid future problems.
- Import the SQL server SSL certificate to vRO using Trust Manager (Only applicable if the DB server uses SSL certs. Mine doesn’t so I will skip this)
- Setup the SQL server database connectivity
- Provide the SQL database connectivity information required and click apply changes

- Once prompted, create the database tables using the link provided. Once completed successfully, the status will be displayed. Click Apply Changes

- Provide the SQL database connectivity information required and click apply changes
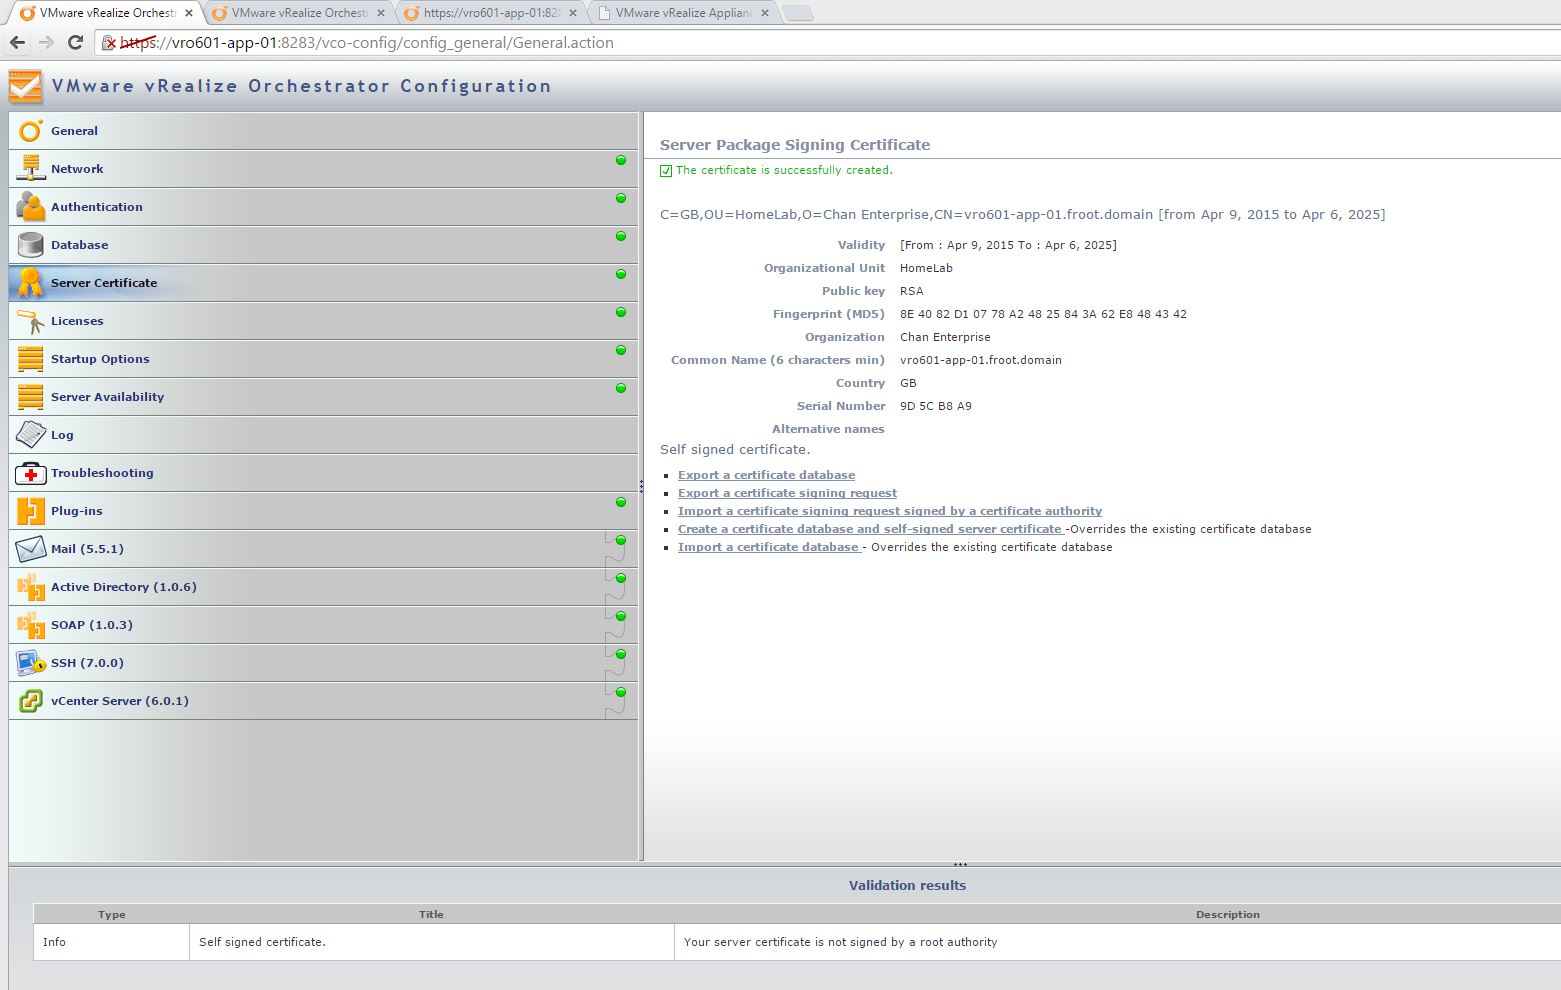
- Assign a SSL Certificate to vRO
- Either create a self signed server certificate or import a certificate database (using an existing CA)
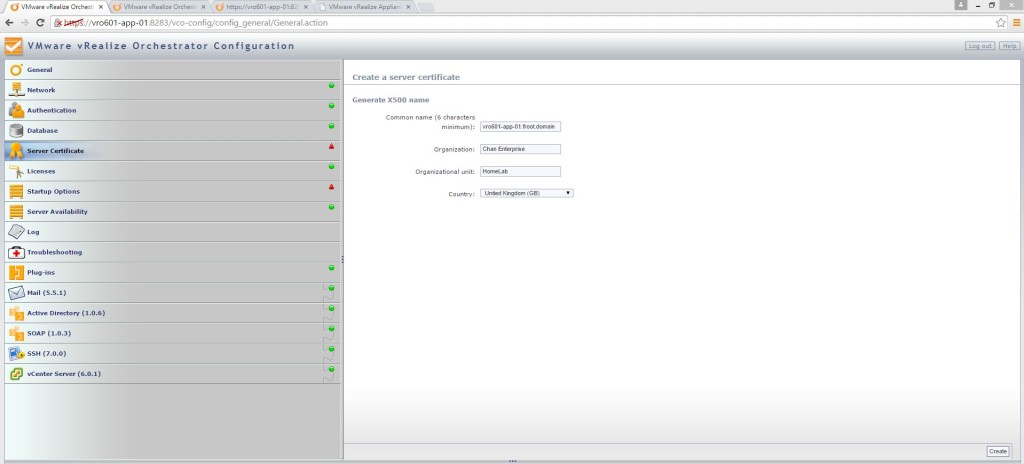
- Export the certificate DB for DR

- Either create a self signed server certificate or import a certificate database (using an existing CA)
- Configure Orchestrator Plugins (Using vRO configuration interface)
- Configuration of Active Directory, SSH & vCenter Server plugins (all come installed by default in vRO) are now done through pre-defined workflows available within vCO rather than through the configuration interface
- Type the vRO admin username and password within the plugin section (When the Orchestrator server starts, the system uses these credentials to set up the plug-ins. The system checks the enabled plug-ins and performs any necessary internal installations such as package import, policy run, script launch, and so on) – I’m using the vRO domain service account (<domain>\svc_vRO) which is also a member of the vRO administrators group I’ve mapped under Authentication.
- Install new Orchestrator plugins
- Various addition vRO plugins can be downloaded from the vRO official web page (here) and installed on to the vRO via the configuration page so that vRO workflows can be created to integrate and manipulate external systems.
- Use the Install Application tab within the General section of the vRO configurator to install plugins that have a .vmoapp extension.
- There are a number of additional plugins available here but I will be installing the followings, for the purpose of this article
- Install the plugin VMware vCenter Orchestrator Plugin for NSX 1.0.1 – Required for vRO workflow creation for NSX in order to orchestrate some NSX tasks
- Compatibility: Based on the VMware product Interoperability Matrix as of now, for vRO 6.0.1, NSX version 6.1, 6.1.1 & 6.1.2 are the only versions of NSX supported and that requires the vRO NSX plugin version 1.0.1. But the vcoteam.info (official site for vRO team) site’s plugin list only contains the NSX 1.0.0 plugin and not version 1.0.1. So be sure to download the correct version via the link I’ve provided above.
- Note: This plugin is required for vRO workflow creation for NSX in order to orchestrate some NSX tasks. The current workflows included within this package are limited however and the installation of the NSX-v Dynamic Types plugin V2 (below) will add additional NSX related workflows. Once these workflows are available, they can be leveraged by vRA.
- Install the NSX plugin (using o11nplugin-nsx-1.0.1.vmoapp file)

- Accept license & Apply changes

- Restart vRO server to take effect (note that the plugin status may not change to “installed” immediately after the vCO service restart. This can take some time)

- Login to the vRO client and verify the NSX workflows are now available within Library->NSX folder

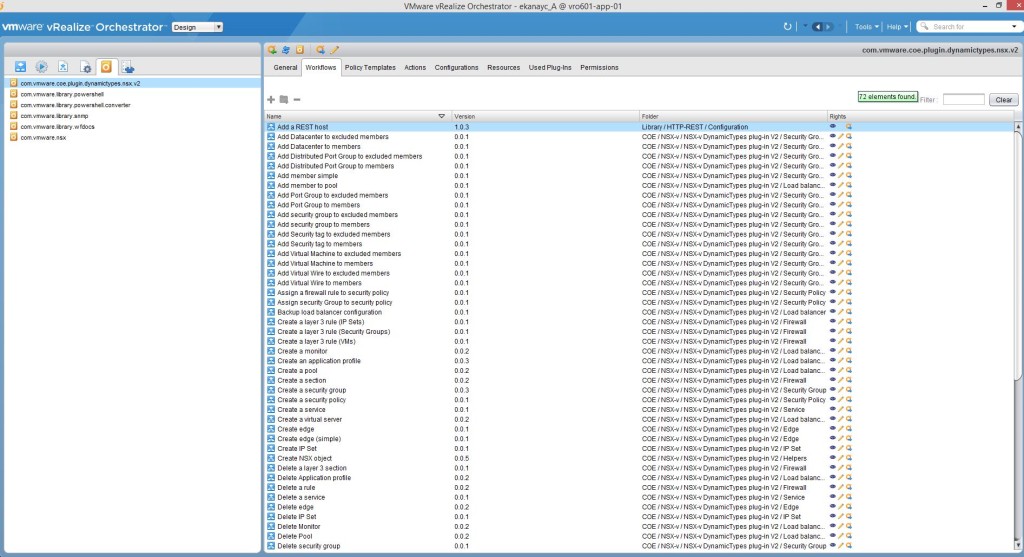
- Install the plugin NSX-v Dynamic Types plug-in V2
- Note: A handy NSX Dynamic Types plugin to use with vRA Advanced Service Designer. This plug-in can be customized and extended using the plug-in generator V2 package.
- Install instructions are all available in the link above (summary below)
- Rename the downloaded package com.vmware.coe.plugin.dynamictypes.nsx.v2.package
- Import the package (Using vRO client, NOT the configuration page)
- Verify that the package and the additional NSX workflows now appear within the vRO client.
- More steps are required to be carried out to complete this which will be done under step 10 below
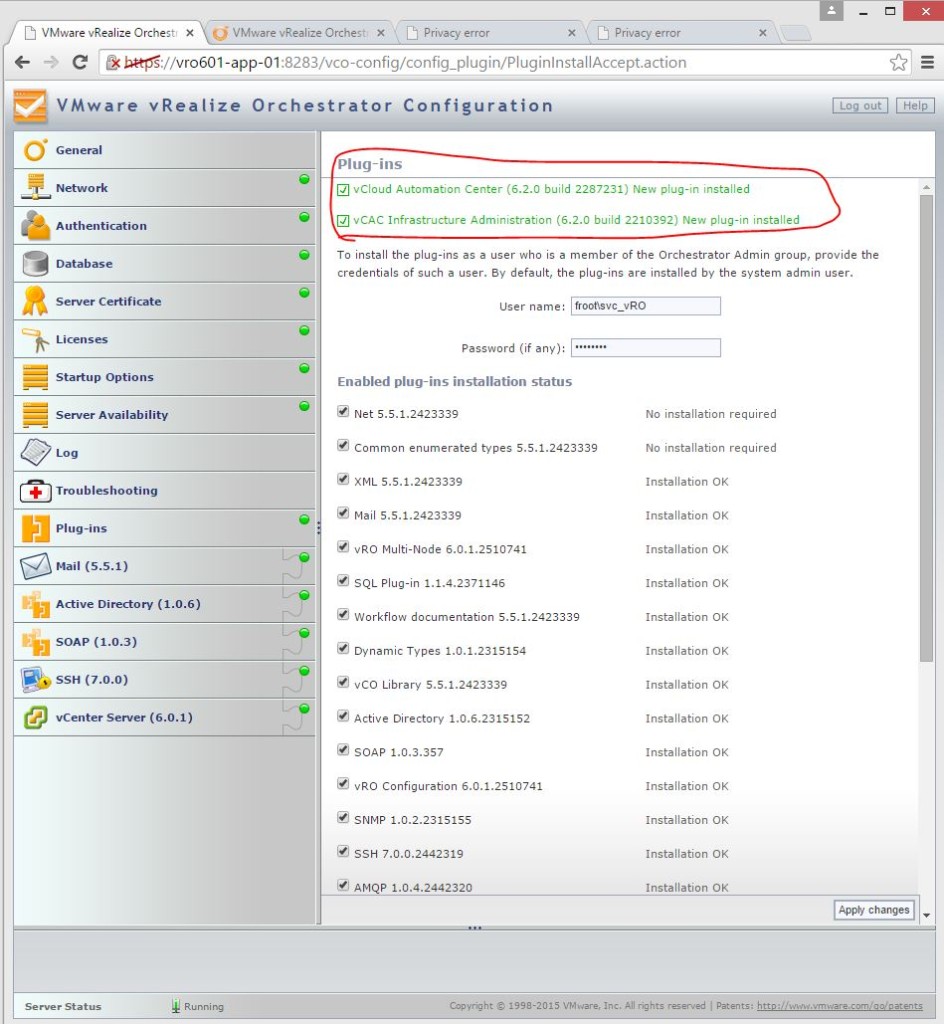
- Install the plugin VMware vRealize Orchestrator vRA Plug-in 6.2.0
- Note: This is required for integration with vRA 6.2.
- Install the vRA 6.2.x plugin using the o11nplugin-vcac-6.2.0-2287231.vmoapp on the vRO configuration page

- Verify the installation and restart the vCO service (note that the plugin status may not change to “installed” immediately after the vCO service restart. This can take some time)
- Note: Login to the vRO client and ensure all default workflows are visible within the client. (I’ve had repeated issues whereby, after the vRA 6.2 plugin has been installed, all default plugins and their workflows disappeared within vCO. If this happens, within the vRO configuration page, go to Troubleshooting section and click “Reset current version” under “Reinstall the plug-ins when the server starts and reboot the vRO appliance) – This can potentially save you lots of time….!!
- Install the plugin VMware vCenter Orchestrator Plugin for NSX 1.0.1 – Required for vRO workflow creation for NSX in order to orchestrate some NSX tasks
- Configure Orchestrator Plugins (using vRO workflows) – We will configure the key plugins here and leave some to be configured later
- Configure vCenter plugin
- Note: The way to integrate vCenter server may differ depending on whether you have vCenter 5.5 or 6.0 as well as whether its a windows install or the vCSA. In my case, its vCenter 5.5 on good old Windows so the below steps are based on that configuration.
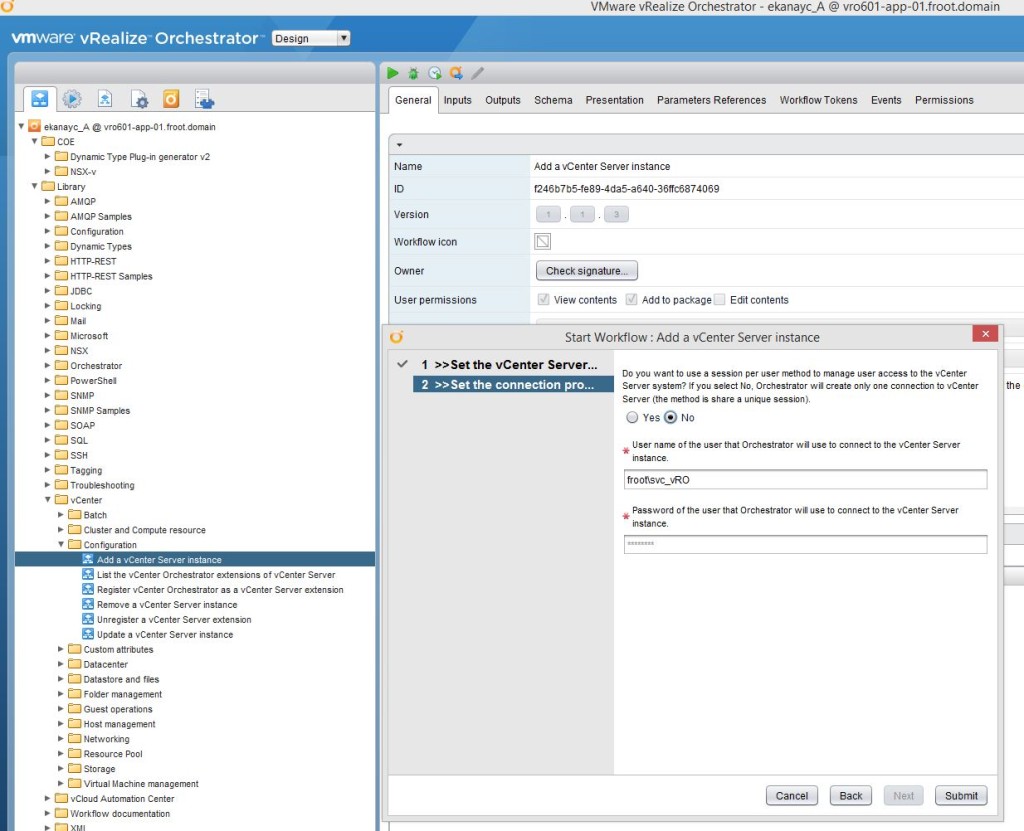
- Login to the vRO client (you can download the client installable from https://<vRO FQDN>:8281 or launch the client directly from there) and run the workflow Library-> vCenter->Configuration->Add a vCenter server instance

- Now, select whether you are happy to use a shared session for vRO to connect to vCenter server. If you using a shared session (meaning, you’ve answered “No”), provide the credentials that the vRO uses to connect to the vCenter with (shared credentials for all users). I’m using the vRO service account (svc_vRO) which I’ve made an Administrators on the vCenter instance. This is usually good enough as I can see all vRO driven activities on the vCenter logs / events clearly thanks to the service account name. Also, since the ultimate goal is to call these workflows via vRA portal, and when I specify blueprints based on these workflows, I’m already controlling who has access to access those blueprints, so the shared credentials between vRO and vCenter is the best option. If however you decides to not use shared credentials, you need ensure each user who access vCO workflows though vRA catalog, will have sufficient permission on vCenter to execute that specific workload and I don’t think that is a good way to go about it, architecturally.
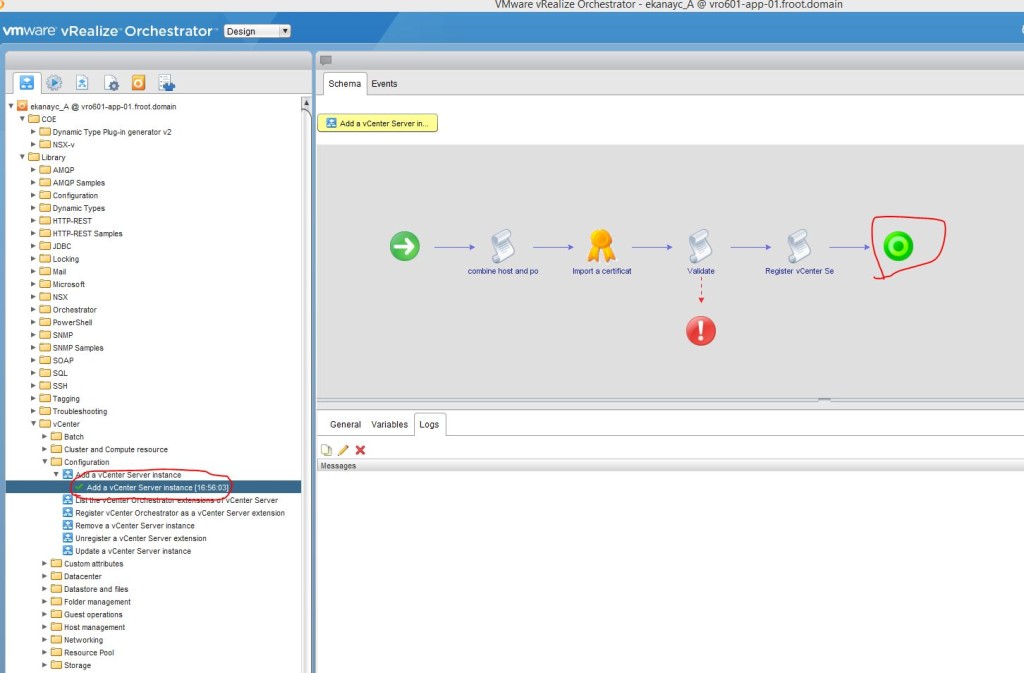
- Once the workflow has been successfully run, you’ll see the message on the screen as follows.
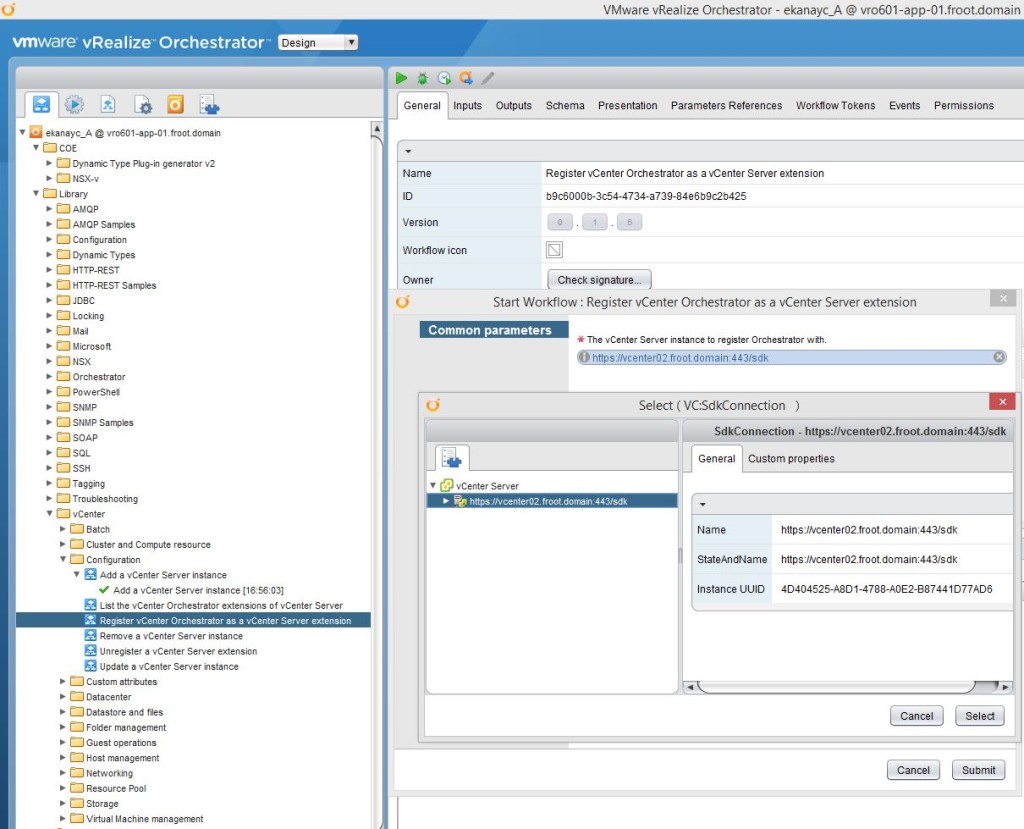
- Register vCenter Orchestrator as a vCenter Server Extension
- Note: This important so that vRO workflows will automatically be available within the vSphere Web Client to execute.
- Login to vRO client and rung the workflow: Library -> vCenter -> Configuration -> Register vCenter Orchestrator as a vCenter Server Extension
- Select the vCenter server (managing compute & edge cluster that the above workflow was run against) here.
- Verify it ran successfully
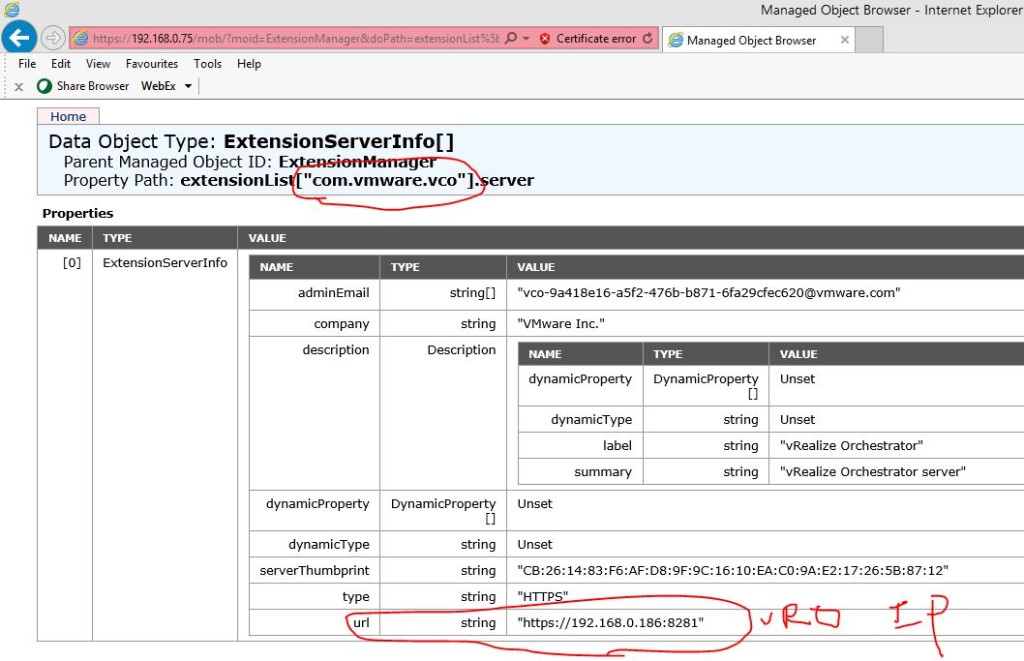
- Verify on the Managed Object Browser for that vCenter that the vRO extension is listed correctly. Instructions are as follows
- In a Web browser navigate to the managed object browser of your vCenter Server instance. https://<vcenter_server_ip?/mob
- Log in with vCenter Server credentials.
- Under Properties, click content.
- On the Data Object Type: ServiceContent page, under Properties, click ExtensionManager.
- On the Managed Object Type page, under Properties, click the Orchestrator extension string.extensionList[“com.vmware.vco”]. The extension has a server property which contains an array of type ExtensionServerInfo. The array should contain an instance of the ExtensionServerInfo type with a url property which contains the URL of the registered Orchestrator server.
- On the Data Object Type: Extension page, under Properties, click server. You can see information about the Orchestrator server registered as an extension, such as serverThumbprint and url. The serverThumbprint property is the SHA-1 thumbprint of the Orchestrator server certificate, which is a unique identifier of the Orchestrator server. The url property is the service URL of the Orchestrator server. There is one record per IP address. If the Orchestrator server has two IP addresses, both of them are displayed as service URLs.
- Configure the Active Directory Plugin
- Login to the vRO client and run the workflow: Library->Microsoft->Configuration->Configure Active Directory Server
- Provide the answers including the AD dc name (I’d providing the root of the domain address which is automatically directed to any of the DCs in the domain rather than pointing at a single DC.

- Now select the authentication method to the AD as a shared session. If a shared session is not used, the user who runs the vRO workflow is expected to have sufficient rights in the AD to run the particular workflow which WILL NOT be practical once the vRO is integrated with vRA and users start requesting machine provisioning from blueprints which in turn, calls for vRO workflows.

- Configure VMware vRealize Orchestrator vRA Plug-in 6.2.0 – This step is key….!!
- Add vRA Host
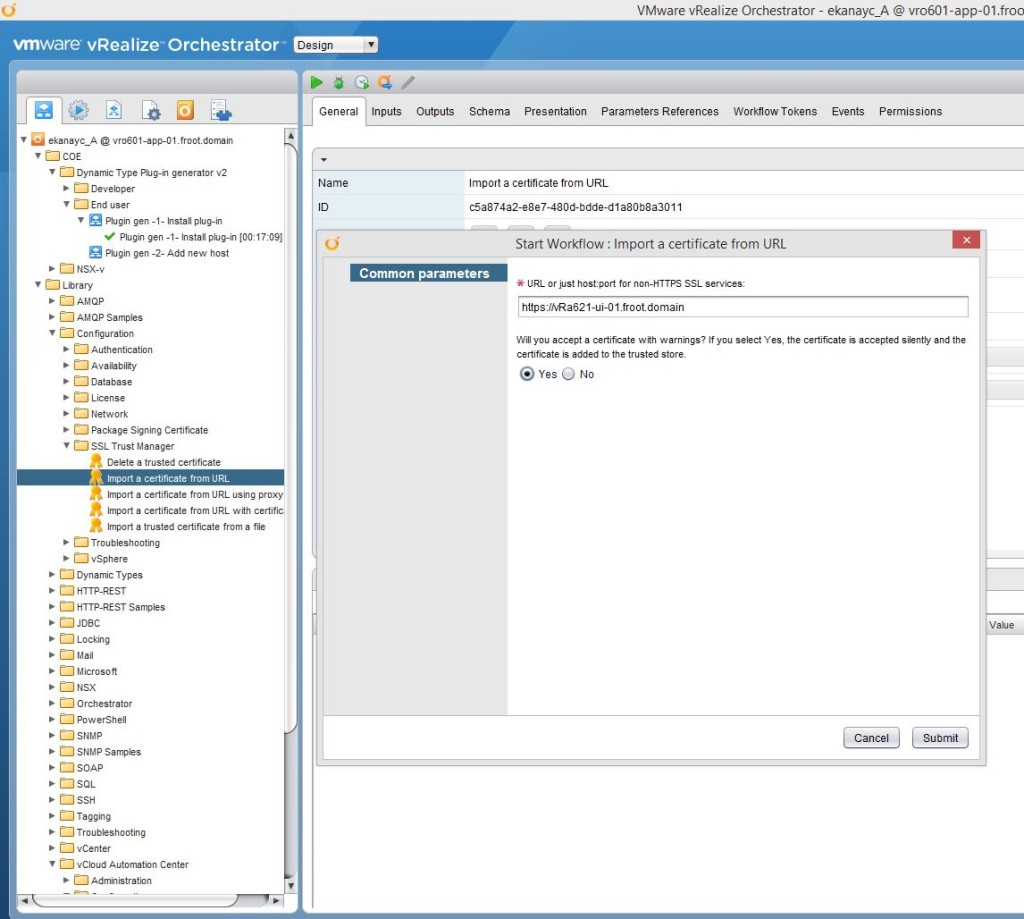
- Import the vRA server SSL certificate
- Run the workflow “Import a certification from URL” under library->configuration->SSL Trust Manager
- Provide the vRA appliance details in the URL & Submit. Verify Its run correctly.
- Add the vRA host
- Run “Add a CAC host” workflow under vCAC->Configuration and select the vRA server FQDN and the URL (with https://)

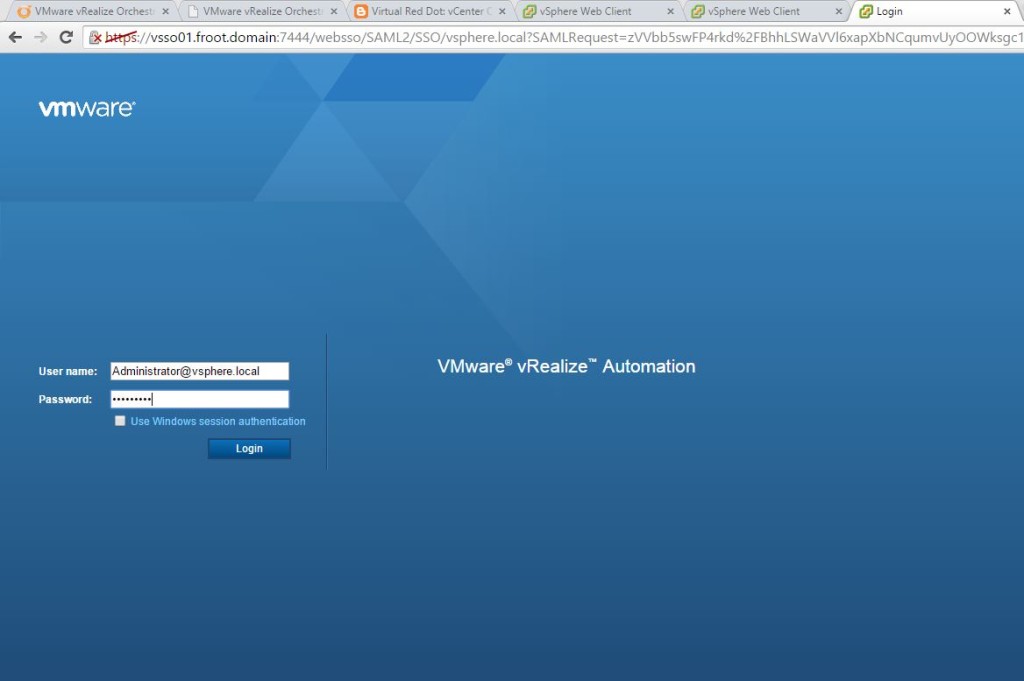
- Use the shared session option using the Administrator@vsphere.local account to connect to the vRA server

- Verify its run successfully at the end.
- Run “Add a CAC host” workflow under vCAC->Configuration and select the vRA server FQDN and the URL (with https://)
- Import the vRA server SSL certificate
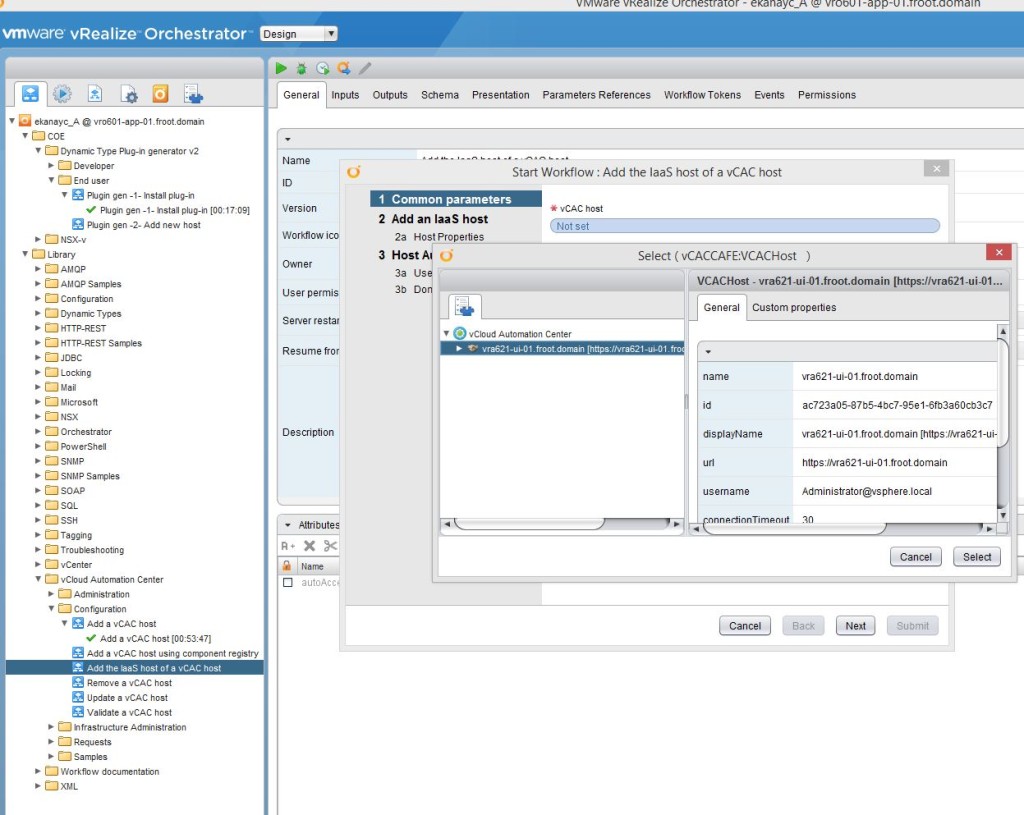
- Add the vRA IaaS host
- Setup Infrastructure Administrators Group on the default tenant
- Login to the vRA UI using https://<vRA Appliance FQDN>/shell-ui-app using the Administrator@vsphere.local account
- Go to the Administratprs tab within the vSphere.local tenant (default) and add an appropriate AD group for vRA Infrastructure Administrators (I have a group created here called <domain>\VMware vCAC Inf Admins and a user account named <domain>\inf-admin as a member of that group)

- Login to the vRA UI using https://<vRA Appliance FQDN>/shell-ui-app using the Administrator@vsphere.local account
- Run “Add a vCAC IAAS host” workflow
- Run the workflow “Add a vCAC IAAS host” under vCAC->Configuration and select the vRA server (already added to vRO)
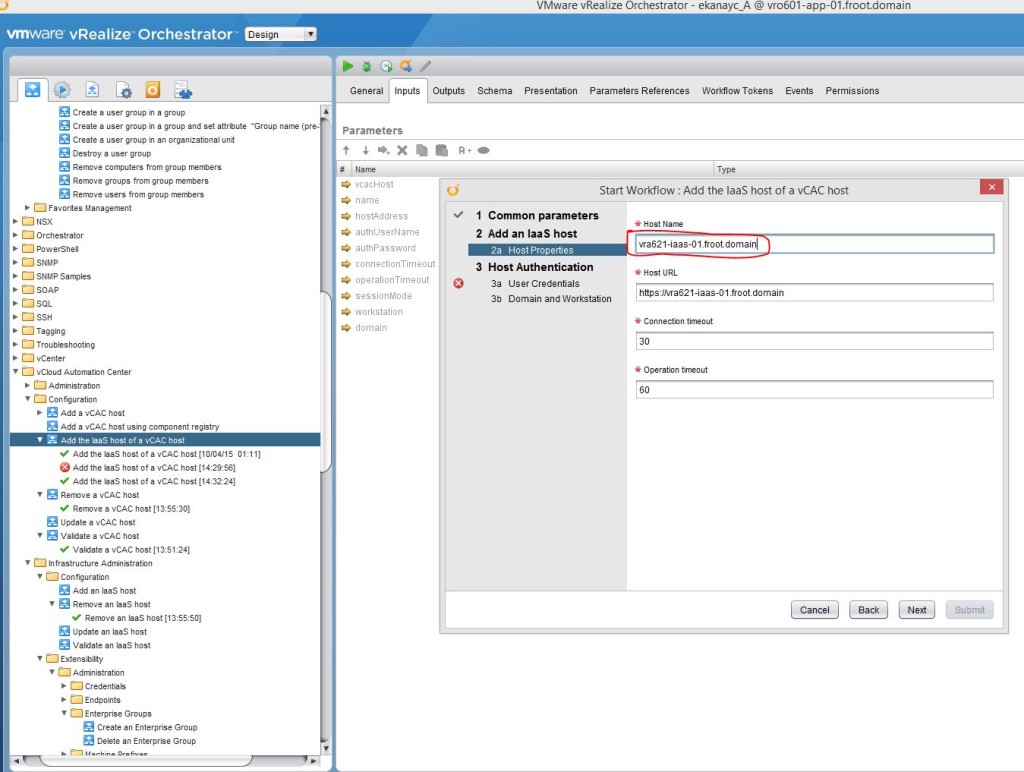
- Host name is are auto populated. Change this to be the name of your IaaS windows server (as shown below) and Click next.
- My preference is to use the shared session option here. The shared user account used to connect to the IaaS windows server needs to be a administrative account that has local administrative rights to the IaaS server where the model manager database is installed. As such, I’m going to use the vRA service account (domain service account that was created and used to install the IaaS services with during an earlier step here which had admin rights to the IaaS server). DO NOT type the domain name here. Just type the account name as the domain is provided in the next step.
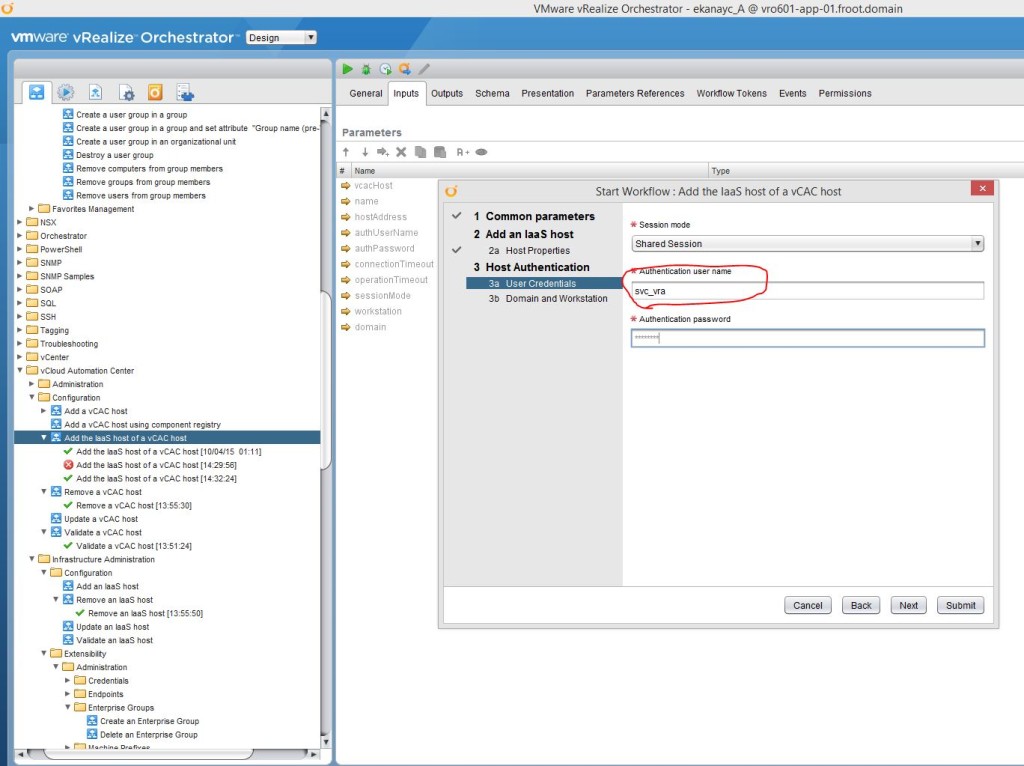
- Change the domain name to the appropriate domain name and submit.

- Verify it runs successfully.
- Run the workflow “Add a vCAC IAAS host” under vCAC->Configuration and select the vRA server (already added to vRO)
- Setup Infrastructure Administrators Group on the default tenant
- Install vRO Stub Workflow Customization
- Note: This workflow will modify the default Workflow Stubs used by vRA so that vRO workflows can be called during normal vRA driven machine provisioning & disposing to achieve e significant level of customisability.
- Run the vCloud Automation Center->Infrastructure Administration->Extensibility->Installation->Install VCO Customisation

- Verify that the defaults Stub Workflows are now modified using vRA Designer
- Download the vRA Designer from using the URL https://<vRA appliance FQDN>:5480 and under vRA Settings tab

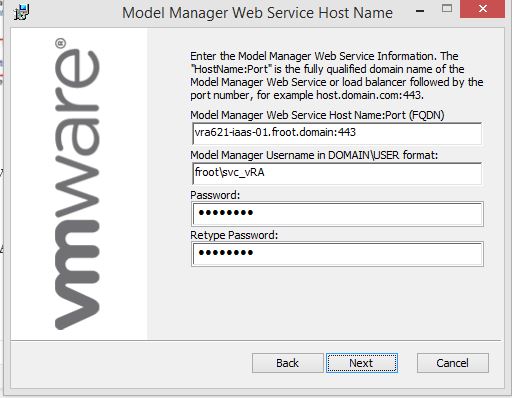
- Install the vRA Designer (model manager runs on the IaaS server. In my case, its the first IaaS server deployed. Ensure you use the FQDN for the server name here)
- Launch the vCAC Designer application installed above
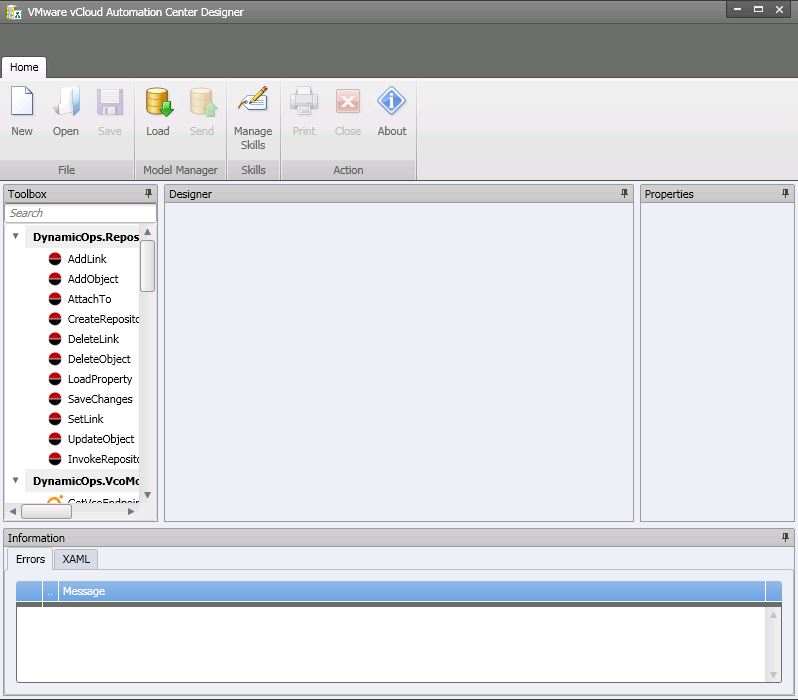
- Click on Load button at the top to load the internal vRA workflow configuration to see the updated version numbers of the built in workflows

- Download the vRA Designer from using the URL https://<vRA appliance FQDN>:5480 and under vRA Settings tab
- Due to this customization, it provides the ability to call vRO workflows during provisioning process using vRA IaaS Blueprints. To assign these vRO workflows to each Blueprint (to be invoked during provisioning stage), we’ll need to later run the Library->vCAC->Inf Administration->Extensibility->Assign state change workflow and select the required Blueprint. – We will be using this extensibility feature later on, but so far we’ve just had all the preparation work completed.
- Add vRA Host
- Configure vCenter plugin


There you have it. vRO 6.0.1 is now deployed, its integrated with AD, vCenter and vRA and the vRA’s default provisioning stub workflows have also been modified so that we can call vRO workflows during vRA IaaS machine provisioning process and use custom properties to populate the input parameters being required by those vRO workflows.
Now that we have all the pre-requisites for a fairly complete vRA deployment, we’ll next look at the initial vRA setup and all the different user accounts involved.
Cheers
Chan
Next: vRA Part 6 – System / Infrastructure & Fabric Administrators –>