VMworld Europe 2015 – Partner Day (PEX)

Quick post about the VMworld Europe day 1 (PEX day)….!! Was meaning to get this post out yesterday but there are too many distractions when you attend VMworld, let me tell ya….! 🙂

I arrived in Barcelona on Sunday and had already collected the access pass on Sunday evening itself. As such, I arrived at the venue on the Partner day on Monday around 9am and the venue was fairly busy with various VMware employees and partners.

As for my schedule for the day, I attended a VSAN deepdive session in the morning, presented by non other than Mr VSAN himself (Simon Todd @ VMware) which was fairly good. To be honest, most of the content was the same as the session he presented few weeks ago at VMware SDDC boot camp in London which I also attended. Some of the interesting points covered include

  • Oracle RAC / Exchange DAG / SQL Always on Availability Groups are not supported on VSAN with the latest version (6.1)
  • Always use pass through rather than RAID 0 on VSAN ready nodes as this gives full visibility of the disk characteristics such as SMART and removal of disks from disk groups causing less downtime with passthrough rather than RAID which makes sense.
  • Paying attention to SAS expander cards and lane allocation if you do custom node builds for VSAN nodes (rather than using pew-configured VSAN ready nodes). For example, a 12g SAS expander card can only access 8 PCI lanes where in an extreme case, can be saturated so its better to have 2 x SAS expander cards to share the workload of 8 channels each
  • Keep SATA to SSD ratio small in disk groups where possible to distribute the workload and benefit from maximum aggregate IOPS performance (from the SSD layer)
  • Stretched VSAN (possible with VSAN 6.1) features and some pre-reqs such as less than 5ms latency requirements over 10/20/40gbps links between sites, multicast requirements, and the 500ms latency requirement between main site and the offsite witness.

Following on from this session, I attended the SDDC Assess, Design & Deploy session presented by Gary Blake (Senior Solutions Architect). That was all about what his team doing to help standardise the deployment design & deployment process of the Software Defined Data Center components. I did find out about something really interesting during this session about VMware Validated Designs (VVD). VVD is something VMware are planning to come out with which would be kind of similar to CVD (Cisco Validated Design Document if you are familiar with FlexPod). A VVD will literally provide all the information required for a customer / partner / anyone to Design & Implement a VMware validated Software Defined Data Center using the SDDC product portfolio. This has been long overdue in my view and as a Vmware partner and a long time customer, would really welcome this. No full VVD’s are yet released to the public yet, but you can join the community page to be kept up to date. Refer to the following 3 links

I then attended a separate, offsite roundtable discussion at a nearby hotel with a key number of NSX business Unit leaders to have an open chat about everything NSX. That was really good as they shared some key NSX related information and also discussed some interesting points. Few of the key ones are listed below.

  • 700+ production customers being on board so far with NSX
  • Some really large customers running their production workload on NSX (a major sportswear manufacturer running their entire public facing web systems on NSX)
  • East-West traffic security requirements driving lots of NSX sales opportunities, specifically with VDI.
  • Additional, more focused NSX training would soon be available such as design and deployment, Troubleshooting…etc
  • It was also mentioned that customers can acquire NSX with limited features for a cheaper price (restricted EULA) if you only need reduced capabilities (for example, if you only need edge gateway services). I’m not sure on how to order these though and would suggest speaking to your VMware account manager in the first instance.
  • Also discussed the potential new pricing options (nothing set in place yet..!!) in order to make NSX more affordable for small to medium size customers. Price is a clear issue for many small customers when it comes to NSX and if they do something to make it more affordable to smaller customers, that would no doubt be really well received. (This was an idea the attendees put forward and NSBU was happy to acknowledge & looking in to doing something about it)
  • Also discussed some roadmap information such as potential evolution of NSX in to providing firewall & security features out on public clouds as well as the private clouds.

Overall, the NSX roundtable discussions were really positive and it finally seems like the NSBU is slowly releasing the tight grip they had around the NSX release and be willing to engage more with the channel to help promote the product rather than working with only a handful of specialist partners. Also, it was really encouraging to hear about its adoption status so far as I’ve always been an early advocate of NSX due to the potential I saw during early releases. So go NSX….!!!

Overall, I thought the PEX day was ok. Nothing to get too excited about in terms of the breakout sessions…etc, with the highlight being the roundtable with the NSBU staff.

Following on from the discussion with the NSBU, I left the venue to go back to the hotel to meet up with few colleagues of mine and we then headed off to a nice restaurant on the Barcelona beach front called Shoko (http://shoko.biz/) to get some dinner & plan the rest of the week… This is the 2nd time we’ve hit this restaurant and I’d highly recommend anyone to go check it out if you are in town.

Unfortunately, I cannot quite recollect much about what happened after that point… 🙂

Post about the official (customer facing) opening day of the VMworld event is to follow….!!

Cheers

Chan

VMworld 2015 Europe – Plans & My Session Schedule

banner-vmworldemea2015

I’ve been fortunate enough to attend the VMworld Europe event for the past 3 years running, and as it turned out, I will be attending this years event too in lovely & lively Barcelona. So I thought I’d do a quick blog post to share my plans for this years VMworld Europe, in case anyone’s interested in knowing or wanting to meet up while I’m there, you know where I am when. Also, I will list my session schedule along with why I thought I should attend each session, just in case anyone’s interested.

As I work for a VMware platinum partner, I’m planning to attend the Partner Exchange Day (PEX) on Monday which is not open to general public. Therefore, I will be travelling on Sunday afternoon from Manchester to Barcelona with a view to collecting my registration pass on Sunday evening itself (they usually have the registration desk open on Sunday till about 6-7pm if I remember correct) which will hopefully save me from having to queue up on Monday morning. I will be staying at hotel Torre Catalunya throughout the week with few other colleagues of mine and some customers that will be joining us there.

  • On Monday (PEX day), I have the following sessions booked to attend.
    • 9am – 10am:  PAR6413 – VMware Virtual SAN Architecture Deep Dive for Partners
      • VSAN has now come of age (its a version 3 product now which means its quite mature) and has turned out to be a really nice, complementary solution to vSphere that work well with most if not all storage use cases. The customer adoption of VSAN for hosting production workload has been beyond belief. I am fairly conversant about VSAN and its technical and business benefits as well as its sizing, architectural side of set up and the implementation details. But by attending this session, I’m aiming to learn a bit more about the All flash VSAN configuration, the new generation snapshot capability (available soon I hear) and the performance enhancements introduced in the most recent 6.1 release.
    • 11am – 12:30 am: Virtual SAN Partner Advisory Roundtable
      • This was an invited event for VMware partners to interactively discuss & debate and share experience about what worked well and where the partners need more support from VMware to successfully implement VSAN solutions for customers. I’m hoping to meet a number of EMEA and Global product management staff responsible for VSAN as well as key people from the Storage business unit within VMware during the event. I already have a number of questions & requests on behalf of my customers to the VMware VSAN team and am looking forward to attending this event.
    • 12am – 1pm: PAR6411 PSE: SDDC Assess, Design and Deploy 2.0 – Whats New?
      • Ok, I know the starting time is clashing with the finishing time of the previous session my I’m planning to bail early from the previous one to attend this one on time. This is a partner only session with the VMware Professional Services Engineering team to discuss the professional services delivery kit these guys put together, especially in light of the vSphere 6 and other related new versions.
    • 2:30pm – 15:30pm: PAR6090 60 Desktops in 60 Minutes: How to Deploy Horizon View with vGPU for a Quick POC
      • I’m not heavy in to VDI side of things, but I was genuinely interested in the vSphere 6 introduced vGPU feature as I’ve seen the demo’s of this in the last years VMworld and it looked totally awesome for graphics performance for VDI. So, naturally wanted to find out more about the deployment tricks and what it takes to do quick POC as no doubt I’d have to be doing this few times for my customers in the future (demand for VDI finally seems to be increasing.
    • 4pm – 5:30pm: Executive Roundtable with NSBU Executives: Martin Casado and Milin Desai
      • Ok, this is personally my most eagerly awaited session for the day. Again, an invited partner event to discuss the NSX and its roadmap with none other than the man who invented it himself (Martin Casado) and also Milin Desai from the VMwae NSX team. This could be epic…!! (The event is NOT taking place at VMworld venue but only at a separate hotel in Barcelona). Hopefully I will be able to get more of an understanding of where NSX is heading as a solution and some roadmap info which would be invaluable for my customers.
    • 5:30pm – 7pm: Gym.
      • Yes, it may be VMworld, but keeping your calorie burn / fitness is equally important (says the man hopefully 🙂 )
    • Evening: Meeting with other Insight (my employer) colleagues and customers to plan the rest of the week and perhaps few beers & food at the hotel.
      • Do come and say hello if you are there….. 🙂


  • On Tuesday (1st day of the general event open for all), I’ve got the following sessions planned
    • 10am – 11am: MGT5956 The New vRealize Converged Blueprints: Driving Automation and DevOps
      • Names says it all right? vRA has been of really keen interest to me and planning to find out more about the latest version and NSX integration as well as Application service integration in to a  single blueprint here from the horse’s mouth. if you are in to Automation and Orchestration, this should be a really important session to attend
    • 11:30am – 3pm: Solutions Exchange browsing and talking to as many vendors as possible about the their solution offerings.
      • Often, this is something that many VMworld attendees don’t prepare for, especially 1st timers as they’d inundate their diary with back to back breakout sessions (which after all, will be available as videos / presentation slides post VMworld). Attending breakout sessions are important yes, but I’d say its far more important to look at the solutions exchange and see what vendors are there and what they have to offer. In my previous attendances, I’ve come away with some really unique vendors with some really cool, unique and useful technology offerings to complement VMware tech that you can position to customers when the come to you with requirements that are not mainstream. Trust me on this one….!!
    • 2:30pm – 3:30pm: INF4945 vCenter Server 6 High Availability
      • While I have a decent understanding of the vCenter / vCSA high availability options available with vSphere v6.0, finding out more should not harm.
    • 4pm – 5pm: SDDC5440 VMware Validated Designs – An Architecture for the SDDC
      • I work with many SDDC offerings for my customers and its aleays good to get more information from VMware about how they’d recommend you design and deploy their SDDC software together such as vSphere, NSX, vRA and vROPS.
    • 5:30pm – 7pm: Gym.
      • Yes, it may be VMworld, but keeping your calorie burn / fitness is equally important (says the man hopefully 🙂 )
    • 8pm – late: Veeam party / VMware UK&I reception party
      • Unsure which one I’ll end up joining but probably try both. Veeam party was a knock out last year and defo worth attending, and I say that not because of the free drinks, but because of the networking element with like minded peers. Its awfully useful to meet with other like minded people and talk tech (most of the time)


  • Friday morning: Travel back home.


There you have it. I will aim to be tweeting (@s_chan_ek) and blogging while I’m there too subject to time constraints…etc. but please do come and say hello if you are interested in meeting up to discuss something or simply to have a chat (even if its to tell me my blog is rubbish….:-) )

Enjoy VMworld Europe 2015….!!

Cheers

Chan

VMware VSAN Assessment Tool – VMware Infrastructure Planner (VIP)

VMware has released an assessment tool called VIP – VMware Infrastructure Planner which is an appliance that a valid VMware partner can download and deploy at a customer environment in order to assess the suitability of VSAN based on the actual data collected from the infrastructure. This post primarily looks at using this VIP appliance to assess the suitability of VSAN. This assessment is  the pre-cursor to a VSAN sizing during which, the sizing data are automatically collected and analysed by VMware and a final recommendations will be made as to the suitability of VSAN and the recommended hardware configuration details be used for building the VSAN. Note that the same appliance can be used to assess the suitability of the vCloud suite components in that environment and I will also publish separate post on how to do that at a later date. The process of using the appliance to do a VSAN assessment involves the following high level steps.

  1. A VMware employee or a valid channel partner will have access to the VIP portal (https://vip.vmware.com) – Note that the partner would need to sign up to an account free of charge. 2. Create Assessment
  2. Once logged in, the partner can create an assessment for a specific customer by providing some basic details (similar to the VMware capacity planner that was heavily used by VMware partners during early virtualisation days to assess virtualisation and consolidation use cases).
  3. Once the assessment is created, a unique ID for the assessment is generated on the portal.   3. Assessment Settings
  4. VMware partner then adds the customer details and the customer gets an email sent with a link to login to the portal and download an .ova appliance (partner can download it also) 4. Customer Email 5. Customer Logs in 6. Download the collector appliance
  5. The customer or the partner then deploys the appliance in the customer’s vSphere cluster (Note that the appliance can be deployed on any vCenter server / Cluster regardless of the one being monitored, as long as the appliance will have the networking access to the cluster being monitored, including the ESXi servers)
  6. Once the appliance is deployed, you can access the appliance using the https://<IP of the appliance> and do a simple configuration.
    1. Enter the unique assessment key generated (above). This will tie in the deployed appliance to the assessment ID online so that the monitoring and analysis data will be forwarded on to the online portal under that assessment ID. You get to determine how long the data collection should take place for.
    2. It then prompts you to select either a VM migration to vCenter assessment or a full cluster migration assessment to vCenter (I’ve used the cluster migration for the below)
    3. Provide the vCenter address (FQDN) that the collector needs to be registered against to perform the assessment of the VM’s. This could also be the same vCenter that manages the cluster where the appliance deployed or an external vCenter instance. A valid account need to be provided to access the vCenter instance.
    4. During the vCenter registration process, a VIB file would be deployed to all attached ESXi hosts that will enable the monitoring capability. (no downtime required) – Note the below
      1. HTTP/S client ports (80,443) need to be open on the ESXi servers to be able to download the VIB.
      2. According to the deployment notes, ” Histogram analysis and possibly tracefile analysis will be run on these VMs, which will degrade performance by about 5 to 10%, and the hosts will become momentarily unreachable, so be sure not to select VMs that are running very performance sensitive or real-time tasks
    5. Once complete, you’ll be presented with a confirmation window similar to the below which lists out all the VM’s in the cluster7. Appliance config
  7. Data collection from the VM’s in the cluster & forwarding on to the online portal will now begin. Once the data collection is complete, an email notification will be sent. Note that all automated email notifications throughout the process will be sent to both the customer’s named contact as well as the VMware partner contact who set the assessment up within the portal. Given below is a screenshot of the portal once the data collection is completed.
    1. As you can see, its automatically analysed the data and recommended the use of a Hybrid VSAN with 400MB of SSD cache size. (This is based on my lab so the cache size is relatively smaller than what would be recommended in a production environment.           8 Data Collection complete 9 Collection report 2
  8. Once the data collection is complete, data can be directly fed to the VSAN sizer (https://vsantco.vmware.com/vsan/SI/SIEV) to size a potential VSAN solution up which is handy. All you need to do is to click on the button at the bottom that says “Go to VSAN TCO and Sizing Calculator” which will take you to the sizing portal with the data being automatically prefilled for the sizer. 10. Sizing calculator 12. Sizing results
  9.  If you then want to do a TCO comparison to using VSAN Vs traditional HW based SAN, you can go ahead by clicking on the TCO inputs button and providing financial information.    14 1315
  10. Sizing calculator then produces a simple TCO report outlining the cost of VSAN Vs traditional SAN (HW based)   16 17 18 19
  11. I should mention that the above screenshots were based on the default TCO assumptions that include default indicative pricing for various HW SAN’s. I’d encourage that you talk to your reseller / storage vendor to have an independent assessment done using their tools and then use the cost they provide for their SAN solution to update the VSAN OPEX assumptions (as shown below) to get an accurate comparison here in these graphs.             20

Pretty cool ain’t it?

Cheers

Chan

VMware vRealize Automation Part 10 – IaaS Extensibility – Using vRO for Blueprint Customization

Now the fun part of this series of articles begins where we look at truly leveraging the extensibility capabilities.

First of all, its important to understand what this word “extensibility” means in the context of vRA.

Extensibility

Machine Extensibility usually means the ability to customise the default IaaS workflows available within vRA through 2 key methods

  1. Old way: Using commandline tools (cloudutil) and vCAC Designer
  2. New (recommended) way:  Using the built in vRO workflows

This customisation lets you achieve various tasks during various stages of a machine life cycle that you cannot achieve using the default, built in IaaS workflows available within the vRA database. You do this by injecting custom logic to the built in IaaS workflows, to be executed at various stages of the machine lifecycle. Lets take a look at the details of the components involved in little more detail.

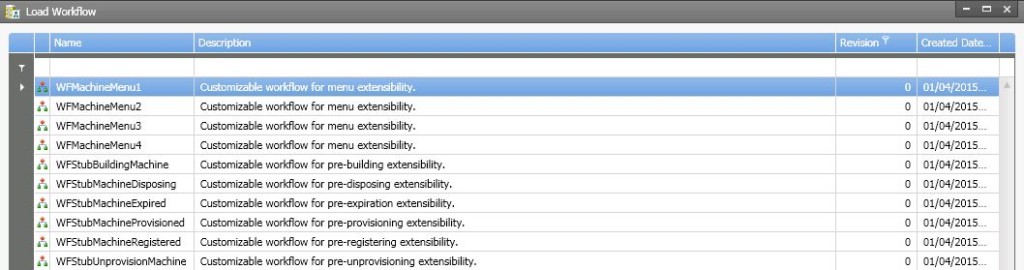
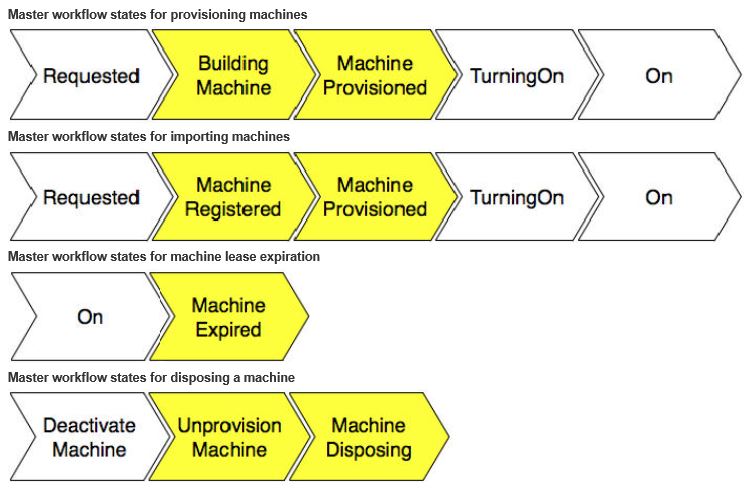
vRA database has 10, built in IaaS workflows that define the logic of how and what happens during an IaaS machine life cycle. These workflows are fully customisable. Out of these 10, 4 are for menu extensibility while the other 6 are state change workflows, , known as workflow stubs which define the actions that take place when a vRA machine reaches its various stages of its lifecycle. Given below is a list of those 10 default workflows

1 - workflows

The 6 state change workflows (a.k.a. workflow stubs) directly correspond to the 6 stages a machine can go through, which are as follows

  • State=BuildingMachine, corresponding workflow name = WFStubBuildingMachine 
  • State=RegisterMachine, corresponding workflow name = WFStubMachineRegistered 
  • State=MachineProvisioned, corresponding workflow name = WFStubMachineProvisioned 
  • State=Expired, corresponding workflow name = WFStubMachineExpired 
  • State=UnprovisionMachine, corresponding workflow name = WFStubUnprovisionMachine 
  • State=Disposing, corresponding workflow name = WFStubMachineDisposing 

You can customise these workflow stubs so that they can call out a vRO workflow for bi-directional integration with external systems. Usually, the vRO workflow is triggered before the IaaS master workflow enters a specific stage. Given below are the key states of the master workflow, with the customisable states highlighted in yellow.

2. States

Note that the difference between the machine building and machine provisioning is such that during the BuldinMachine state, VM’s created or the physical server is being built but OS Is not deployed where as the MachineProvisioned state, the OS is already deployed and may be going through customisation / sysprep or any other post deployment tasks. I have not seen these states and what each state mean being clearly documented by VMware anywhere unfortunately. Closest I’ve seen is this article at Dailyhypervisor from Sid Smith who was an ex Dynamic Ops employee. I’m quoting the below from his article which explains when the customisation work actually kicks in for 2 of the most common sub states found within the provisioning master workflow state.

  • Provisioning state – Order of execution of sub states
    • Building Machine – WFStubBuildingMachine workflow can be used to customise. Executes pre-building machine state
    • Customise Machine – Things like cpu & memory & disks are adjusted. No need to customise as the default workflow can address most requirements
    • Customize OS – Customisation spec applied – Again, not need to customise the default workflow which is good enough
    • Customize Guest – Guest agent performs guest level tasks such as disk partitioning, scripts…etc.
    • Machine Provisioned – WFStubMachineProvisioned workflow can be used to customise. Executes during pre-machine provisioned state.

Ok, now that we have a little understanding of what the default workflows are and what’s meant by stub workflows, next step is to look at how to customise some of these stub workflows.

As mentioned earlier, the old school way of doing his would have meant we would have had to use a command line tool called cloudutil and a separate installable program called vCAC Designer (downloadable from the vRA server IaaS component page). This is quite a cumbersome process and involve lot of understanding of things inside the IaaS model manager. If you fancy having a go, all the instructions are available here.

What I prefer and will use in the example below is the use of the vRO workflows that are included as a part of the vRA plugin for vRO, to achieve this customization instead (you simply run the workflows on vRO and it will automatically customise the default vRA workflow stubs within the model manager database). The vRO team has kindly made the above tedious task a lot simpler by making a number of vRO workflows that you can use to customise the stub workflows within vRA IaaS model manager DB. Once the stub workflows are customised, you can run another workflow called, “Assign a state change workflow to a Blueprint and its virtual machines” and effectively bind any vRO workflow to a blueprint so that this workflow can be automatically called during any of those customisable machine states. For example, you can create a vRO workflow to create the description of a computer account and use the state change workflow to assign that to a machine provisioning blueprint so that every time a machine is provisioned from that blueprint (assuming that you select the MachineProvisioned state to trigger the workflow), vRA will call the vRO workflow to change the description of the computer account on the AD. Any input parameters to the vRO workflow will be added automatically as custom properties to the blueprint which needs to be manually filled out with values before the blueprint can be published to the users (in the above example of setting the computer account description, you’d have to specify the description string on the blueprint’s custom properties)

The whole process of using vRO state change workflow with vRA at a high level goes something like this

  1. Install the vRA plugin to vRO – We’ve already covered this in step 9.3.3 under the heading vRO configuration, mentioned in the previous article here.
  2. Register the vRA server and the IaaS component of the vRA server with vRO – We’ve already covered this in step 10.4.1 & 10.4.2 under the heading vRO configuration, mentioned in the previous article here
  3. Install vCO customization – You do this by running the “Install vCO customization” workflow found within “Library->vCloud Automation Center->Infrastructure Administration->Extensibility->Installation” folder within vRO – We’ve already covered this in step 10.4.3 under the heading vRO configuration, mentioned in the previous article here   3. vCO customization
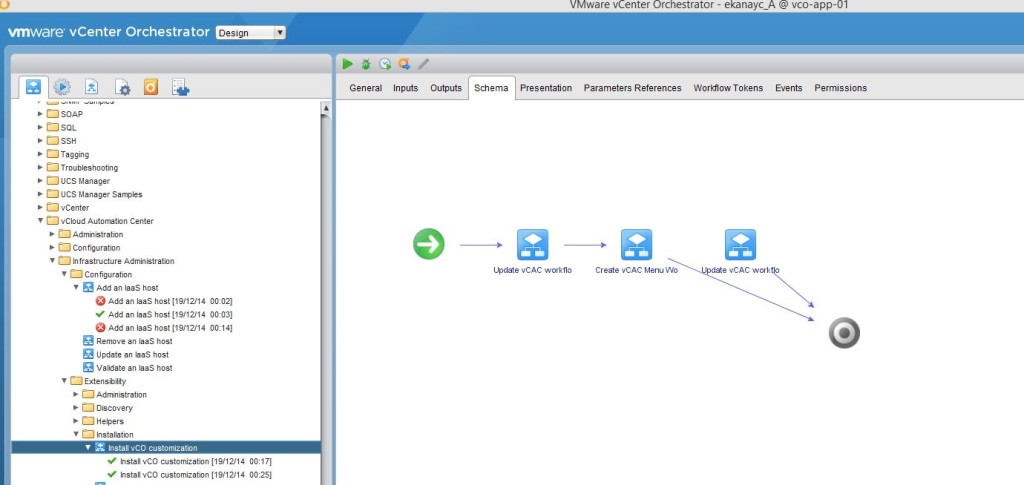
    1. Note that once this workflow has been run successfully, if you look at the vRA Model manager database using the vCAC designer, you’ll see the default Workflows have been modified (now appear with an increased version number) as shown below IaaS 8
  4. Assign a state change workflow to a blueprint (effectively bind a vRO workflow to a blueprint and specify which state of the machine lifecycle should trigger the call out to that vRO workflow) – We will look at this in detail below
  5. Fill out any input parameter values using the custom properties of the blueprint – We will look at this in detail below

This is quite powerful and let you associate any vRO workflow with a blueprint to be called out for numerous extensibility tasks, to be triggered at any of the following machine states

  • State=BuildingMachine, using the corresponding workflow name = WFStubBuildingMachine 
  • State=RegisterMachine, using the corresponding workflow name = WFStubMachineRegistered 
  • State=MachineProvisioned, using the corresponding workflow name = WFStubMachineProvisioned 
  • State=Expired, using the corresponding workflow name = WFStubMachineExpired 
  • State=UnprovisionMachine, using the corresponding workflow name = WFStubUnprovisionMachine 
  • State=Disposing, using the corresponding workflow name = WFStubMachineDisposing 

Lets take a practical example and see how we can assign a state change workflow to a blueprint (in other words, how to bind a vRO workflow to a machine blueprint such that when the machine state changes to a chosen state, that vRO workflow is executed) – Step 4 & 5 mentioned above. As mentioned earlier, lets assume that you have a requirement to add a description to the computer’s AD account, each time a vSphere VM is provisioned from a blueprint and joint to the domain. Given below are the steps involved

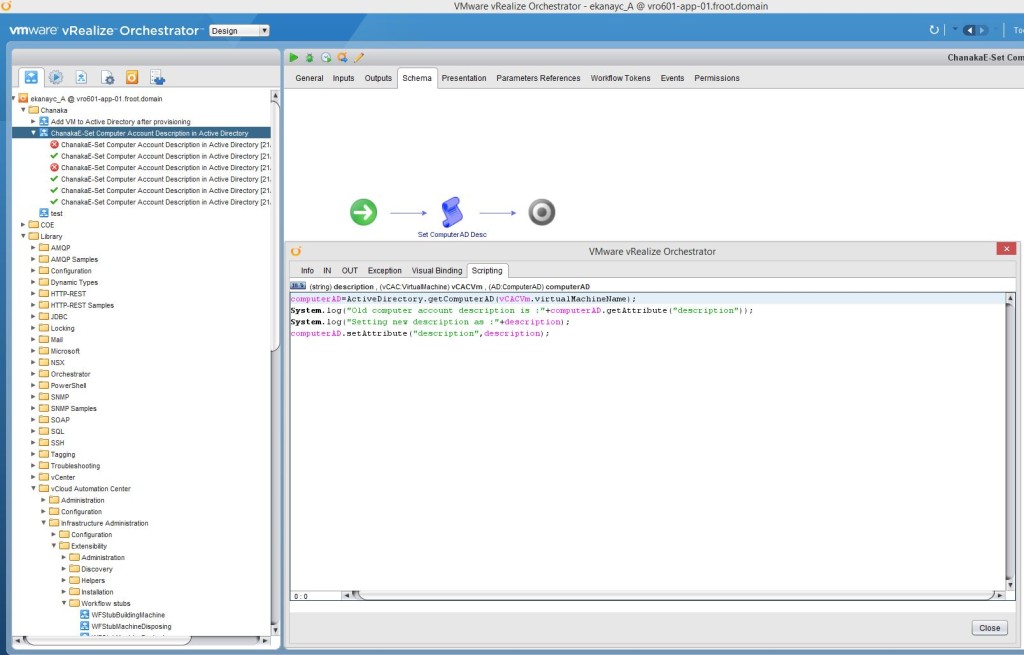
  1. Create a normal vRO workflow to change the computer account name
    1. Within the vRO client, create a simple workflow to change the description of an AD computer account. – Note that you cannot do this with the built in workflows or action elements and you need to create your own workflow with a scripted task.
      1. The workflow will have 2 input parameters as follows
        1. Input Parameter – description (type: string) – Computer account description
        2. Input Parameter – vCACVM (type: vCAC:VirtualMachine) – vRA VM object
        3. Attribute – ComputerAD (type: AD:ComputerAD) – Computer AD account 1.1.1
      2. The scripting part would look like the below   1.1.2
      3. If its easier, I’ve uploaded the whole workflow which you can just download using below link and import in to your vRO library without having to manually created the workflow from the scratch.  ChanakaE-Set Compputer Account Description in AD.workflow (make sure to change the extension from .txt to .workflow once downloaded, before importing to vRO)
    2. Run this workflow manually against a computer account to ensure the vRO workflow is working as expected.
  2. Use the built in workflow “Assign a state change workflow to a blueprint and its virtual machines” to bind the above workflow to a vRA blueprint
    1. Note the pre-reqs below
      1. I’m assuming that you have a VM / physical machine blueprint that creates a Windows VM / Server that is joint to the domain as a part of the provisioning.
      2. If you don’t have one, simply login as tenant administrator to the vRA portal and create, publish and entitle a new vSphere VM type blueprint to create one. Given below is a screenshot of the build information for you to get an idea. 2.2
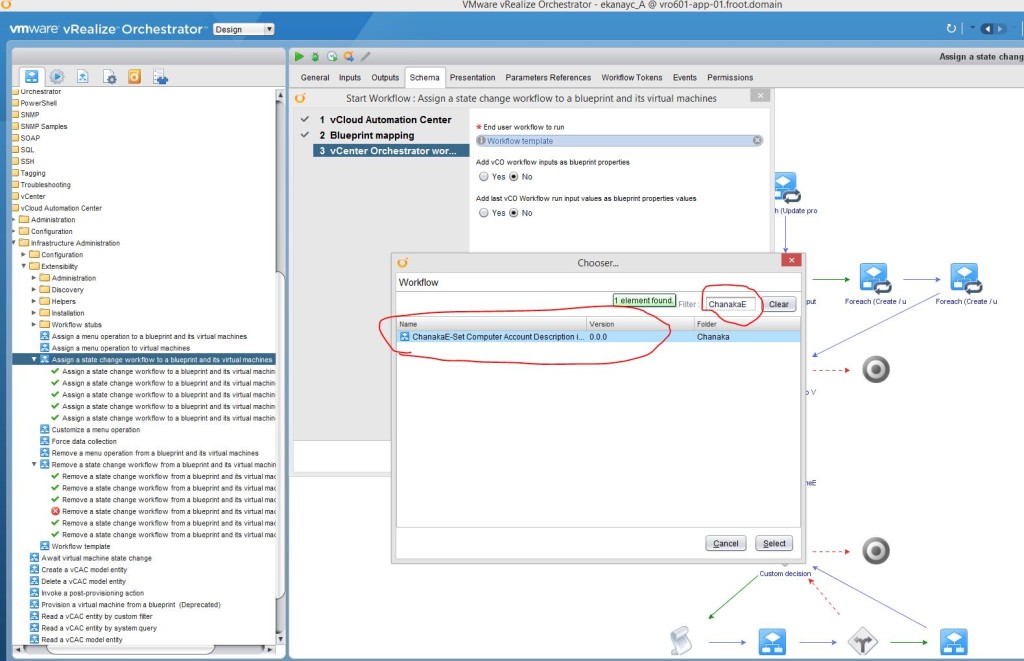
    2. Run the built in vRO workflow “Assign a state change workflow to a blueprint and its virtual machines” found within the “Library->vCloud Automation Center->Infrastructure Administration->Extensibility” folder within vRO
      1. Start the workflow and select,
        1. The appropriate vRA workflow stub to enable (What you select here will decide when the vRO workflow will get executed based on the various states of the machine). We are selecting the MachineProvisioned stub as that means the workflow will get executed during the machine provisioned state, after the guest level customizations are completed (i.e. AD account for the machine has been created as a part of the customization).   2.2.1.1
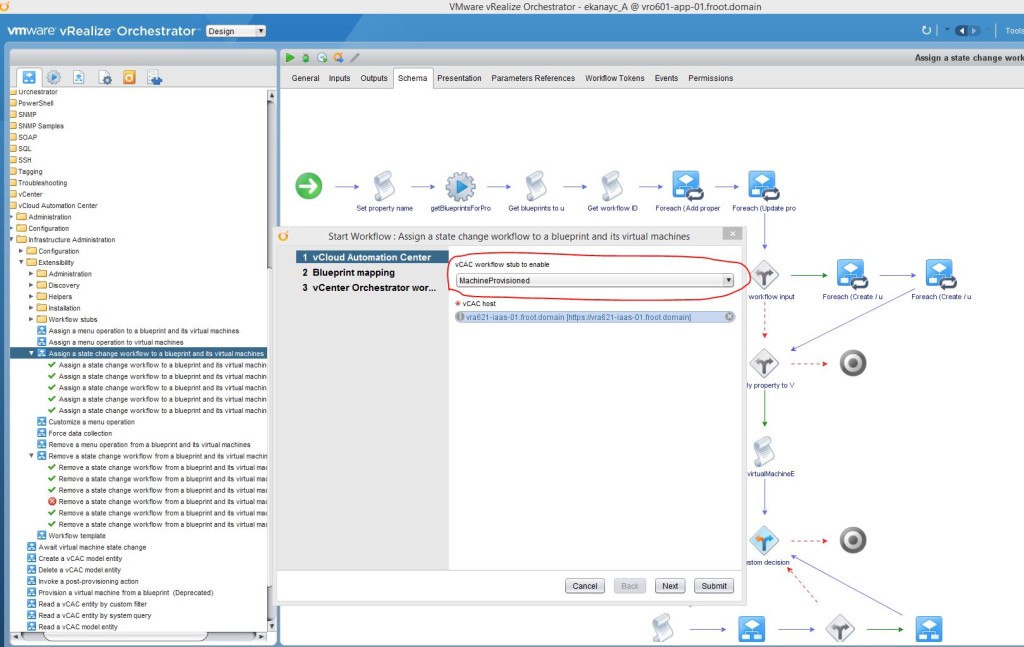
        2. Also select the vRA host where the blueprint’s are located.    2.2.1.2
        3. Click Next
      2. Now browse to the blueprint you want to bind the vRO workflow & click Next 2.2.2
      3. Now select the vRO workflow to bind to the blueprint
        1. Click on the Workflow template link and type the name of the vRO workflow in the filter box 2.2.3.1
        2. Select Yes checkbox to the option “Add vCO workflow inputs as a blueprint properties” – This is the step you add the vRO workflows’ input parameters to the blueprint via custom properties. 2.2.3.2
        3. Now click submit and ensure its run successfully within the vRO client.   2.2.3.3
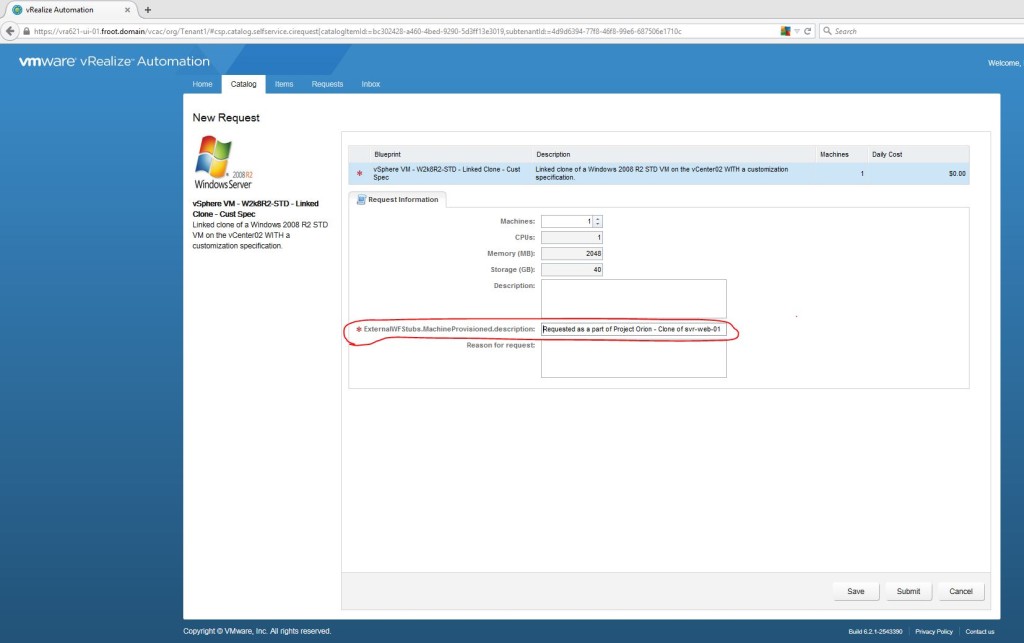
        4. Verify that its successfully modified the blueprint by navigating to the vRA portal (as the tenant administrator) and looking at the custom properties for the blueprint. Note that you’ll see the following custom properties automatically being added.
          1. vRO workflow ID for the workflow you’ve bound to the blueprint. 2.2.3.4
          2. The 2 input parameters required by the blueprint.
    3. Set up the AD computer account description on the blueprint properties.
      1. You can pre-specify the computer account description on the blueprint or force the user provide a description. Im going to use the latter approach.
      2. Login to the vRA portal as tenant-administrator and go the custom properties page of the blueprint.
      3. Edit the  “ExternalWFStubs.MachineProvisioned.description” property and select the checkbox “Prompt User”. 2.3.3
      4. Click the green tick to complete and OK to commit the changes to the blueprint.
    4. That’s it. You’ve now customised the vRA model manager workflow stubs to invoke vRO workflows at various stages of a machine lifecycle and have also used that customisation capability to execute a specific workflow during a machine provisioning from a blueprint.
  3. Verify the customization by provisioning a machine using the blueprint.
    1. Lets now verify our customisation is working by provisioning a VM from the blueprint.
    2. Login to the vRA portal as a business group user (in this case, its bg-user@froot.domain if you’ve correctly been following all of the vRA deployment articles I’ve published in the correct sequence) who has the correct entitlement to this blueprint.   3.2
    3. Request a machine to be provisioned using this blueprint. You’ll note that the computer account description also need to be provided.   3.3
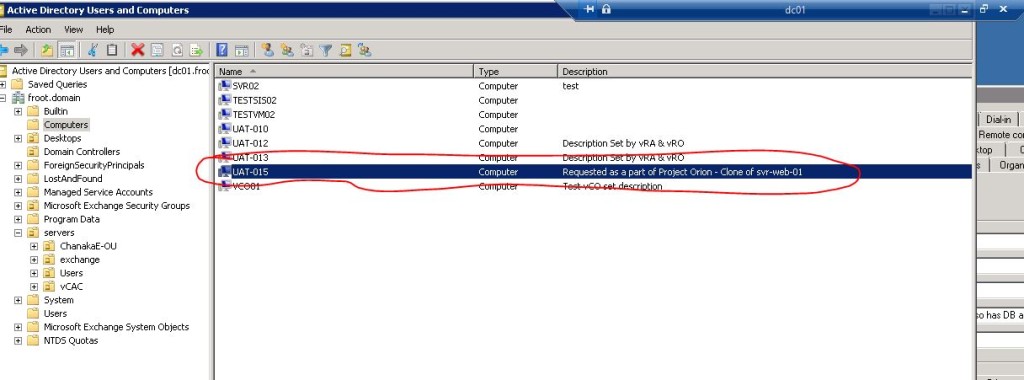
    4. Wait for the VM to be provisioned and the request to be complete on the vRA portal.
    5. Once complete, login to the Active Directory and verify that the customised description has been added to computer account.    3.5
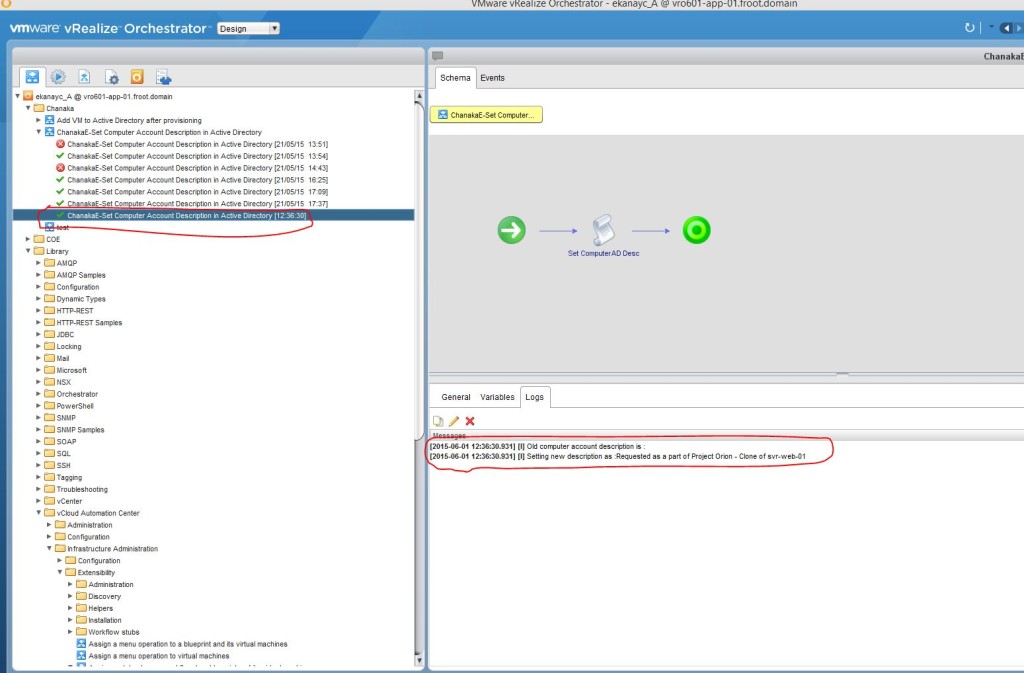
    6. You can further verify that the workflow has been run automatically by looking at the execution history for the workflow on the vRO client. 3.6

There you have it. A simple customisation of the vRA model manager database logic through the execution of vRO workflows makes the extensibility more fun by allowing us to call various different vRO workflows to be executed during various different lifecycle stages of a machine, through the integration of vRA with vRO.

Hope this was useful…!!

Cheers

Chan


A great VMware EUC book – Mastering VMware Horizon 6

I attended a VMware EUC workshop not long ago and came across this great book called “Mastering VMware Horizon 6”  by Peter von Oven at VMware (Peter is the Manager of the Systems Engineering team in VMware UK so he knows his stuff). I’ve had a quick look at it seems like a great read for anyone wanting to learn more about VMware Horizon 6 platform. (If you are an EUC consultant covering VMware’s EUC portfolio, this is a must read). While it focuses primarily on the Horizon 6 and Horizon View 6, there are also introductions to 2 of the coolest new additions to the EUC platform  from VMware, App volumes (came from the cloud volumes acquisition VMware did a while ago) and VSAN for VDI which is a great use case for VSAN in the enterprise.

The book covers the following topics.

  • Introduction to VMware Horizon 6
  • An overview of Horizon View Architecture and its components
  • Design & deployment considerations
  • Installing and configuring Horizon View
  • Securing Horizon View with SSL
  • Building and Optimizing the desktop OS
  • Managing and configuring desktop pools
  • Fine tuning the end user experience
  • Managing the user profiles with View Personal Management
  • Delivering remote applications with Horizons advanced
  • Delivering session based desktops with Horizon View
  • View client options
  • Upgrading to Horizon View 6
  • Horizon view 6 Advanced Edition
  • Introduction to App volumes
  • Introduction to VSAN for VDI
  • Troubleshooting

Its available to buy via https://www.packtpub.com/virtualization-and-cloud/mastering-vmware-horizon-60 which is available as an eBook as well as printed (and both). I have an  exclusive discount code if you order it before the 16th of May: MVH25 which offers 25% off the standard price.  I believe its also available on Amazon too.

Enjoy…….!!

Chan

VMware vRealize Automation Part 9 – Extensibility – Custom Properties & Build Profiles & Property Dictionary

vRA Custom Properties

Custom properties can be used to modify a machine throughout all stages of its lifecycle such as,

  • Request,
  • Provisioning
  • Manage
  • Retire

Custom properties can be used to achieve various objectives such as,

  • Defining the number of cores per socket on a VM blueprint
  • Customising the operating system (hostname, Sysprep information…etc.)
  • Specifying the OU for the machine account to be placed in, on AD
  • Specifying the VM disk type, determine the network placement for a machine
  • Integrating machines with external systems such as Citrix Desktop delivery controller
  • Update external systems once the machine is retired such as cleaning up AD of the stale computer account, clean up DNS, clean up DHCP…etc.

Custom properties can be added to the following sections within vRA (if same property is defined in multiple layers, the order of precedence is as shown below)

  1. Business group
  2. Blueprint
  3. Build profile
  4. Endpoint
  5. Reservation
  6. Compute Resource
  7. Storage

There are 4 main types of custom properties available

  1. Read-Only
    1. Specified value is implemented on the machine and maintained in the vRA database but cannot be changed within vRA
    2. Examples include:
      1. VirtualMachine.Admin.UUID – Specifies the UUID of the machine which cannot be changed
      2. VirtualMachine.Admin.Name
      3. VirtualMachine.Admin.AgentID
  2. Internal
    1. Specified value is maintained only in the vRA database and used purely for information purposes within vRA and has no impact on the machine itself or the virtualisation platform.
    2. Examples include:
      1. VirtualMachine.Admin.Owner
      2. VirtualMachine.Admin.Approver
      3. VirtualMachine.Admin.Description
      4. VirtualMachine.Admin.AdministratorEmail
      5. VirtualMachine.Admin.ConnectionAddress
  3. External
    1. This value is implemented on the machine and maintained in the vRA db. However its not updated in the vRA db when it changes on the machine.
    2. Examples include:
      1. VirtualMachine.Admin.AddOwnerToAdmins – if set to True, owner of the VM added automatically to the local admins group but when revoked, not updated on the vRA db to False (therefore if reprovisioned, the user will be added to the Admins group again)
      2. Hostname (clone)
      3. VirtualMachine.Admin.ClusterName
      4. VirtualMachine.Admin.ThinProvision
      5. VMware.Memory.Reservation
      6. VMware.VirtualCenter.Folder
      7. VMware.VirtualCenter.OperatingSystem
  4. Update
    1. The specified valye is omplemen ted on the machne and is maintained in the vRA db thoughout via data collection when it changes on the machine / virtualisation platform / outside of the vRA. This update is performed by the proxy agent.
    2. Examples include:
      1. VirtualMachine.Admin.Hostname (clone)
      2. VirtualMachine.Admin.TotalDiskUsage
      3. VirtualMachine.Memory.Size
      4. VirtualMachine.Admin.CPU.Count

There are many built in custom properties that belong to these categories and additional custom properties should NOT be created with the same names. The full list of built in custom properties available within vRA 6.2.x are available here.

Build Profiles

Build profile is a collection of properties to be applied to a machine when its provisioned. Built profiles are always read during the machine building process. Build profile provides the ability to group a set of properties so that rather than adding a multiple set of properties to each blueprint, a single build profile can be associated saving time & effort. Build profiles can be created from using default property sets of custom properties (mentioned above). There a number of default property sets that vRA 6.2.1 ships with such as ActiveDirectoryCleanupPlugin. (When you login to vRA portal as the Fabric Administrator and go to Infrastructure->Blueprints->Build profiles, you can see the full list when trying to add a new build profile). Note that build profiles are only applied to blueprints.

Creating a Build profile

  1. Login as Fabric Administrator and go to Infrastructure->Blueprints->Build profiles
  2. Create a new build profile and provide a name. I’m creating a build profile to peform AD cleanup tasks when a computer is retired / destroyed.
  3. Select from the default property set if applicable. Since we already have a default property set for AD cleanup (called ActiveDirectoryCleanupPlugin), im going to be using that here. Select the property set and click load to load the relevant custom properties
  4. Provide the information required for each custom property including the AD user account & passwords with rights to remove computer accounts Build Profiles
  5. Login as Tenant Admin and edit an appropriate blueprint for provisioning a Windows VM that is joined to the domain during the provisioning process and apply the build profile. Associate build profile with BP

That’s it. Every time a VM created using this blueprint is removed / destroyed via vRA (by the user or an administrator), the computer account would now be removed from the AD too. (note that this won’t happen if the VM is removed outside of the vRA management platform, such as directly on the vSphere client.

 Property Dictionary

Property dictionary within vRA is used in tandem with the custom properties and is typically used to achieve the followings.

  • Define characteristics of properties that are used to tailor the behavior of the request user interface
  • Associate a property name with a particular user control, such as a check box, a calendar control, or a drop-down menu
  • Specify constraints such as minimum and maximum values or validation against a regular expression
  • Provide descriptive display names for properties or specify text (for a tool tip or text label) with additional information
  • Designate a property as optional rather than required

Note that property names and values are case sensitive…..!!

Here are different types of property dictionary types available within vRA.

  • Checkbox – Check box for specifying true or false values
    • Example Configuration
      • Create a property dictionary as the fabric admin as follows  CheckBox 1
      • Now attach the property dictionary as a custom property to the blueprint as follows CheckBox 2
      • When you now attempt to provision a machine using the above blueprint, you can see that the defined property dictionary is available (checkbox in this instance)   CheckBox 3
      • Obviously the above example is practically meaningless as the intention was to show how to add a checkbox, not to actually use it for a meaningful purpose. But additional logic can be built in to this checkbox such that if selected, it could perform some additional action during the machine provisioning.
  • DateTimeEdit
    • Can add a date & time edit field to the blueprint
  • DropDown
    • Can add a drop down menu. As an example use case, you can define multiple tiers of storage (Gold, Silver & Bronze) within a drop down list and upon a user selecting the appropriate value from this drop down list during the machine provisioning, the VM can files can be placed automatically on the correct storage tier
  • Integer
    • Defines an integer value
  • Label
    • Provide a label value
  • Link
    • Provide a link. An example would be to direct the user to a 3rd party page where corporate IT policy details are specified which each user requesting a machine provisioning must first read and accept prior to continuing with requesting a machine being provisioned from a blueprint.
  • Notes
    • Notes filed
  • Password
    • Password field
  • TextBox
    • Text box

Now lets take a look at using some of the property dictionary types in a real world scenario.

  • Requirement:
    • You need to enable the business group users who request machine provisioning (using a blueprint) to select the type of the server they are provisioning (Web, App or DB) and depending on the type of the server selected, automatically list all the compatible VM networks available for that server (App-Network-1, App-Network-2 for App VMs, Web-Network-1, Web-Network-2 for Web VMs & DB-Network-1, DB-Network-2 for DB VMs) so that the appropriate network can be selected during the machine provisioning.
  • How to implement using property dictionaries
    1. Login as Fabric-Admin and go to Infrastructure-Blueprint->Property Dictionary and create a property definition called Custom.VM.Category (this could be any name you wish as long as it doesn’t conflict with any of the default custom properties). Select the control type for this property as DropDownList and select required. EX-1
    2. Once created (and the green tic is clicked to complete), click on the edit link under property attribute and create a new property attribute as type ValueList and type the values as Web,App,DB (no spaces in between. Note that these values are case sensitive)   EX-2
    3. Now create another property definition called Custom.VM.Network0 (again, can be any name here as long as there are no conflicts) and select the type as a DropDownList EX-3
    4. Now create an XML file using an XML editor (such as the free XML copy editor) similar to the below, defining the relationship between the 2 property definitions. I’ve attached a link to the file I’ve  created here which you can download. Ensure that you always edit this in an XML editor and not the notepad as due to line breaks & whitespace issues, it will just not work if you copy / paste content within the notepad). Pay attention to the details such as <FilterName> tag which defines the parent property definition name, <FileValue> which defines the parent value (App, Web or DB) and the <Value> which defines the appropriate child value (App/Web/DB-Network-1/2. This XML definition fully defines the relationship between the parent and child properties.  EX-3.5
    5. Now copy the content of this XML definition (from the XML editor, NOT the notepad), go to the property attribute created in the step 3 above (Custom.VM.Network0) and click on the edit button under the property attributes. Create a new property attribute and select type as value expression and paste the XML definition here. Once complete, click the green tic and click ok.         EX-4
    6. Now, create another property attribute here as type relationship and set the value as Custom.VM.Category (Name of the parent property definition created above in step 1) EX-5
    7. Now, add both property definitions as custom properties to a blueprint as follows. EX-6
    8. When you now attempt to provision a machine from this blueprint as a user, you can see that you are bing prompted to select a VM category first (where you have 3 options, Web, App or DB) and depending on which one you choose, the next VM Networks field presents you with the relevant network names to select from. EX-7 EX-8
    9. It should be noted that by selecting the appropriate VM network in above example, it will not automatically connect the machine / VM to that network you select (if that is required, additional work is required including a vRO workflow type of customisation to take the value selected here and match that to a network label available and map the VM’s primary vNIC to it. That is obviously not show in the example here).


There you have it. Custom properties, property dictionaries can be used together to achieve various level of customisation work when defining blueprints and build profiles can be used to group multiple custom properties all together as one, to be attached to blueprints.

Hope this was useful

Cheers

Chan

Next: (Optional) – vRA Part 10 – IaaS Extensibility – Using vRO for Blueprint Customization –>

VMware vRealize Automation – (Optional Fix) Missing Catalog / Entitlement Actions on vRA 6.2.x


I came across this weird issue on vRA 6.2.1 where, during the IaaS blueprint creation, most of the actions that should be available (such as “power on”, “Reboot”, “Suspend”…etc.) were not available to be allocated to catalog items (blueprints & services). All of these actions are supposed to be IaaS catalog actions that are available by default once the IaaS components have been deployed, that you can assign to business groups / users when blueprints / catalog items are entitled to users, so that once a vm / server has been provisioned from the said blueprints, those actions are available to the users to interact with the vm / server, through the vRA web portal. If you had this issue, when you login to the vRA portal with tenant administrator privileges, all the actions shown below where the source is listed as IaaS were missing (Everything outside of the highlighted actions below were missing)

Capture

This has always been a known issue with previous versions of vCAC where the recommended fix was to run the following command on the IaaS web server, as an administrator.

C:\Program Files (x86)\VMware\vCAC\Server\Model Manager Data\Cafe\Vcac-Config.exe registercatalogtypes -v

However, with vRA 6.2.x platform (specifically, version 6.2.1), I found that this command alone wouldn’t fix the problem. In my environment, running the above command comes back as succeeded but the actions were still not available. Having raised a VMware support ticket, it turned out that the SAML Token Validation Check (enforced through a configuration line item in C:\Program Files (x86)\VMware\vCAC\Web API\Web.Config file on the IaaS server) is also failing which needs to be fixed as well. If you have the same issue of missing actions in your vRA setup and running the above command doesn’t fix the issue on the vRA 6.2 platform, check the C:\Program Files (x86)\VMware\vCAC\Web API\Logs\Elmah directory on the IaaS server and check if you can see a number of XML files as follows

Elmah XMl

If you see them, open the most recent one up and check for the lines highlighted below

XML content

If this is the case, this is a known issue with regards to the vRA 6.2 platform, internally within VMware and currently there is no specific KB article related to this. From what I found out through VMware support, the issue is caused by vRA sending a signature that is using an algorithm not compatible wit the .Net code on the IaaS server and the error is seen in the Elmah XML file (above), that states “System.Security.Cryptography.CryptographicException: SignatureDescription could not be created for the signature algorithm supplied“.  While a formal fix is likely going to be included in a future release, currently there’s only a workaround available which is to amend the web.Config file to disable SAML Token validation Check. Heres what you need to do.

  1. Go to the IaaS web server as an Administrator and backup the current C:\Program Files (x86)\VMware\vCAC\Web API\Web.Config file (I’d cope & rename this as Web.Config.Backup
  2. Open notepad as Administrator and open the original Web.Config and replace the <!– add key=”DisableSAMLTokenSignatureCheck” value=”false”–> with <add key=”DisableSAMLTokenSignatureCheck” value=”true”/>
  3. Once replaced, the new Web.Config file should be as follows. Web.Conf
  4. Now run iisreset to restart IIS and ensure all the vRA services are started back up correctly
  5. Now (re) run the following command, as an administrator
    1. C:\Program Files (x86)\VMware\vCAC\Server\Model Manager Data\Cafe\Vcac-Config.exe registercatalogtypes -v
  6. You will now see the missing actions being available on the vRA to be assigned to the catalog items.

Hope this was useful

Cheers

Chan

Next: (Optional) vRA Part 8 – Adding a VMware vCloud Air Endpoint & Publishing a Cloud VM Blueprint –>

VMware vRealize Automation Part 8 – Adding a VMware vCloud Air Endpoint & Publishing a Cloud VM Blueprint


So now we have a fully functioning vRA 6.2.1 deployment, fully integrated to the on-premise vCenter instance, the vRO appliance for workflow orchestration and NSx for network orchestration (via vRO). Now lets look at how to set up a cloud endpoint so that you (or the users) can request VM’s to be provisioned on the cloud rather than their local vSphere cluster. We are looking at adding VMware’s own vCloud Air platform in this article (if I managed to gain access to an Amazon AWS instance, I’d publish a future post on that too as each cloud platform integration is different to one another.

VMware vCloud Air (formally known as vCHS) is VMware’s own managed and operated cloud platform, that runs on the same vSphere technology as your on-premise environment. They have a vCloud Director instance in front, which manages the multi tenancy aspect of a collection of vSphere clusters which you can either buy a subscription as an on demand basis (similar to AWS) or monthly / annual subscription basis (with no usage charges which is real handy). vCloud Air has been around a while now and is quite popular given that you don’t have to change the architecture of your on-premise applications or servers (VMs) that they are installed on to move them to the cloud (which is the case with both Amazon and Azure and could be painful and expensive). With vCloud Air, you just move the whole VM as is with the application already deployed on it and it will work fine on vCloud Air platform just like it did on your own vSphere cluster (You also have the option to do a “Stretched deployment” which is a way of  moving the VM to the cloud but establishing a Layer 2 network between your vSphere cluster and vCloud platform over a VPN so no IP’s need changing which is awesome).

Just like AWS, vCloud Air (as well as any other 3rd party cloud provider who runs their cloud platform behind vCloud Director basically) can be integrated to your on-premise vRA instance as an endpoint. Imaging that you have a number of developers who, as a part of an application development cycle, would require multiple copies of your production environment (System Integration Testing, User Acceptance Testing…etc.) can easily be offloaded on to a vCloud Air platform without having to buy expensive kit locally to host multiple copies of your prod environment (we are talking additional SAN, Compute, Hypervisor & Networking costs here). Lets also imaging that they want to be able to use vRA so that they can self provision clones / copies of the production environment using pre-defined blueprints defined & published on the vRA IaaS catalog portal? You can quite easily make this happen and attach a vCloud Air endpoint, create a resource reservation on that endpoint and associate that with the business group that the developers belong to and create vCloud (vApp) type blueprints on vRA so that everytime a developer want to create a copy of that SQL server with 2 x App and 2 x Web servers to test a new application, they go to the vRA catalog, request those be provisioned and the servers will automatically be created on the mapped vCloud Air platform. (You can create a single Multi-Machine blueprint to group all of those individual server blueprints too which we’ll cover later)

Ok, enough of what we can do with vRA and vCloud Air and how cool that is… Lets look at what it takes to integrate the vCloud Air subscription you have to vRA and create and publish a vCloud blueprint & provision a VM on cloud that way.

Given below are the steps involved

  1. Create a vCloud Air (vCloud Director) endpoint
    1. Note: If you can remember what we covered in a previous post here, Infrastructure Admins usually create the endpoints within vRA. So login to the vRA portal using as the infrastructure admin (if you are using the default tenant, the URL is “https://<FQDN of the vRA Appliance>/shell-ui-app”. If you have a tenant specified, it’ll be https://<FQDN of the vRA Appliance>/shell-ui-app/org/<TenantName>”. I’m using a tenant called Tenant1 in my example within vRA)
    2. Go to Infrastructure->Endpoints->Credentials and set up credentials to access the vCloud Air endpoint – this is the same username & password you use to login to the vCloud Air online portal that you should have been given / created during the vCloud Air onboarding process (first thing that happens once you’ve signed up)  01
    3. Go to Infrastructure->Endpoints-> and create a new vApp (vCloud) type endpoint (this is the same as if you were creating an endpoint to a local vCloud Director instance)   02
    4. Once the endpoint is created, hover the mouse over the endpoint name and select the data collection and start the collection. You need to wait for this to complete first.
  2. Create a new Fabric group (Infrastructure Admin)
    1. Go to Infrastructure->Groups->Fabric groups and create a new Fabric Group (or you can use an existing fabric group and map the vCloud Air endpoint to it. 1
  3. Create a reservation for the vCloud Air endpoint (Fabric Admin)
    1. Note: Creating a reservation maps a logical portion of the vCloud Air endpoint to the business groups you have. I’m using an existing business group but if you need to create a new business group, do that first and select that business group during the reservation creation here.
    2. Go to Infrastructure->Reservation and create a new cloud reservation of type vApp (vCloud), as Fabric Admin user, selecting the mapped endpoint and the business group 2.1
    3. Go to the Resources tab and select a memory portion and storage portion to be used for this reservation 2.2Reservation-Resources
    4. Go to the Network tab and select the network you want to map to the reservation. Networks available here depends on the networks you’ve created within your vCloud Air portal. By default, you’ll have 2 networks, the default-isolated (private network) and default-routed (network with external connectivity) – Note here that at some point in the future, VMware will roll out NSX on the vCloud Air platform and once that’s complete, you’d also be able to create the logical networking via the same vRA / vCO blueprint too. This is going to be really cool and I don’t think any other public cloud vendor will have this capability for a while. If you have a network profile with static IP’s configured, select that network profile here which will allocate an IP to the VM from the network profile (which we covered in a previous post of the series). I’m not using a one here. 2.3
  4. Create & Publish vApp Component Blueprint (Tenant Admin)
    1. Note: When creating vCloud Air blueprints, its a 2 step process whereby you need to create a vApp Component blueprint first for each VM and then create a higher level master (group) vApp blueprint which will contain 1 or more of the lower level vApp Component blueprints. This is because on vCD (vCloud Director), every VM is placed inside a vApp so you need to create both through the vRA. But when you ultimately create the service & publish it with entitlements to the users, you only need to publish the master vApp blueprint.
    2. Login as tenant admin & go to Infrastructure->Blueprints and create a new cloud blueprint of type vApp Component (vCloud). Provide a name and select the Machine prefix 3.1vApp Component blueprint - info
    3. Go to build information tab and select the cloning action and select the template (you can select from a list of VM templates available within vCloud Air here provided that the data collection from the endpoint has been successful. You have a default set of global templates VMware provides (include CentOS, Ubuntu, Major Windows flavours with SQL) or if you’ve migrated some of your local templates you’ve created, that is specific to your environment (i.e. a Standard server build template from your local vSphere cluster which you can do using vCloud Connector to the vCloud Air portal), they too would appear here. And select the machine resources appropriate. 3.2vApp Component blueprint - Build info
    4. Add any custom properties in the next tab  and click OK.  3.3 vApp Component Blueprint - Properties
    5. Once the vApp Component blueprint is created, don’t forget to publish it (hover the mouse over the blueprint and click publish).  3.4vApp Component blueprint - Publish
  5. Create & Publish a vApp Blueprint (Tenant Admin)
    1. Note: now its the time to create the master vApp blueprint (which, as I explained above, is going to include the component blueprint and which will be published to users)
    2. Create a new cloud blueprint of type vApp (vCloud) and provide the information. Select the same reservation as used for the vApp component blueprint. 4.1vApp blueprint - Build info
    3. Go to the build information tab and select the clone action, and the clone from template should be the same as what you’ve chosen for the component blueprint. Then, nder the components, select the previously created component blueprint to link the child to the parent. 4.2vApp blueprint - Build info
    4. Once completed, don’t forget to publish this one too. 4.3vApp blueprint - Publish
    5. Create a Service to list the blueprint within the catalog (Tenant Admin)
      1. Go to Administration->Catalog Management->Services and add a service and provide all the information required including an icon, owner & support group details. 5.1 Service
      2. Select the service create and click on manage Catalog Items and add the vApp blueprint. Make sure you don’t add the vApp component blueprint here. 5.2 Service Catalog items
    6. Create Entitlements (Tenant Admin)
      1. Go to Entitlements and add a new entitlement and set the status to active. Also select the users / groups (from the business group) that this blueprint is entitled to. 6.1 Entitlements
      2. Go to the Items & Approvals tab and select the created service under entitled services & the same vApp blueprint under the catalog items and all relevant user actions. 6.2 Entitlements - items & Approvals


That’s it. You’ve now successfully created a public cloud endpoint within your on-premise vRA, and created and published a VM blueprint that can be used to deploy VM’s on the cloud automatically by your users.

If you now login to the same vRA URL as a valid user who were given the appropriate entitlements above, you’ll see the new blueprint item being available.

7. Catalog items

If you go ahead and request a VM using this cloud blueprint, the request status would be shown under the requests tab 8 Provisioning request on vCloud Air

If you now look directly at the vCloud Air online management portal, you’ll see the VM is being provisioned automatically. Once its complete, you’ll notice the owners name changes.9. Being provisioned in vCloud Air portal automatically 10 Provisoning complete

Once the VM is successfully provisioned in the cloud, the user will also see the status of that within the on-premise vRA portal which they can either access through vRA (console access) or though the vCloud Air online management portal directly (provided that they have a valid user account to login with – note that this account is separate. 11 Item now available on vRA

There you have it. VMware vRA can be a single point of automation and orchestration engine to automate and orchestrate various tasks, machine / VM provisioning on-premise as well as VM provisioning on the cloud. And this shows how vRA can be a key part of what I believe to be the true hybrid cloud infrastructure where you can place workloads on-premise or off premise based on your needs.

If your on-premise vRO is integrated with vCloud Air also, you can create further customisation workflows within vRO and publish them on vRA as an advanced service blueprint too (I will cover that in a future post)

Cheers

Chan

Next: (Optional) – vRA Part 9 – Extensibility – Custom Properties & Build Profiles & Property Dictionary –>

VMware vRealize Automation Part 7 – Tenant Administrator & Basic Blueprints


Now that we’ve got all the system-wide roles (System / Infrastructure & Fabric Admin) fully configured and each user has done their configuration tasks, next in the to-do-list is the configuration items to be performed by the Tenant Administrator. We wont be looking at everything a Tenant Admin can do here, but only focus on key items relating to blueprints.

First of all, lets briefly look at the Tenant Administrator role (note that the System Administrator assigned the Tenant Administrator role during a previous stage mentioned here)

Tenant Administrator is a key user that is typically a business manager or an IT administrator who is responsible for a tenant who configure vRA according to the needs of the company. He / She is responsible for the followings primarily,

  • Manages and configures the tenant
  • Manages the users and groups (within the tenant)
  • Manages catalog services
  • Creates approval policies & entitlements
  • Manage tenant brandings
  • Manage business groups within the tenant
  • Tracking resource usage by all tenant users
  • Create & manage global (shared) blueprints

Key Tenant Admin tasks

  1. Tenant Configuration Tasks
    1. Configure Identity Stores – This should have already been done at an earlier stage by the System Admin
    2. Configure custom groups
      1. Configure Custom groups (approval Administrator / Release Dashboard user / Release engineer / Release manager & Service architect roles
        and map them to AD users / groups   121
    3. Configure Identity store users such as business group admins, business group users and support users and configure additional privileges to these users (Administration->Users&Groups->Identity Store Users & Groups)
    4. Configure Tenant branding if this is required (Administration->Branding)
    5. Configure notification providers such as email servers to be used within the Tenant for the approval notifications via Administration->Notification->Email servers (I’m not doing this here)
    6. Create Business groups (We’ve already created a business group earlier as Tenant Admin user)
  2. Create & Publish IaaS blueprints
    1. Create an IaaS blueprint
      1. Notes:
        1. We’ll create a simple VM provisioning blueprint here using a CentOS 6.6 template & a customization specification (both need to have been pre-created and be registered in the compute / production cluster vCenter server)
        2. We will be using a basic cloning as the provisioning method (linked cloning and NetApp FlexClone options are also available)
      2. Go to Infrastructure->Blueprints and use new blueprint button to create a new virtual vSphere blueprint and fill out the basic Blueprint information 212
      3. Go to the build information tab and select the appropriate options (as below) 213
        1. You can use custom properties to achieve various functions. A full list of available all custom properties are available here and a list of specific custom properties applicable for a cloning blueprint (similar to what we are creating here) are available here.
        2. Some key, useful custom properties are as follows
          1.  Snapshot.Policy.Limit = <Depth of Snapshot limit. Default is 1, max is 31>
          2. Snapshot.Policy.AgeLimit = <Snapshot age limit in days. Default is no limit>
          3. VirtualMachine.Admin.ThinProvision = True/False (Applicable for VMware & Hyper-V using local or iSCSI storage)
          4. VMware.VirtualCenter.Folder = <Folder to place the VMs within vCenter>
          5. VirtualMachine.Admin.Owner=
          6. VirtualMachine.Admin.AddOwnerToAdmins=True
          7. VirtualMachine.Admin.AllowLogin=True
          8. VirtualMachine.Network0.Address=<IP address for Network 0>
          9. VirtualMachine.NetworkN.MacAddressType=generated/static
          10. VirtualMachine.NetworkN.MacAddress=<MAC Address>
          11. VirtualMachine.NetworkN.Name=<VMNetworkName>
          12. Machine.SSH=True
      4. We will cover the Build profiles and custom properties section separately 214
      5. Select the Actions that would be made available within the Blueprint definition (so they’d be available as entitlement actions to assigned users)   215
      6. Now we have the first basic blueprint definition created successfully.
    2. Publish the IaaS blueprint
      1. Hover the mouse over the created blueprint and select publish & click Ok to confirm. 221
    3. Create a service
      1. In order for a published blueprint to be made available on a catalog to the users, a service need to be created and the blueprint must be associated with that service
      2. Go to Administration->Catalog management -> Services and add a new service, populate the information required and add.   232
      3. Associate the blueprint with the service by selecting the service created and click on “manage catalog items” 233
      4. Add a catalog item and select the previously created blueprint 234
    4. You can create approval policies if required next(Administration->Approval Policies). I’m opting to not create approval policies and instead opt for no approvals.
    5. Create Entitlements
      1. Once a blueprint is created, and has been associated within a service, it (the service) need to be given entitlements. In other words, the service needs to be mapped to a user / group to be given access so that they can request a VM to be provisioned from this service / blueprint.
      2. Go to Administration->Catalog management->Entitlements and add a new entitlement. Provide a name for the entitlement (note: To avoid confusion, if the relationship between a blueprint:service:entilement is a 1:1:1, I keep the name identical for all 3 to keep thins simple and related) and select the AD groups / users that this blueprint / service is made available for within the online catalog. Click next 252
      3. Add the entitled services (created above), Catalog item (blueprint created above) and the appropriate entitled actions.
        1. Note: if the VM actions are not fully populated within the entitlements section, on the IaaS server host, navigate to “C:\Program Files (x86)\VMware\vCAC\Server\Model Manager Data\Café” folder from command line and run “Vcac-Config.exe” registercatalogtypes –v”253
      4. Once added, the entitlements are complete 254
  3. User request through the catalog
    1. All tasks required to make the blueprint listed on an IaaS catalog are now complete and the entitled users can now request a machine provisioning based on this blueprint through the portal
    2. Login to the vRA portal (URL “https://<FQDN of the vRA Appliance>/shell-ui-app” if using the default tenant) using the appropriate business group user (bg-user in our example based on the entitlements we set above) and you’ll see the CentOS 6.6 server is now available in the users catalog.    32
    3. Request a VM to be provisioned off of this catalog item.    33
    4. All submitted requests can be tracked within the requests tab. 34
    5. You can see the cloning task initiated by the vRA service account within vSphere client / web client. Note that there may be a slight delay before this is executed on the vCenter after being submitted via vRA. Note that the default custom properties set for the business group (explained in the previous post of this series) dictated where the VM is created within the vCenter folder hierarchy & the name of the VM is automatically based on the default machine prefix attached to the business group (also created earlier) 35
    6. Once successfully created, the item will appear under the “Items” tab within the vRA IaaS portal for the user to access based on the entitled actions previously defined.   36

That’s basically it. This effectively now concludes the basic deployment tasks I’ve intended to cover as the typical deployment & configuration tasks you’d have to do in the field to deploy vRA 6.2.1 along with vRO 6.0.1 and NSX 6.1.x all fully integrated for extensibility. Hopefully this series of posts gave you a summarized view of all the initial tasks that you’d need to do, in the exact order they need to be done, including any undocumented little quarks I’ve come across that potentially could have cost you some troubleshooting time in the field. Hope this was of use to some. I know I will refer back to this in the future for my own benefit.

I would appreciate any feedback

Cheers

Chan


P.S. While this post concludes the series of posts formally, I will continue to provide additional vRA articles for further extensibility where we will look at more extensibility options to leverage vCO workflows during the provisioning stage to achieve various results and creating custom actions, advanced service blueprints, using vRA for publishing non IaaS functions such as AD password resets…etc. However they are not really mandatory for a typical vRA deployment and would only be required depending on the end user’s needs.


Next: (Optional Fix) Missing Catalog / Entitlement Actions on vRA 6.2.x –>

VMware NSX Upgrade from 6.1.2 to 6.1.3

OK, I’ve had NSX 6.1.2 deployed in my lab, simulating a complex enterprise environment and the DLR (Distributed Logical Routers) kept on causing numerous issues (one of which I’ve blogged about in a previous article here). Anyways, VMware support has requested that I upgrade to the latest NSX version 6.1.3 which is supposed to have fixed most of the issues I’ve been encountering so I’ve decided to upgrade my environment and thought I’d write a blog about it too, especially since there aren’t very many precise NSX related documentation out there.

Note that despite the title of this article (upgrading 6.1.2 to 6.1.3), these steps are also applicable to upgrading from any NSX 6.0.x version to 6.1.x version.

High level steps involved

  1. First thing to do is to check for compatibility and I have vSphere 5.5 which is fully supported with NSX 6.1.3 as per the compatibility Matrix here.
  2. Then have a look at the 6.1.3 release notes to make sure you are up to date with what’s fixed (not all the fixes are listed here btw), what are the known issues…etc. That is available right here.
  3. Next thing is to download the upgrade media from the NSX / Nicira portal. If you have an active NSX subscription, you may download it from My VMware portal or else, (if you have taken the course and were deemed to be suitable to have access to the eval, you can download it from Nicira portal here. Once you’ve downloaded the Nicira upgrade media (VMware-NSX-Manager-upgrade-bundle-6.1.3-2591148.tar.gz file), you may also download the install & upgrade guide here.(Note that there don’t appear to be a separate set of documentation for 6.1.3 as it appears to be for the whole 6.1.x platform).
  4. If you are upgrading vSphere to v6.0 also at the same time, follow the steps below
    1. Upgrade NSX Manager and all NSX components to 6.1.3 in the following order.
      1. NSX Manager
      2. NSX controller(s)
      3. Clusters and Logical Switches
      4. NSX Edge
      5. Guest Introspection and Data Security
    2. Upgrade vCenter Server to 6.0.
    3. Upgrade ESXi to 6.0. – When the hosts boot up, NSX Manager pushes the ESXi 6.0 VIBs to the hosts. When the hosts show reboot required on the Hosts and Clusters tab in the left hand side of the vSphere Web Client, reboot the hosts a second time.  NSX VIBs for ESXi 6.0 are now enabled.
  5. If you are not upgrading vSphere at the same time (this is the case for me), follow the step below
    1. Upgrade NSX Manager and all NSX components to 6.1.3 in the following order.
      1. NSX Manager
      2. NSX controller(s)
      3. Clusters and Logical Switches
      4. NSX Edge
      5. Guest Introspection and Data Security

Now lets look at the actual upgrade process of NSX

NSX Upgrade steps

  1. NSX Manager Upgrade
    1. I don’t have Data security deployed. If you did, uninstall it first
    2. Snapshot the NSX Manager virtual appliance (as a precaution)
    3. Login to the NSX manager interface and go to the upgrade tab. Click on the upgrade button on top right and select the previously downloaded VMware-NSX-Manager-upgrade-bundle-6.1.3-2591148.tar.gz file & continue.          1.3
    4. Select to enable SSH and click upgrade.                                                           1.4
    5. Upgrade of the NSX Manager appliance will now start.       1.5
    6. Once the upgrade completes, the appliance will automatically reboot (this is not so obvious unless you look at the console of the appliance). Once rebooted, login to the NSX manager instance and confirm the version details (Top right).    1.6
  2. NSX controller(s) Upgrade
    1. Notes
      1. Upgrades are done at cluster level and would appear with an upgrade link in NSX manager.
      2. It’s recommended that no new VM’s are provisioned, no VMs are moved (manually or via DRS) during the controller upgrade
    2. Backup controller data by taking a snapshot
      1. If the existing NSX version is < 6.1, This has to be done using a REST API call
      2. If the existing NSX version is => 6.1, you can do this using the GUI of the web client as follows 2.2.2
    3. Login to the Web client, and go to the Networking & Security -> Installation and click on upgrade available link as shown below 2.3
    4. You’ll now see the upgrade being in progress (may ask you to reload the web client). Controller(s) will reboot during the upgrade 2.4
    5. The upgrade should complete within 30 mins normally. If not completed by then, upgrade may need to be launched using the upgrade available link again. Once successful, the upgrade status should state upgraded and the software version should be updated with the new build number. Note that if the upgrade status says failed, be sure to refresh the web client prior to assuming that its actually failed. It may state its failed due to the 30 standard timeout even though the controller upgrade has completed successfully (happened to me couple of times) 2.5
  3. Clusters and Logical Switches
    1. Go to the host preparation tab and click update                           3.1
    2. Installation and upgrade guide states that each host will automatically be put in to the maintenance mode & rebooted. If the upgrade failed with a Not ready status for each node, you may need to click resolve each time to retry (happened o me once) and it will proceed. Some host may require manual evacuation of VM’s too. Also worth noting that if you keep getting the task “DRS recommends hosts to evacuate” logged in vSphere client, you may want to temporarily disable HA so that the ESXi host can be put in maintenance mode by the NSX cluster installer (Arguably, in a well managed cluster, this should not happen).    3.2
    3. When the cluster is updated, the Installation Status column displays the software version that you have updated to.    3.3
  4. NSX Edge (Including the Distributed Logic Router instances)
    1. Go to the NSX Edges section and for each instance, select the Upgrade Versions option from the Actions menu.   4.1
    2. once the upgrade is complete, it will show the new version of the Edge device, weather that’s a DLR or an Edge gateway device.   4.2
  5. Guest Introspection and Data Security
    1. Upgrading these components are relatively straight forward and I’d encourage you to look at the install & upgrade guide…
  6. Now, create a NSX backup (You may already have routine backup scheduled on the NSX manager)
  7. If all is well, remove the snapshot created earlier, on the NSX manager appliance.


All in all, it was a fairly straight forward upgrade but the time it took due to somewhat finicky nature of some of the components (especially the cluster upgrade where a number of manual retries were required) unnecessarily added time. Other than that, all appears to be well in my NSX deployment.

Cheers

Chan