Next Article: ->
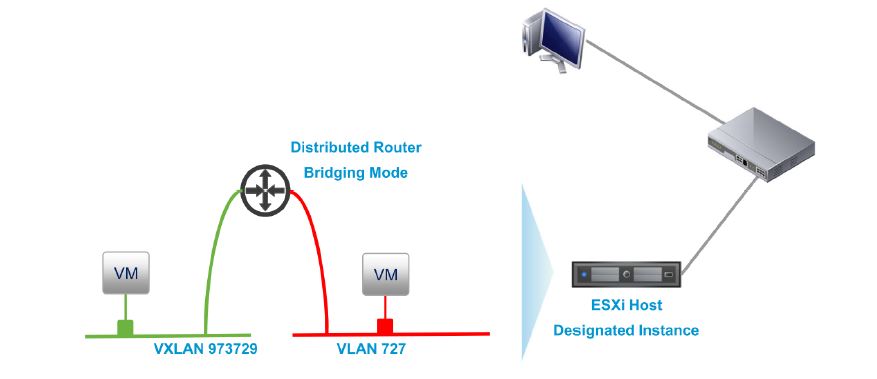
NSX L2 bridging is used to bridge a VXLAN to a VLAN to enable direct Ethernet connectivity between VMs in a logical switch, or a distributed dvPG (or between VMs and physical devices through an uplink to the external physical network). This provides direct L2 connectivity rather than L3 routed connectivity which could have been achieved via attaching the VXLAN network on to an internal interface of the DLR and also attaching the VLAN tagged port group to another interface to route traffic. While the use cases of this may be limited, it can be handy during P2V migrations where direct L2 access from the physical network to the VM network is required.  Given below are some key points to note during design.
- L2 bridging is enabled in a DLR using the “Bridging” tab (DLR is a pre-requisite)
- Only VXLAN and VLAN bridging is supported (no VLAN & VLAN or VXLAN & VXLAN bridging)
- All participants of the VXLAN and VLAN bridge must be in the same datacentre
- Once configured on the DLR, the actual bridging takes place on the specific ESXi server, designated as the bridge instance (usually the host where DLR control VM runs).
- If the ESXi host acting as the bridge instance fails, NSX controller will move the role to a different server and pushes a copy of the MAC table to the new bridge instance to keep it synchronised.
- L2 bridging and distributed routing cannot be enabled on the same logic switch at present (meaning, the VMs attached to the logical switch cannot use the DLR as the default gateway)
- Bridge instances are limited to the throughput of a single ESXi server.
- Since, for each bridge, the bridging happens in a single ESXi server, all the related traffic are hair-pinned to that server
- Therefore, if deploying multiple bridges, its better to use multiple DLR’s where the control VM’s are spread across multiple ESXi servers to get aggregate throughput from multiple bridge instances
- VXLAN & VLAN port groups must be on the same distributed virtual switch
- Bridging to a VLAN id of 0 is NOT supported (similar to an uplink interface not being able to be mapped to a dvPG with no VLAN tag)
- Given below is an illustration of the packet flow, during an ARP request from the VXLAN to a physical device
![RP-VXLAN to physical]](http://chansblog.com/wp-content/uploads/2015/03/RP-VXLAN-to-physical-1024x642.jpg)
- 1. The ARP request from VM1 comes to the ESXi host with the IP address of a host on the physical network
- 2. The ESXi host does not know the destination MAC address. So the ESXi host contacts NSX Controller to find the destination MAC address
- 3. The NSX Controller instance is unaware of the MAC address. So the ESXi host sends a broadcast to the VXLAN segment 5001
- 4. All ESXi hosts on the VXLAN segment receive the broadcast and forward it up to their virtual machines
- 5. VM2 receives the request because it is a broadcast and disregards the frame and drops it. 6. The designated instance receives the broadcast
- 7. The designated instance forwards the broadcast to VLAN 100 on the physical network
- 8. The physical switch receives the broadcast on the VLAN 100 and forwards it out to all ports on VLAN 100 including the desired destination device.
- 9. The Physical server responds
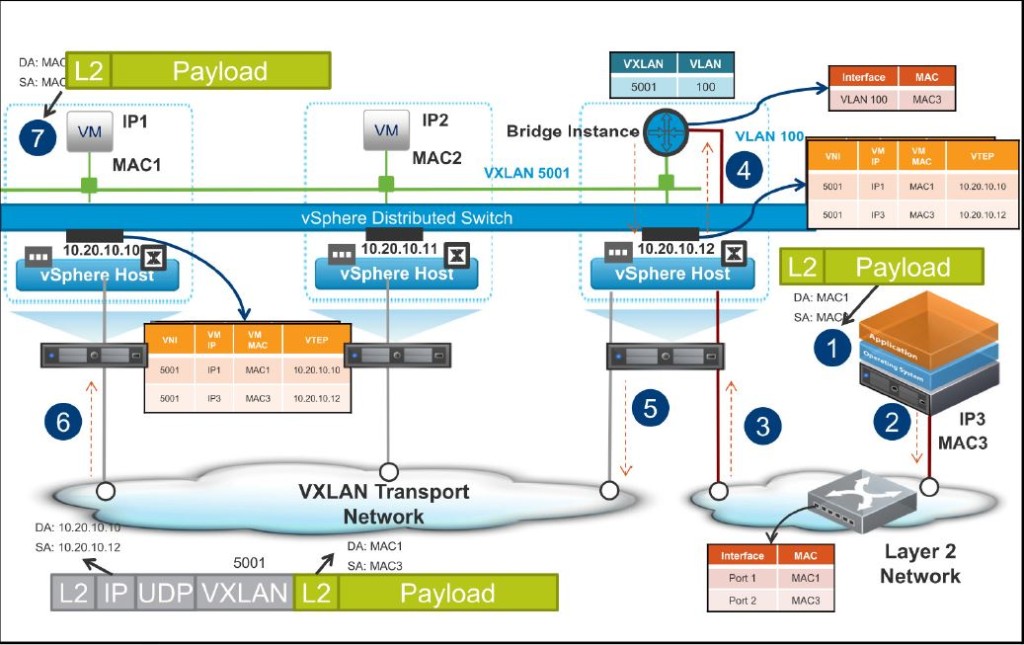
- Given below is an illustration of the packet flow, during the ARP response to the above, from the physical device in the VLAN to the VM in the VXLAN

- 1. The physical host creates an ARP response for the machine. The source MAC address is the physical host’s MAC and the destination MAC is the virtual machine’s MAC address
- 2. The physical host puts the frame on the wire
- 3. The physical switch sends the packet out of the port where the ARP request originated
- 4. The frame is received by the bridge instance
- 5. The bridge instance examines the MAC address table, sends the packet to the VNI that contains the virtual machine’s MAC address, and sends the frame. The bridge instance also stores the MAC address of the physical server in the MAC address table
- 6. The ESXi host receives the frame and stores the MAC address of the physical server in its own local MAC address table.
- 7. The virtual machine receives the frame
- Given below is an illustration of the packet flow, from the VM to the physical server / device, after the initial ARP request is resolved (above)

- 1. The virtual machine sends a packet destined for the physical server
- 2. The ESXi host locates the destination MAC address in its MAC address table
- 3. The ESXi host sends the traffic to the bridge instance
- 4. The bridge instance receives the packet and locates the destination MAC address
- 5. The bridge instance forwards the packet to the physical network
- 6. The switch on the physical server receives the traffic and forwards the traffic to the physical host.
- 7. The physical host receives the traffic.
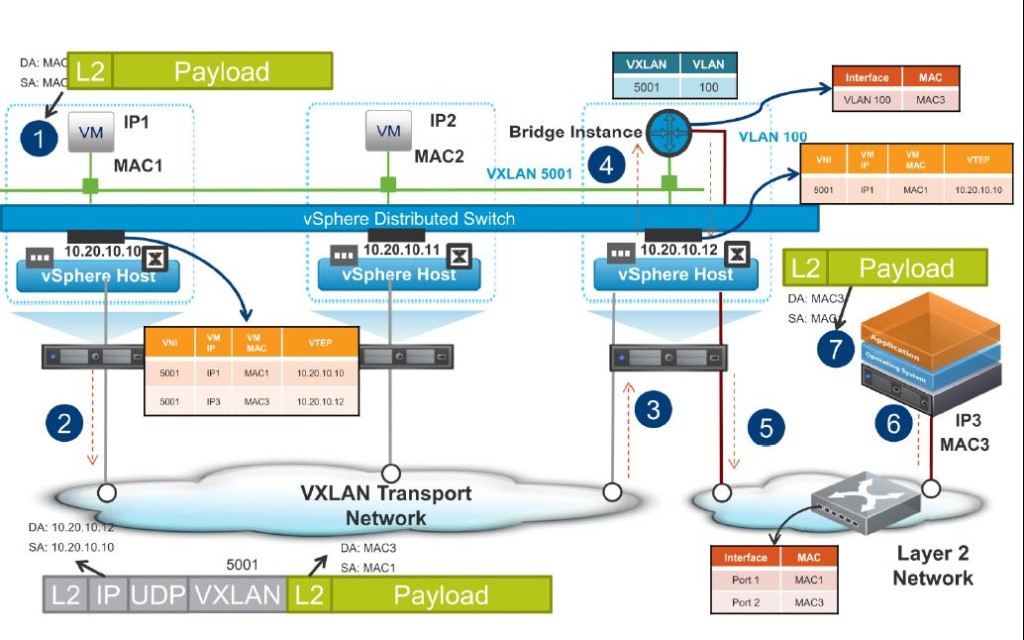
- Given below is an illustration of the packet flow, during an ARP request from the physical network (VLAN) to the VXLAN vm.

- 1. An ARP request is received from the physical server on the VLAN that is destined for a virtual machine on the VXLAN through broadcast
- 2. The frame is sent to the physical switch where it is forwarded to all ports on VLAN 100
- 3. The ESXi host receives the frame and passes it up to the bridge instance
- 4. The bridge instance receives the frame and looks up the destination IP address in its MAC address table
- 5. Because the bridge instance does not know the destination MAC address, it sends a broadcast on VXLAN 5001 to resolve the MAC address
- 6. All ESXi hosts on the VXLAN receive the broadcast and forward the frame to their virtual machines
- 7. VM2 drops the frame, but VM1 sends an ARP response
Deployment of the L2 bridge is pretty easy and given below are the high level steps involved (Unfortunately, I cannot provide screenshots due to the known bug on NSX for vSphere 6.1.x as per documented in the VMware KB article 2099414).
Prerequisites
- An NSX logical router must be deployed in the environment.
High level deployment steps involved
- Log in to the vSphere Web Client.
- Click Networking & Security and then click NSX Edges.
- Double-click an NSX Edge.
- Click Manage and then click Bridging.
- Click the Add icon.
- Type a name for the bridge.
- Select the logical switch that you want to create a bridge for.
- Select the distributed virtual port group that you want to bridge the logical switch to.
- Click OK.
Hope these make sense. In the next post of the series, we’ll look at other NSX edge services gateway functions available.
The slide credit goes to VMware….!!
Thanks
Chan
Next Article: ->