There are various types of Access Roles within vRA, each with different permissions that exist within vRA (more roles introduced through the IaaS server). Some are System-Wide, some are Tenant-Wide and some are Business Group wide roles. First part of this post, we’ll briefly cover all the different roles available within vRA, the order they are created and each roles remit followed up by a brief look at different architectural concepts available within vRA IaaS service to understand how the resources are mapped to users. The next part of the post will then look at the 3 system wide roles (System Admin / Infrastructure Admin / Fabric Admin) and what need to be set up under each user role during the initial deployment and in what order. Lets take a look at the roles at first. There are multiple roles each with a certain set of privileges within vRA. The number and the types of roles can get very confusing and often, I’ve not been able to remember every role and all of their abilities properly with the order of when and how they need to be created. So, I thought I’d document it all in one place as follows. 
Now the various user roles available within vRA and what they do and what order you create them is clear, one may wonder what the heck are those endpoints, business groups, fabric groups…etc. A fair question, and the user roles discussed above may not fully be understood until these essential vRA components & concepts are also understood. A typical vRA environment provides a complete multi – tenancy deployment capability so that an ISP for example, can deploy vRA to automate IaaS service provisioning to a number of its customers, each of which may have a dedicated, separate tenant, associated with each client’s own directory service system, all hosted securely on the same vRA platform. And then, vRA uses a number of specific internal constructs to map external resources (such as vCenter servers with compute clusters, vCloud Director instances with Org VDCs…etc) to a set of business users in order to grant them role based access to those resources. This require understanding of those constructs and in what order they are created which, I’ve found to be pretty damn convoluted when I first started off (to be honest, I still tends to forget the order if I stay away from working with it for a while). So, I’ve thought to summarise all the key constructs used by vRA, and how they are used to map external resources and the order of setting those up, using a simple example below. 
System-Wide Roles & Initial Configuration
Ok, now that we’ve established a reasonable understanding of the vRA IaaS platform architecture with regards to Multi tenancy and the types of users & groups involved, lets look at how to setup things, in the exact order they need to be done, following on from the previous posts. (We configured up to creating the Tenants and specified the Tenant Administrators within the post 3) Once you’ve completed the IaaS server components specified within the post 4, you can carry on with the following tasks, in the specified order to complete the IaaS configuration. For the purpose of the IaaS configuration from here on, we are assuming that we are configuring the Default Tenant (vSphere.local). If you decide to create additional tenants, they can also be configured the same way, however the URL you need to login to non default Tenants would be “https://<FQDN of the vRA Appliance>/shell-ui-app/org/<Tenant Name>”.
- System Administrator – Setup Infrastructure Administrators for the IaaS platform
- Login with the System Administrator privileges (Administrator@vsphere.local) to vRA UI for the default tenant (URL “https://<FQDN of the vRA Appliance>/shell-ui-app”). Note that the Infrastructure Administrators section inside the Default Tenant is only enabled because we’ve deployed the IaaS server component on top of the vRA appliance.

- Specify the Active Directory Group to be given the Infrastructure Administrator privileges here. (I have an Active Directory group I will be using here named “VMware vCAC Inf Admins – Default” & a specific user as a member of that group called “<Domain>\inf-admin” which will inherit this permission through this group.
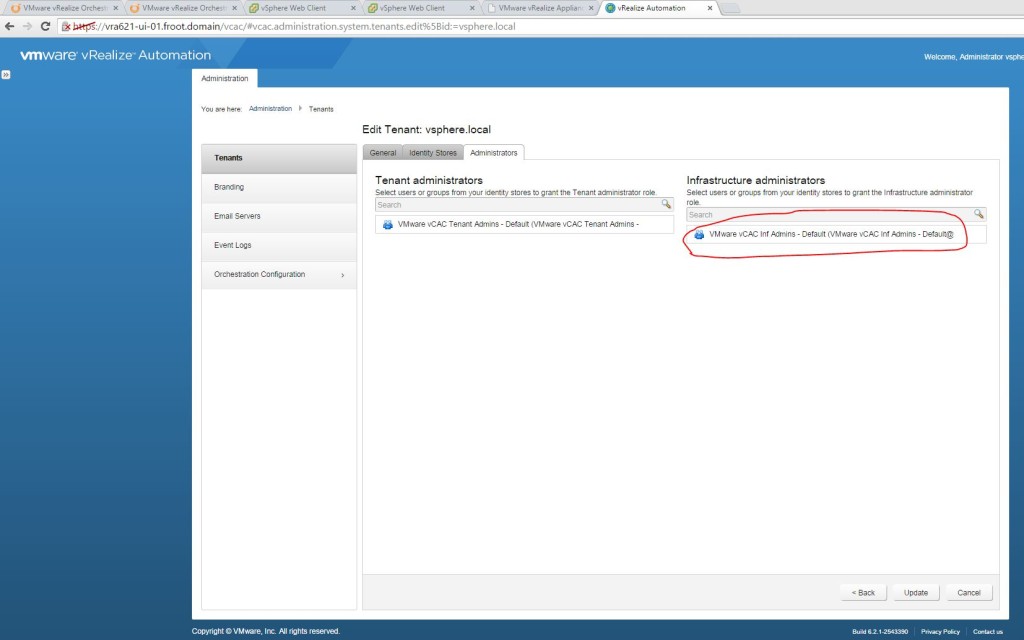
- Login with the System Administrator privileges (Administrator@vsphere.local) to vRA UI for the default tenant (URL “https://<FQDN of the vRA Appliance>/shell-ui-app”). Note that the Infrastructure Administrators section inside the Default Tenant is only enabled because we’ve deployed the IaaS server component on top of the vRA appliance.
- Infrastructure Administrator
- Login as the newly setup Infrastructure Admin to the default tenant on vRA (URL “https://<FQDN of the vRA Appliance>/shell-ui-app”) and follow the Goal Navigator (Click on the >> on the top left). Else, the steps are as follows
- License the vRA IaaS component (Administration->Licensing) – same vRA license code as used in initial vRA appliance configuration as described here.
- Setup Endpoints & Credentials
- Note: Its best practise to always create the endpoint first here before installing the agents (in this example, the agent has already been installed during the IaaS server deployment)
- vCenter Endpoint
- Create the vCenter credentials. I’m using the vRA service account (domain\svc_vRA) which I’ve permissioned as a vCenter Administrator here.

- Add a vCenter endpoint using Infrastructure->Endpoints->New Endpoint->Virtual->vSphere (vCenter URL is https://vCenter FQWDN/sdk). Note that the endpoint name here for vCenter should match the endpoint name defined during the IaaS server vSphere agent component deployment (covered in the post 4 of this series. Screenshot is here). If the 2 names are different, vCenter endpoint will not connect.

- Create the vCenter credentials. I’m using the vRA service account (domain\svc_vRA) which I’ve permissioned as a vCenter Administrator here.
- vRO Endpoint Setup for IaaS functions
- Create the vRO credentials. I’m using the vRA service account (domain\svc_vRA) which I’ve also permissioned as a vRO Administrator user (when setting up the vRO in post 5, we mapped an AD administrative group as a vRO admin group of which the svc_vRA user is made a member of)
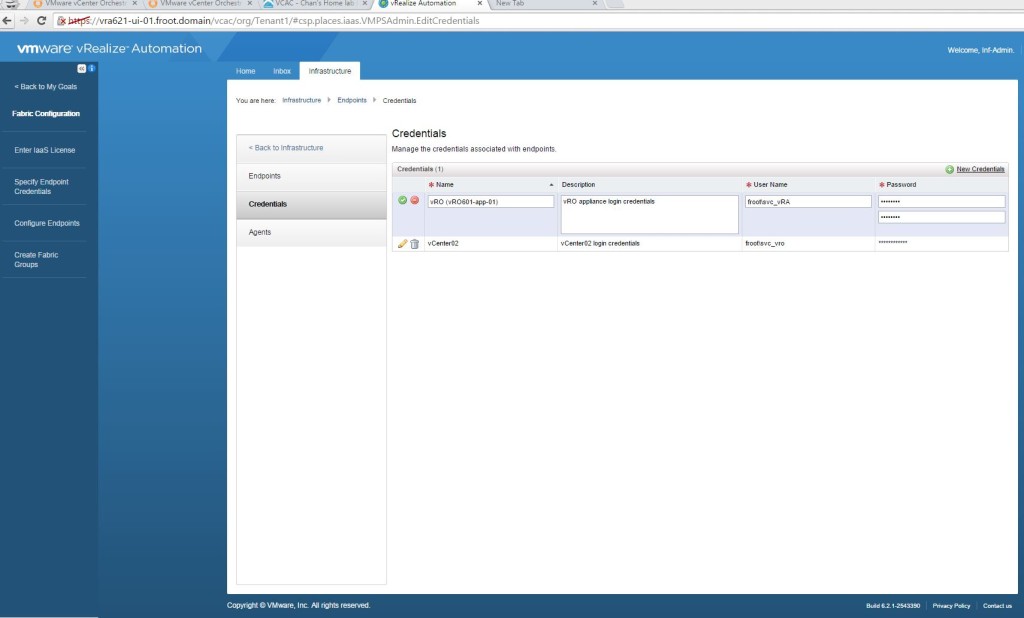
- Add a vRO endpoint using Infrastructure->Endpoints->New Endpoint->Orchestration->vCenter Orchestrator
- Use the vRO URL as https://vRO FQWDN:8281/vco
- Ensure to add a custom property VMware.VCenterOrchestrator.Priority with a value of 1

- Then go to the Infrastructure->Endpoints and hover the mouse over the vCO endpoint and select Data Collection. Start collection and verify success

- Create the vRO credentials. I’m using the vRA service account (domain\svc_vRA) which I’ve also permissioned as a vRO Administrator user (when setting up the vRO in post 5, we mapped an AD administrative group as a vRO admin group of which the svc_vRA user is made a member of)
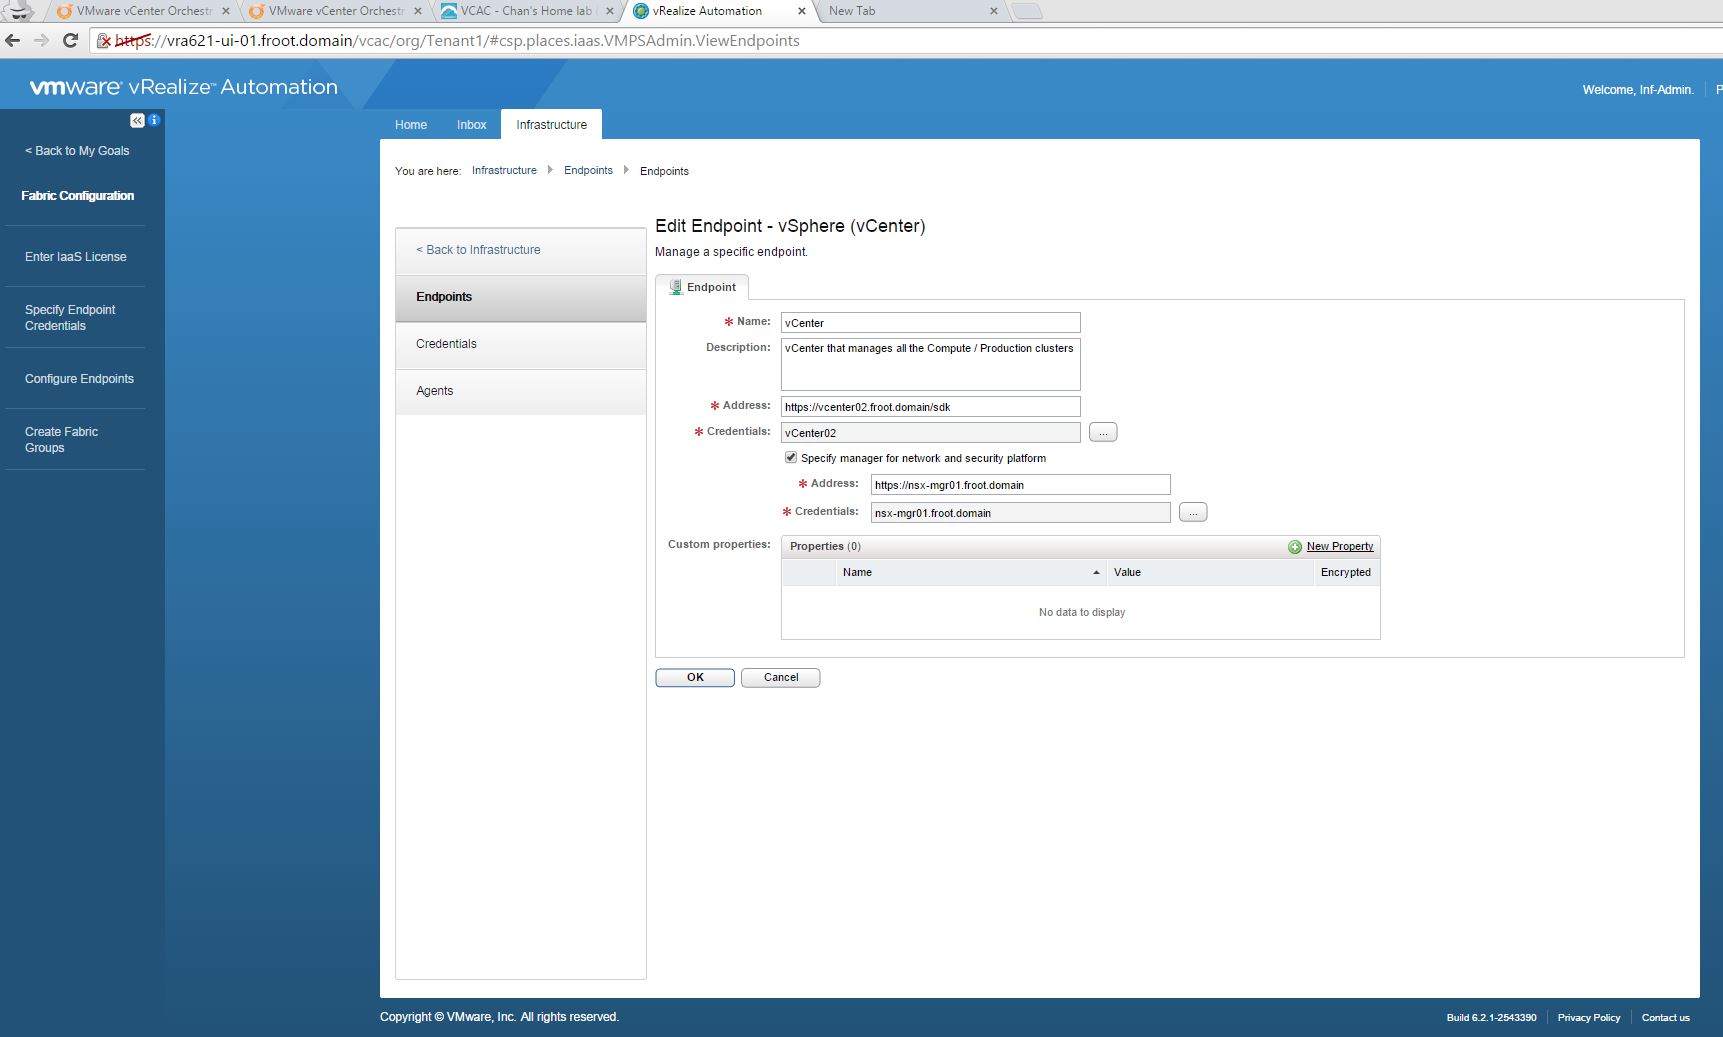
- NSX Endpoint
- Note: before adding the NSX endpoint, the NSX plugin for vRO must have been configured correctly (we did this in the previous post of the series – step 9.3.1)
- Set the vRA service account (Domain\svc_vRA) with appropriate NSX privileges within the NSX manager via the web client.
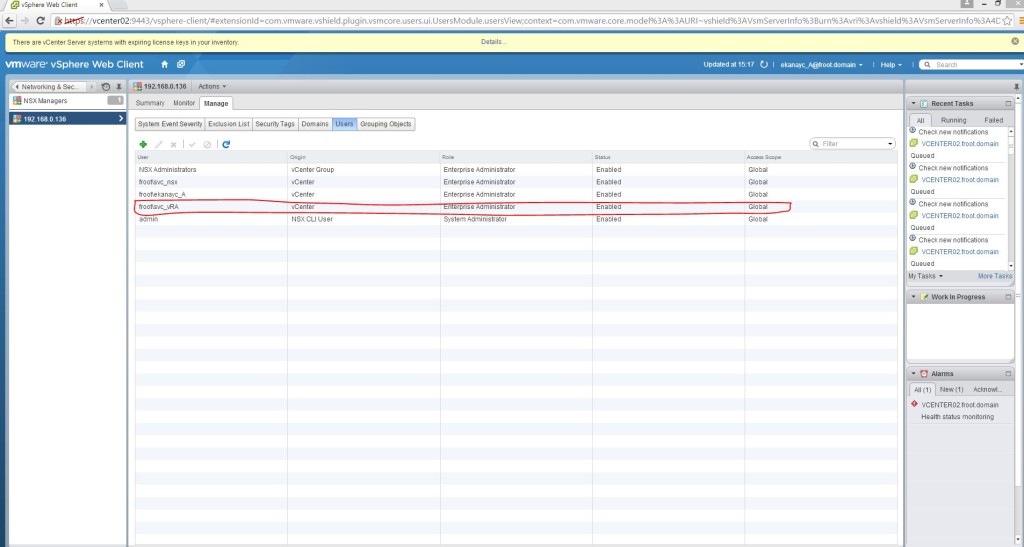
- Create NSX credentials by specifying the Domain\svc_vRA account (mapped as NSX Enterprise Administrator above)

- Go the configured vCenter endpoint, edit and select “Specify manager for network and security platform” checkbox and specify the NSX manager FQDN as the address and the NSX credentials specified above

- We need to start a NSX data collection here and verify which we cannot do until the fabric administrator account is created and logged in which we will do later on below. (another weird design within vRA where Infrastructure admins can initiate data collection of vCloud Air and vRO endpoints but only Fabric Admin can do the same for vCenter & NSX endpoints….).
- Additional endpoints such as vCloud Air Endpoint will be covered in a separate post in the future.
- Create Fabric Groups & Fabric Administrators
- Go to Infrastructure->Groups->Fabric Groups and create a new Fabric Group
- Select an AD group as Fabric Administrators and the compute cluster to be mapped to this Fabric Group. (refer to the diagram above for resource mappings) – note that with previous version of vRA / vCAC, you were NOT able to add an AD group here (had to be a single AD user). Appears fixed in this version.

- That’s it. You now have a fabric group with a fabric administrator group defined. Next step is to login as the Fabric Admin and complete his tasks.
- Fabric Administrators – Part 1
- Note: I have an AD user named Domain\fab-admin who is a member of the Fabric Administrators AD group used above and will be using this user account to login to vRA to perform with for all Fabric Administrators tasks.
- Verify data collection for the vSphere endpoint and the NSX endpoint
- Login to vRA as the Fabric Admin. (URL “https://<FQDN of the vRA Appliance>/shell-ui-app”)
- Go to Infrastructure->Compute resources and hover the mouse over the compute cluster and select data collection and ensure Compute/Inventory/State/performance / Networking & Security (NSX) data collections have succeeded. (I normally change the interval to 1 hour)

- If the NSX data collection is not complete, invoke a collection manually via request now.
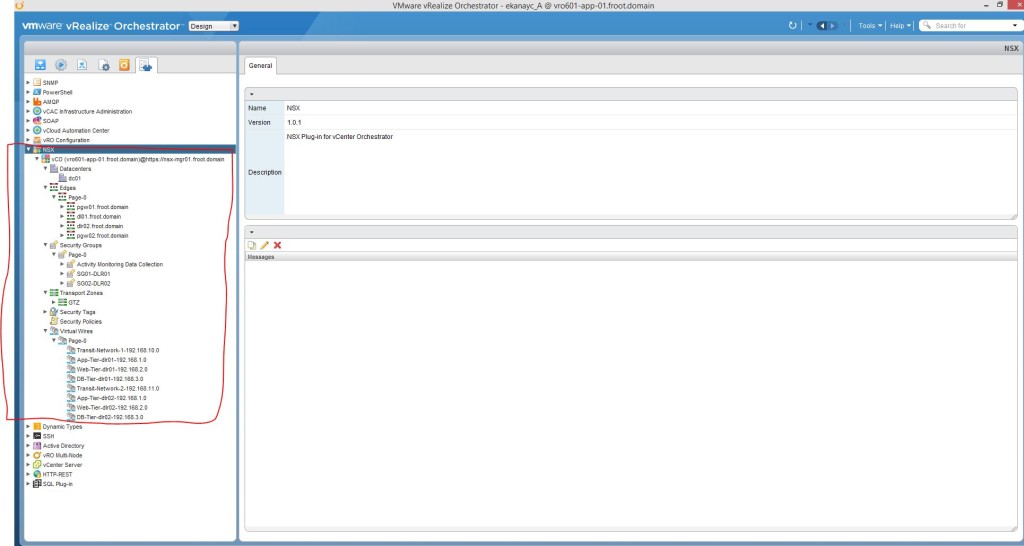
- Once the NSX collection is successful, login to the vRO client (you can get the client using https://vRO FQDN:8281/vCO) and go to the Inventory tab
- Reload by pressing F5 and expand the NSX field on the left to confirm vRO is populated fully with the NSX configuration of your environment
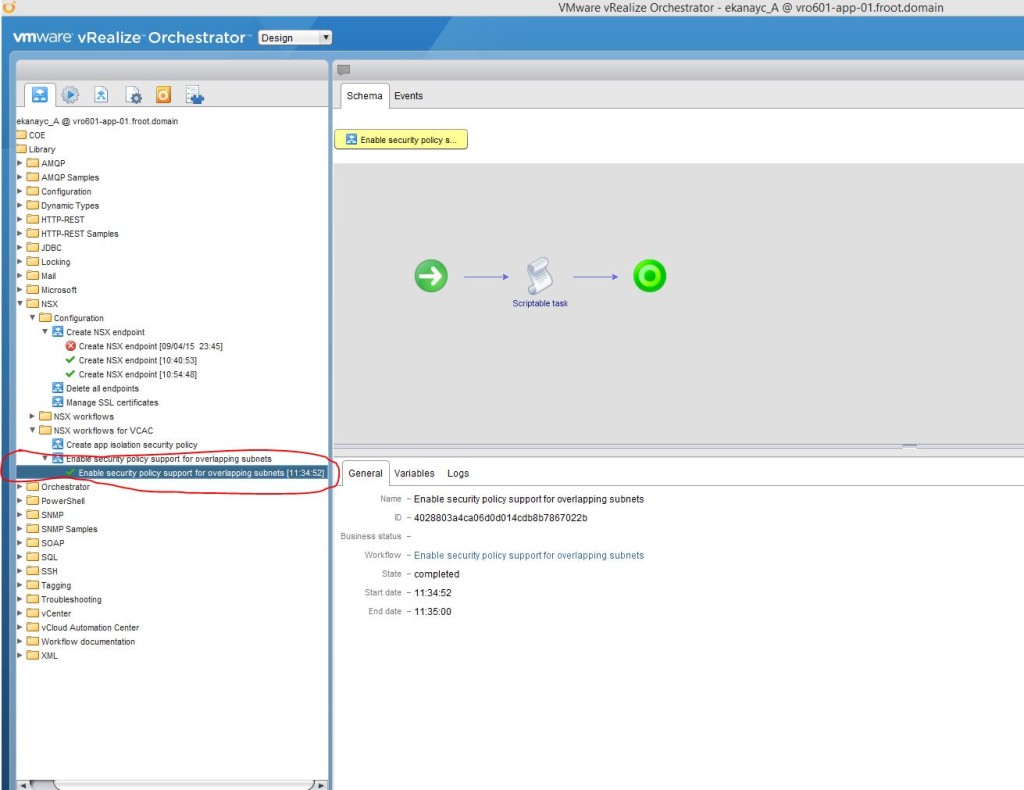
- If you are planning to use NSX security policy features from vRealize Automation, an administrator must run the Enable security policy support for overlapping subnets workflow in vRealize Orchestrator. The security policy support for overlapping subnets workflow is applicable to an VMware NSX 6.1 and later endpoint. For 6.1, 6.1.1, and 6.1.2, you must run this workflow only once to enable the AppliedTo flag in the service composer. For VMware NSX 6.1.3 and later, you do not need to run the workflow because this support is enabled by default. – As my NSX version is 6.1.2, I’ve run this workflow as follows.
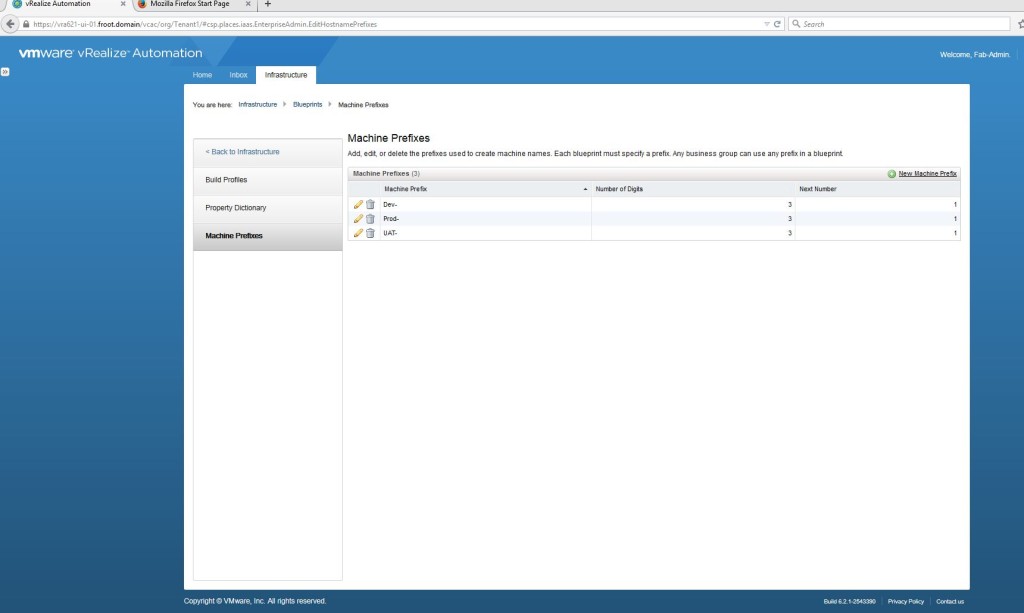
- Create the Machine prefixes
- Some points on Machine Prefixes
- Machine prefixes are mandatory and are used to generate names of vRA provisioned machines.
- They can be shared across all Tenants
- Consist of a base name followed by a counter (i.e. Prod-XXX where XXX is a number will produce machine names such as Prod-001, prod-002…etc.
- When business groups are created by Tenant admins, you need to assign a default machine prefix to each.
- Every blueprint must have a machine prefix or share the default machine prefix of the business group
- Must conform to DNS naming restrictions (ASCII letters A-Z and digits 0-9 with no special characters).
- If used for a Windows machine, need to be < 15 characters in length.
- Go to Infrastructure->Blueprints->Machine prefixes and create a machine prefix.
- Some points on Machine Prefixes
- Tenant Administrators – Part 1
- Note: Next up in the list of to do things is for the Fabric Admin to create the reservations, reservations policies & network profiles. But thanks to somewhat less than ideal role allocation available within vRA (VMware: Hope you are listening??), you cannot do those steps without having the business groups created first which Fabric Admins cannot do. So we have to login as a Tenant Admin briefly here and create the business groups before we can resume with the rest of the fabric admin’s duties.
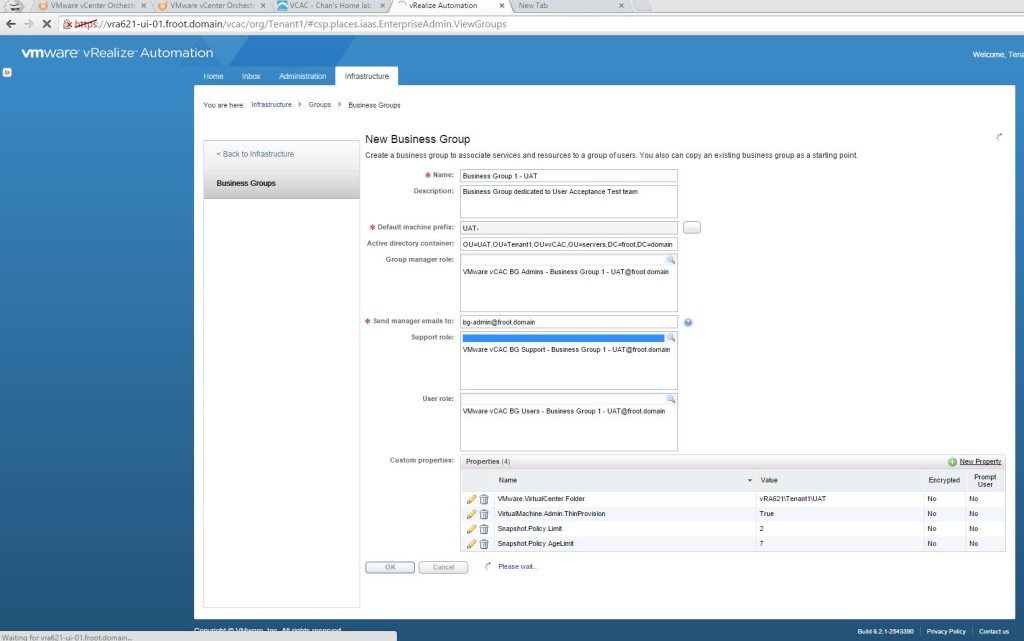
- Create Business Groups
- Important points on Business Groups
- A business group associates a set of services and resources to a set of users such as a line of business, department or other organizational unit.
- Reside within a Tenant
- Created by a Tenant Admin of that particular Tenant
- To request machines, a user MUST belong to an appropriate business group with the appropriate privileges (Business Group User)
- Login as Tenant Administrator (I have a dedicated tenant admin domain account named Domain\Tenant-Admin which is a member of the Tenant Admin AD group which we had earlier permissioned with the tenant Admin privileges). – The login URL is “https://<FQDN of the vRA Appliance>/shell-ui-app”
- Go to Infrastructure->Groups->Business Groups and create a new business group.
- AD container can be the location where machine objects would be created
- Group Manager / Support Role / User Role can all be AD groups (this wasn’t possible with earlier versions of vCAC) or an AD user account. I’ve used AD groups here as its neater and allows RBAC. I’ve then created individual user accounts (Domain\bg-admin, Domain\bg-support, Domain\bg-user) that have been nested in the relevant AD group to inherit permissions.
- Create Custom properties (if applicable)
- Custom properties are quote useful in manipulating where machine accounts gets created within vCenter, relevant snapshot policies…etc. We will look at Custom properties in detail a little later on but for now, will create few basic custom properties as shown below.
- Custom properties are quote useful in manipulating where machine accounts gets created within vCenter, relevant snapshot policies…etc. We will look at Custom properties in detail a little later on but for now, will create few basic custom properties as shown below.
- That’s it. You now have a Business Group created that can be used within a reservation so we will now go back to finishing off fabric admins duties.

- Important points on Business Groups
- Fabric Administrators – Part 2
- Create Reservations
- Key Points
- Reservation is a share of provisioning resources allocated by the Fabric Admin (from a Fabric group) to a particular business group to use.
- Each reservation is for a single business group
- Each machine or blade can only belong to a single reservation
- Login as the fabric administrator (URL is “https://<FQDN of the vRA Appliance>/shell-ui-app”)
- Go to Infrastructure->Reservations and create a new Reservation from the previously created Fabric Group to be used by the previously created Business Group.

- Select the Resources tab and allocated a portion of the available storage & Memory to be included within this reservation
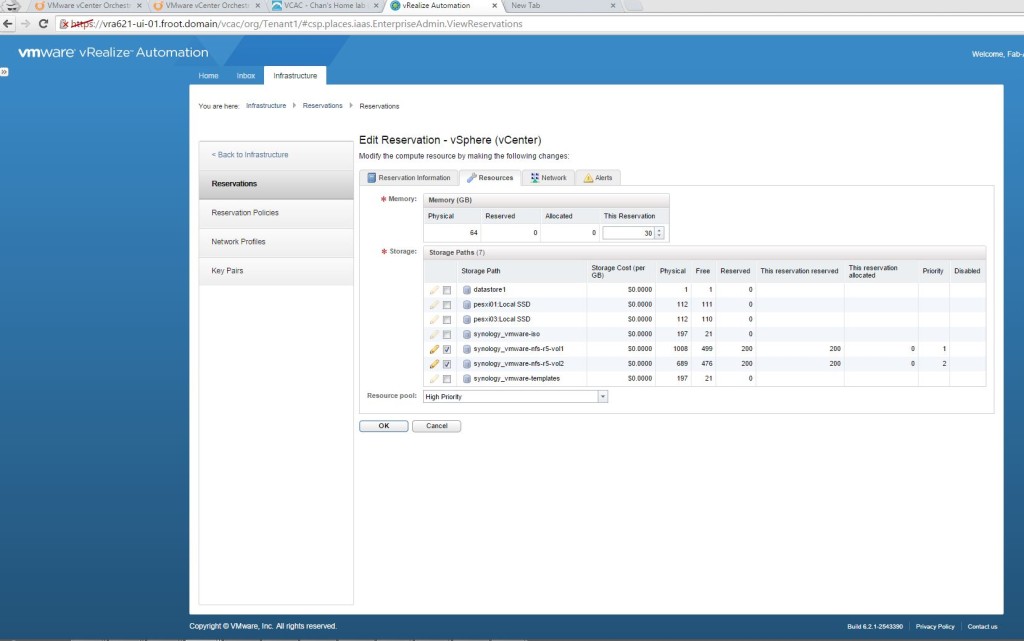
- Select a VM Network by selecting the appropriate VM Network Port group Name within the Network Tab. (Note that NSX specific networking will be setup later)

- Key Points
- Create Reservation policies
- Key points
- Reservation Policy restricts a blueprint to a subset of the available resource & storage reservations (a Blueprint which is created at Tenant level can otherwise deploy to any reservation within that template)
- Go to Infrastructure->Reservations-> Reservation Policies and create a reservation policy.
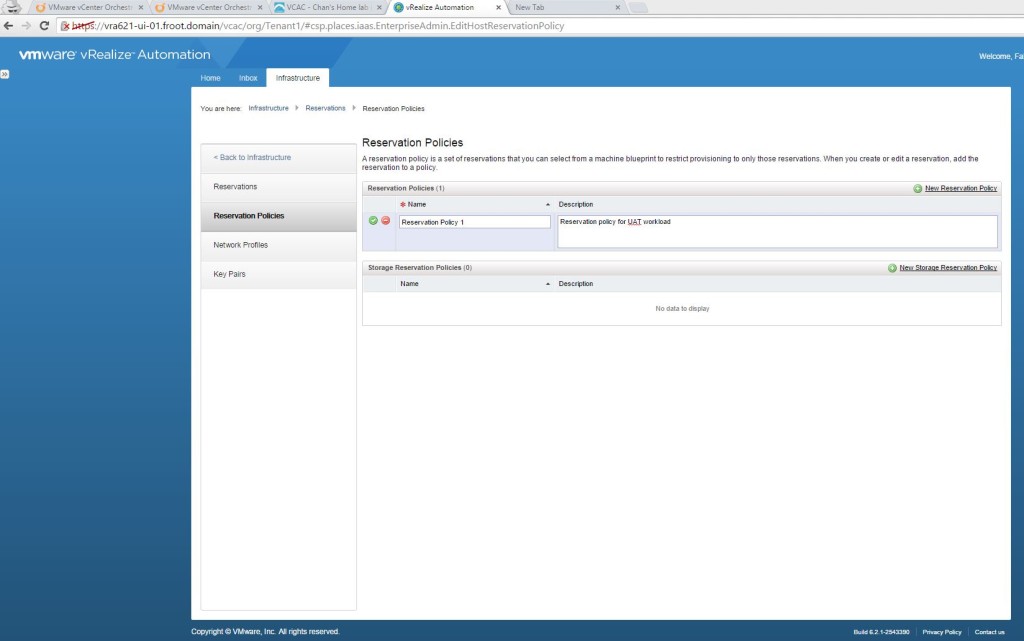
- Now amend the existing reservation “prodclust01-Res-1-UAT” (created above) to include this reservation policy

- Key points
- Create Network Profiles
- Key points
- Network profiles allow machines to be assigned static IP addresses
- Create a network profile by going to Infrastructure->Reservations->Network Profile and selecting a new External network profile

- Define the IP range so that each machine provisioned by vRA will have an IP assigned from this range

- Key points
- Modify the reservation profile to map the Network profile
- Go the reservation created above and under the network tab, select the Network Profile created.
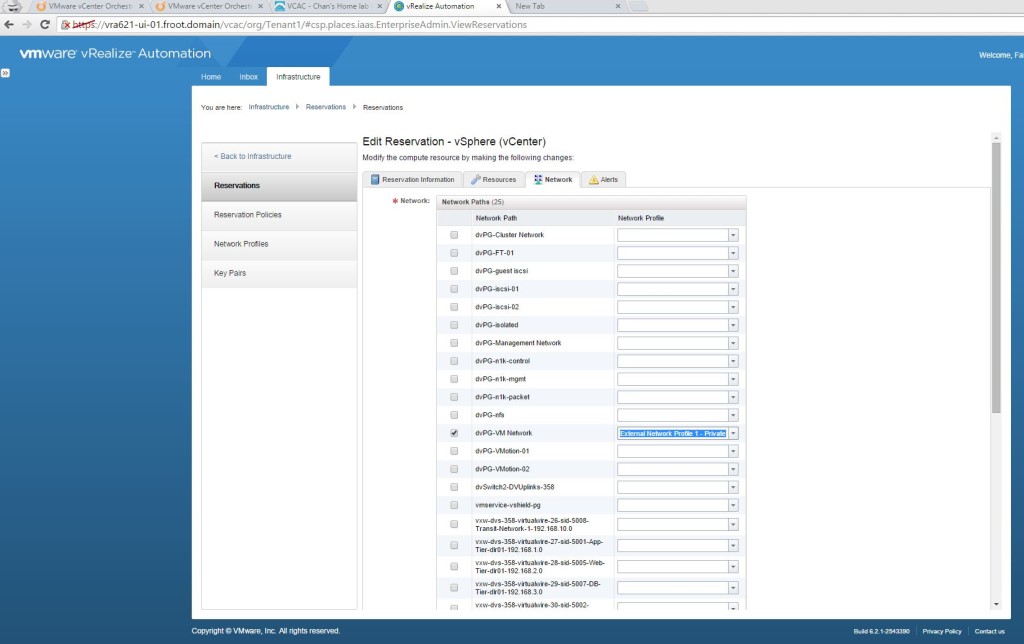
- Now, all VMs created in to this reservation will have an IP allocated using this IP range defined within the network profile.
- Go the reservation created above and under the network tab, select the Network Profile created.
- Create Reservations


There you go, we now have all the 3 main System-wide roles setup and their subsequent duties completed. Next up is the Tenant Administrators tasks which we’ll cover in a separate, dedicated post as the next logical step in our vRA deployment.
Next: vRA Part 7 – Tenant Administrator & Basic Blueprints –>