VMware vRealize Automation Part 3 – vRA Appliance Deployment

Next: vRA Part 4 – IaaS Server Deployment –>

Ok, now that we’ve established the need for a dedicated management cluster to host the vRA management components, lets look at the deployement highlights of the vRA components within the management cluster.

  1. vRA Identity Appliance:
    1. If you want to use the vRA’s own identity management appliance, that should be the first component to be deployed. Deployment of this appliance is pretty straight forward and is self explanatory, hence I will not be covering here. However I will instead be using the vSphere SSO as the identity management source for vRA environment also, in order to keep all authentication for the my virtual infrastructure centralised (and simple).
    2. But if you are NOT planning on using vSphere SSO, make sure you download the vRA identity appliance from VMware and deploy on to the management cluster.
    3. Once deployed, ensure to configure the time zone and the NTP server settings using the management IP (specified during the Appliance deployment)
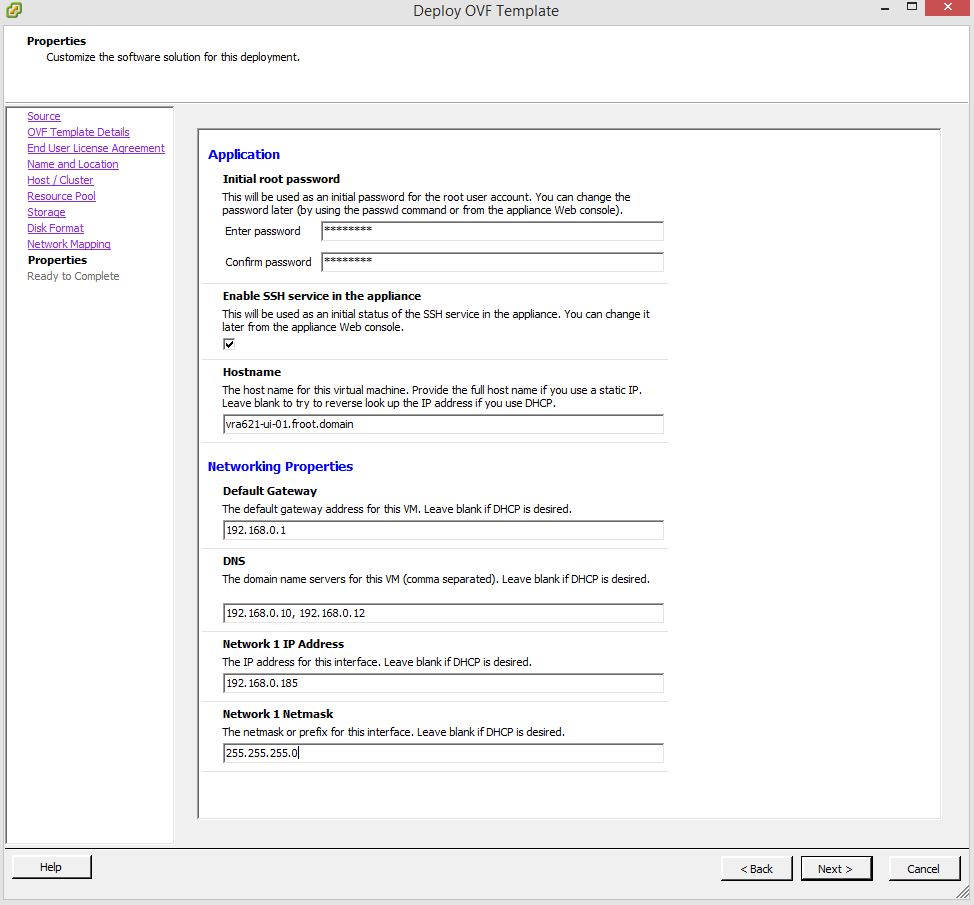
  2. vRA Appliance deployment
    1. Download the vRA appliance from VMware. Documentation for the latest release can be found here
    2. Deploy the appliance on to the Management Cluster using the vCenter server that manages it. You would need the following information during the deployment 1
  3. Configure the vRA Appliance
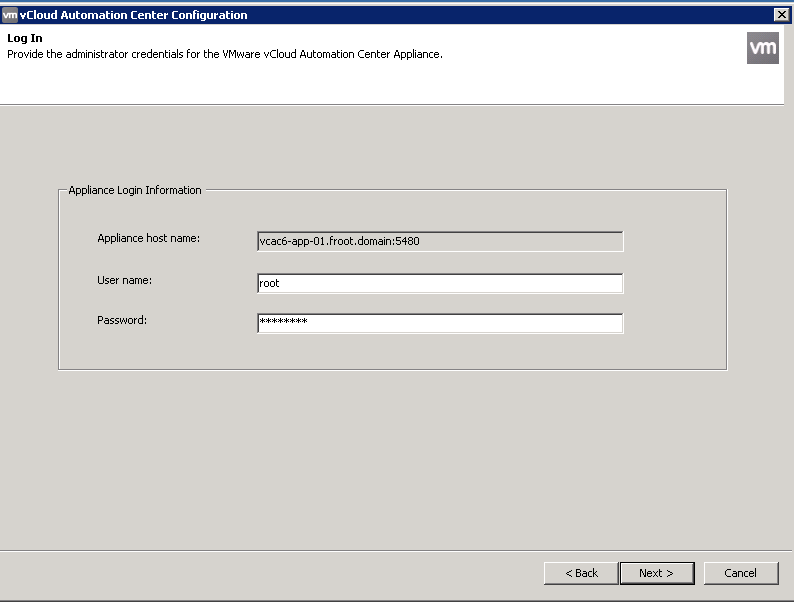
    1. Once the appliance deployment is complete, use the URL https://<FQDN/IP of the vRA appliance>:5480 to access the management interface
    2. Login with username root and password as specified during the deployment
    3. Set up the Time Zone (System->Time Zone)
    4. Set up the Host name (Network->Address) & Proxy server (Network->Proxy) if applicable
    5. Set up NTP to sync time (Admin->Time Settings)
    6. Set up the vRA specific settings
      1. Setup SSL (vRA Settings->Host Settings) – You can either self generate a Certificate or import a certificate obtained from a CA    2. SSL
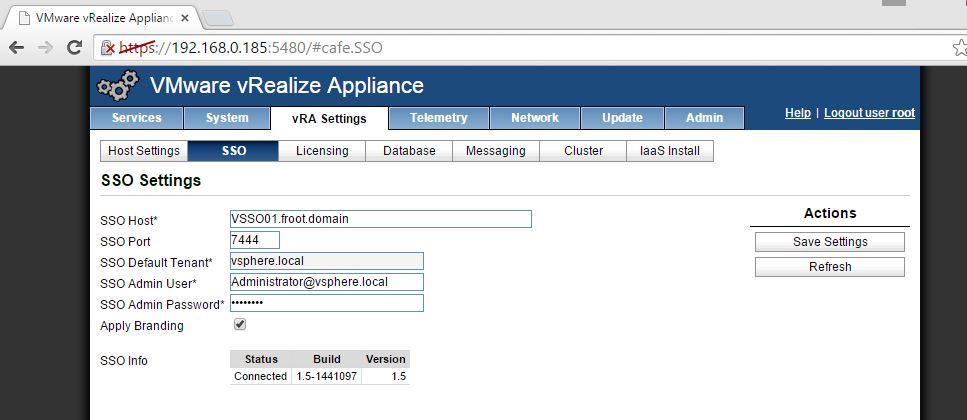
      2. Set up SSO (vRA Settings->SSO) – You can connect to default vRA identity appliance or the vSphere SSO (>5.5 1b) as below using default SSO admin account. Note the following key points regarding the SSO host name
        1. Important Note: If you have an existing vRA / vCAC deployment already that is using a vSphere SSO server, note that you CANNOT use the same SSO server for another vRA server. I had number of issues when I attempted this, and the most notable one 1 where the non of the group / roles created within the default tenant (such as infrastructure admin & tenant Admin) would work and may come up with “401 – Unauthorized: Access is denied due to invalid credentials” error when logged in. This doesn’t appear to be correctly documented so watch out, but shouldn’t apply to most as its unlikely that you’d have multiple vRA deployments in the same organisation. the only way around this (if you have to use the same SSO source for multiple vRA’s) is to create a tenant rather than using the default tenant. Note the tenant name should be unique within the whole SSO too (if you have Tenant-A in vRA-A, you cannot add another Tenant-A on vRA-B using the same SSO)
        2. Host Name: When using the vSphere SSO server, host name should have the same case as what’s been registered in the vCenter SSO (if unsure, browse to https://ssoserver:7444/websso/SAML2/Metadata/vsphere.local and save the vsphere.download file when prompted.  Open the vsphere.download file in notepad or some text editor.  Locate the entityID attribute of the EntityDescriptor element.  Use the SSO server name in the way its specified here paying attention to the case)
        3. Port: 7444 in the host name for the vCenter SSO is NOT required with the vRA6.2.1 (this was required to be specifically specified in the host name field with the earlier versions of vCAC)
          3. SSO
      3. Add the appropriate license.(vRA Settings->License). It should be noted here that the license key added here should be the vRA standard or vRA Adavnced and not the vCloud suite license.
      4. Database connectivity (vRA Settings->Database) can be ignored in most cases unless you want to connect to an external Postgre SQL server / cluster
      5. Messaging (vRA Settings->Messaging) can also be ignored as this should have been automatically configured.
      6. Cluster configuration (vRA Settings->Cluster) can be bypassed unless you are creating a vRA appliance cluster in which case you can join an existing cluster here.
      7. Once all above are configured, allow couple of minutes and ensure all vRA services are now registered within the “Services” tab. 4. Services
    7. Configure the Identity stores
      1. Here, you can create new tenants (for a multi tenant deployment) or use the default tenant (automatically created). I’m going to use the default tenant here.
      2. Login to vRA UI using the URL “https://<FQDN of the vRA Appliance>/shell-ui-app” with the default SSO administrator credentials (Administrator@vsphere.local). The default vSphere.local tenant should be available. 5. Login
      3. Click on the vSphere.local, go to Identity stores and verify the default domain name listed (by default, the native ad domain would have been added here)
      4. If you need a separate identity / authentication realm (AD or open LDAP supported), you add it here
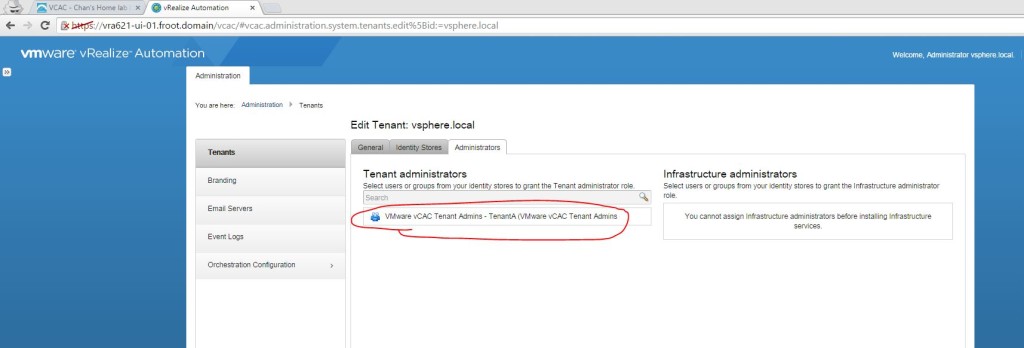
    8. Setup Tenant Administrators for the tenants
      1. Login with the SSO Administrator account and click on the tenant and then go to Administrators (using the default tenant in the example below)
      2. Add the AD user account or group to be used as the Tenant Administrator 7. Tenant admin 2
    9. Add the inbound and outbound email servers within the Email Servers tab on the left
    10. (Optional) Set up branding for the vRA user interface if required using the Branding tab


That’s it, the vRA appliance is not set up and the Tenant Admin account is also setup. Next up would be the IAAS server installation.


Next: vRA Part 4 – IaaS Server Deployment –>

VMware vRealize Automation part 2 – Deployment Architecture – Dedicated Management Cluster

Next: vRA Part 3 – vRA Appliance Deployment –>

Having had a look at the vRA support matrix, next point to consider in a typical vRA deployment is the deployment architecture which I’ll briefly explain below

vRA is part of the VMware product set that recommends the use of a dedicated management cluster (along with vCD and NSX). This is important because the concept behind this is that a dedicated management cluster will isolate all the VM’s that make up the management infrastructure such as Active Directory VMs, vCenter & SQL server VMs, Monitoring VMs…etc. This separation provides a separate execution context from those virtual machines that provides end user accessible resources, in other words, compute VM’s / production VMs that actually run the business critical workloads. Such a separation inherently provide a number of benefits to an enterprise.

  • Security & isolation of management workloads
  • Elimination of resource (and otherwise) contention between management & production workloads.
  • DR and Business Continuity without replicating un-necessary management components

An example would look like below

1.0 Mgmt cluster

Within a typical vRA deployment, the management cluster would host the following vRA components

  • vRA UI appliance (if using a distributed high availability deployment model, the vRA appliance cluster, Postgre SQL cluster & load balancers)
  • vRA Identity appliance (of is using the vSphere SSO, vSphere SSO server/s)
  • IAAS windows VMs (if using a distributed high availability deployment model, IAAS web servers, Model Manager web servers, MS SQL DB cluster, DEM Orchestrators, DEM Workers & Agents and the required load balancers)
  • vRO appliance (if using a distributed high availability deployment model, vRO cluster and the backend SQL DB cluster with relevant load balancers)

During the configuration of IAAS components, vRA will connect to various end points (such as a vCenter server instance that manages a number of resource clusters) and once an endpoint such as a vCenter instance is connected, a Fabric Administrator would create resource reservations for each cluster managed by that vCenter instance. Once these reservations are created, vRA typically assumes complete control over those clusters (resource reservations within the clusters) to be able to use those resource reservations as how it sees fit. This could present problems if you run your management infrastructure VMs (such as vCenter server and vRA appliances..etc.) in one of those same clusters as vRA will not take in to account the existence of other VMs in the same cluster, that was not created by itself. This could result in vRA deploying VM’s (based on IAAS request from users) which will affect the resources available for the management VMs with a  potential to affect performance of both the management VMs and production VMs (created by the vRA based on blueprints). It is therefore typically recommended that you keep all resource / compute clusters separate from the vRA management VMs and under the full control of vRA itself (no manual creation of VM’s in the resource clusters).

If you have an existing vCloud Director deployment or an NSX deployment, you may already have a dedicated management ESXi cluster in place as these products makes it a mandatory requirement to have one. However even if you don’t and are considering a vRA deployment, I would highly encourage you to have a dedicated management cluster to host the vRA infrastructure components.

An example high level design where vRA along with VMware NSX is deployed using a Management cluster could look like below.

2.0 HLD arhcitecture


Next: vRA Part 3 – vRA Appliance Deployment –>

VMware vRealize Automation Part 1 – vRA Support Matrix

Next: vRA part 2 – Deployment Architecture – Dedicated Management Cluster –>

The first step that should be involved in deploying vRealize Automation in any one’s book is to refer to the support matrix PDF on VMware web site. There are a strict number of support limitations which you must be aware of, and all the key information you need can be found within this document.

I’d encourage you to read the document for complete support details (and stay up to date with newer versions too) but given below is a high level summary of some key contents (based on the current vRA release of 6.2.1).

  • vRA IAAS server
    • Host OS (for IAAS components) – W2k8R2, W2k12 & W2k12R2 only (note that Windows 2008 is NOT supported)
    • IAAS DB: SQL 2008 R2 SP3 or higher (up to SQL 2014)
    • Web Server (for IAAS model manager…etc.): IIS 2008 R2 & IIS 2012 only


  • vRA Appliance
    • DB Support: vPostgres Appliance 9.2.4 / 9.2.9.x / 9.3.5.x, PostgreSQL 9.2.4 / 9.2.6 / 9.3.4
    • SSO / Authentication sources: vRA Identity Appliance v6.2, vSpere SSO 5.5 1b or above (up to PSC 1.0 with vSphere 6.0)


  • Hypervisor Support (for the vRA Hypervisor proxy agent):
    • VMware: ESX 4.1 to U2, ESX 4.1 to U2, ESXi 5.0 onwards (including ESXi 6.0) – note that Application Director only works with vSphere and NOT other hypervisors
    • Red Hat: KVM RHEN 3.1 only
    • Microsoft: Hyper-V 2008 R2 SP1 onwards (inc 2012 R2)
    • Citrix: XenServer 5.6 through to SP2, 6.0.2 & 6.2 through to SP1


  • Hypervisor management platform support (for vRA proxy agent and DEM worker compatibility)
    • VMware: vCenter 4.1 through to U2, vCenter 5.0 U3 onwards (till vCenter 6.0)
    • Microsoft: SCVMM 2012 (Hyper-V) only
    • Red Hat: RHEV-Manager 3.1 / 3.3


  • Network Virtualisation support
    • VMware vCNS 5.5.3 only, NSX 6.1 and above (up to 6.1.3)


  • Cloud Support (IAAS Endpoint compatibility)
    • VMware: vCD 5.1.x & 5.5.x, vCloud Air
    • Amazon: AWS
    • (Note that Azure is NOT support as a cloud endpoint)


  • Image Deployment Methods (IAAS)
    • Microsoft: SCCM 2012 & SCVMM 2012 only, Windows WinPE & WIM imaging
    • NetApp: FlexClone on Data OnTap 7.3.1.1, 8.0.1 & 8.1 (Note that this doesn’t state whether its cDOT or 7Mode. Also, the most latest OnTap version 8.3 is NOT supported yet)
    • BMC: Blade Logic Operations Manager 7.6 & 8.2
    • HP: Software Server Automation 7.7
    • Citrix: Provisioning Server 6.0 & 6.1
    • Linux: Red Hat Linux kickstart, SUSE AutoYaST
    • PXE boot


  • Guest OS
    • Microsoft: Windows 7, 8, 8.1, W2K8R2, W2K12 & W2K12R2
    • Red Hat: RHEL 5.9, 5.10, 6.1, 6.4, 6.5, 7.0
    • SUZE: SLES 11 SP2 & SP3
    • CentOS: CentOS 5.10, 6.4. 6.5, 7.0
    • Debian: 6 & 7.0
    • Ubuntu: 12.04 LTS & 13.10
    • Oracle: Oracle Enterprise Linux
    • VMware: ESX/i 4.1 U2, ESXi 5.1 and above (up to ESXi 6.0)


  • VDI Connection Broker support
    • Citrix: XenDesktop 5.5 and above (up to 7.6.x)
    • VMware: Horizon View 6.x only


  • Task Automation Engines / Scripting support
    • VMware: vCO 5.5.1 and above (up to vRO 6.0)
    • Microsoft: PowerShell 2.0


Next: vRA part 2 – Deployment Architecture – Dedicated Management Cluster –>

vRA – Deployment Highlights

This article aim to provide key deployment highlights during a typical deployment of VMware vRealize Automation, also known as vRA / vCAC for quick reference. Note that this is NOT an in depth, step by step guide but only a summary of key points to remember, in a hierarchical format based on the order of deployment.

  1. Deploy the SSO appliance that ships with vRA or use the existing vCenter SSO server (as long as the version is =>5.5)
    • I’d prefer to use the existing SSO server from vCenter, especially if its already deployed in a scaled out deployment model (dedicated SSO server / cluster that is separate from vCenter server itself) which is more scalable and provide single SSO infrastructure which I believe is better and neater than having multiple SSO servers everywhere.
    • There are arguments for deploying the vCAC SSO also, especially since its release cycle is the same as vCAC appliance itself where as vCenter SSO is on a different release cycle which can cause feature mismatches…etc
  2. Deploy the vRA/vCAC appliance itself
    1. Once deployed go to the administrative page (https://<fqdn of the vRA appliance>:5480) and configure the settings
    2. If using vCenter SSO, note the below during the vRA configuration (SSO tab within the vCAC settings tab of the vRA configuration page)
      1. SSO Host & Port: SSO server name should have the same case as what’s been registered in the vCenter SSO (if unsure, browse to https://ssoserver:7444/websso/SAML2/Metadata/vsphere.local and save the vsphere.download file when prompted. Open the vsphere.download file in notepad or some text editor. Locate the entityID attribute of the EntityDescriptor element. That is the name and case you need to use here)******** This will save you lot of troubleshooting time*********
      2. SSO Port: 7444 for the vCenter SSO
  3. Deploy the IAAS server component
    1. Pre-requisites:
      1. Ensure that the IAAS server has the W2k8R2 SP1 applied…..!!
      2. Download the latest pre-req automation script “vCAC61-PreReq-Automation.ps1” on to the IAAS server host (Windows). (vRA 6.2 version of the script here)
      3. Run the above powershell script on the IAAS host. When run, this will download all the missing pre-requisite components including DontNet 4.5.1 & JRE 7 on to the IAAS server automatically.
    2. Install IAAS components:
      1. Download the IAAS install components specific to your vCAC deployment from the vCAC appliance deployed in step and install (from https://<vRA Apliance FQDN>:5480/#iaas)
      2. Run the installation of IAAS components
        • Accept the EULA

1

        • Provide the vRA/vCAC username to connect to vRA appliance

2

        • Select complete / custom install – for this example, I’m selecting the complete install assuming that this is the first IAAS server being installed.

3

        • Select Database and click bypass in the below screen (Installer will provide the option to enter DB server details afterwards)

4

        • Provide the DB server details as follows – This is where you can provide the SQL server details for a separate, resilient / clustered SQL server instance. (recommended). Note the points below
          • Don’t type the SQL server instance name (if you have one). Use just the DB server name.
          • If using Windows authentication, the vRA service account (i.e. domain\svc_vcac) needs to be a sysadmin on the SQL box during the installation phase (sysadmin role can later be revoked). There will be no need to pre create an empty SQL database files on the server or even a prepolated DB using the DBCreate script provided with the installer (used to be the case before 6.1). vRA IAAS database will automatically be created during the installation using the specified service account. Note that the domain service account need to be mapped to SQL instance as shown below (MSDB as the default database & with sysadmin rights. These are required only during the installation and can be revoked afterwards)

5

6

Without the red highlight below, the DB setup script will fail. (Just assigning the sysadmin rights alone is NOT enough)

7

If not using windows authentication (i.e. using SQL authentication), the SQL DB can be pre-created by SQL / sys admin using the install scripts (install guide page 63) and an SQL account with DBO permission granted to the database need to be manually created. Installer can create the DB – Need Sysadmin privileges for the SQL account credentials specified in the below screen

Now proceed with the IAAS install

8

Provide the names for the 1st DEM orchestrator and worker. Note that while multiple DEM orchestrator deployment is recommended for a resilient deployment, only 1 DEM orchestrator can ever be active at one time. Note that when creating the end point (as the Inf-admin later on during the post deployment configuration), the name of the end point provided SHOULD match the endpoint name defined in this screen. (make a note of the endpoint name)

9

Test the credentials and make sure they pass for the installation to proceed.

10

Click install to begin the 1st IAAS server installation

11


vCAC 6.1 secondary DEM Orcehstrator and Worker installation error (Error 3: -2147287038)

Just thought I’d share a peculiar error I’ve been getting while trying to deploy a second DEM Orchestrator / Worker component as a part of a redundant vCAC server deployment…..

I have a single IAAS server that was installed with the Model manager service and the default DEM Orchestrator (Active) and a DEM worker in one server and wanted to deploy a second instance of DEM Orchestrator (passive) and an additional DEM worker as per VMware best practise, on a separate IAAS server VM. (VMware best practise is for more than 1 DEM orchestrator to be deployed along with additional DEM workers). In order to achieve this, I was attempting a custom install of the IAAS setup where only the Distributed Execution Manager components were selected but the installation kept failing with the following error message every time despite all the pre-req’s being in place….. (Even the verification is passed successfully as shown below)

DEM_Error_1

Error message below

DEM_Error_2

I haven’t been able to find any KB articles from VMware with regards to this issue or how to fix it so having had a boring read through the install log, you can see the following lines with error codes (amongst other things – see the bold text)

  • MSI (s) (10:70) [02:01:17:654]: Note: 1: 2262 2: Error 3: -2147287038
  • Error executing: C:\Program Files (x86)\VMware\vCAC\Distributed Execution Manager\DEM2\RepoUtil.exe Model-Config-Import -c “C:\Program Files (x86)\VMware\vCAC\Distributed Execution Manager\DEM2\DEMSecurityConfig.xml” -v
    Error importing security config file DEMSecurityConfig.xml. Exception: System.Data.Services.Client.DataServiceTransportException: The underlying connection was closed: Could not establish trust relationship for the SSL/TLS secure channel. —> System.Net.WebException: The underlying connection was closed: Could not establish trust relationship for the SSL/TLS secure channel. —> System.Security.Authentication.AuthenticationException: The remote certificate is invalid according to the validation procedure.  ——————————–
  • DynamicOps.Tools.Repoutil.Commands.ModelConfigImportCommand.Execute(CommandLineParser parser)Warning: Non-zero return code. Command failed.
    CustomAction RunRepoUtilCommandCA returned actual error code 1602 (note this may not be 100% accurate if translation happened inside sandbox)
    Action ended 02:01:48: InstallFinalize. Return value 2.

Turned out that this happens primarily due to the fact that my primary IAAS server’s default SSL certificate (self signed) not being trusted by the new server where I’m trying install the additional DEM components….

So the solution is  to manually import the certification from the primary IAAS server and add it to the certificate store of the new server first prior to attempting the install of the secondary DEM components.

You can grab the certificate from the primary IAAS server using the URL https://<FQDN of the primary IAAS server>/repository/Data/MetaModel.svc/

Make sure you import the certificate in to the Local Computer’s Certificate store and that you can see it under the Trusted Root Certificate Authorities…

Note to VMware: Perhaps you need to add a SSL certificate validation criteria to the Test option where this is checked properly within the initial screen???

See the screenshots below for guidance.

DEM_Error_3

DEM_Error_4

DEM_Error_5

DEM_Error_6

DEM_Error_7

Once the SSL cert is added to the second server, the additional DEM components gets installed successfully.

Cheers

Chan